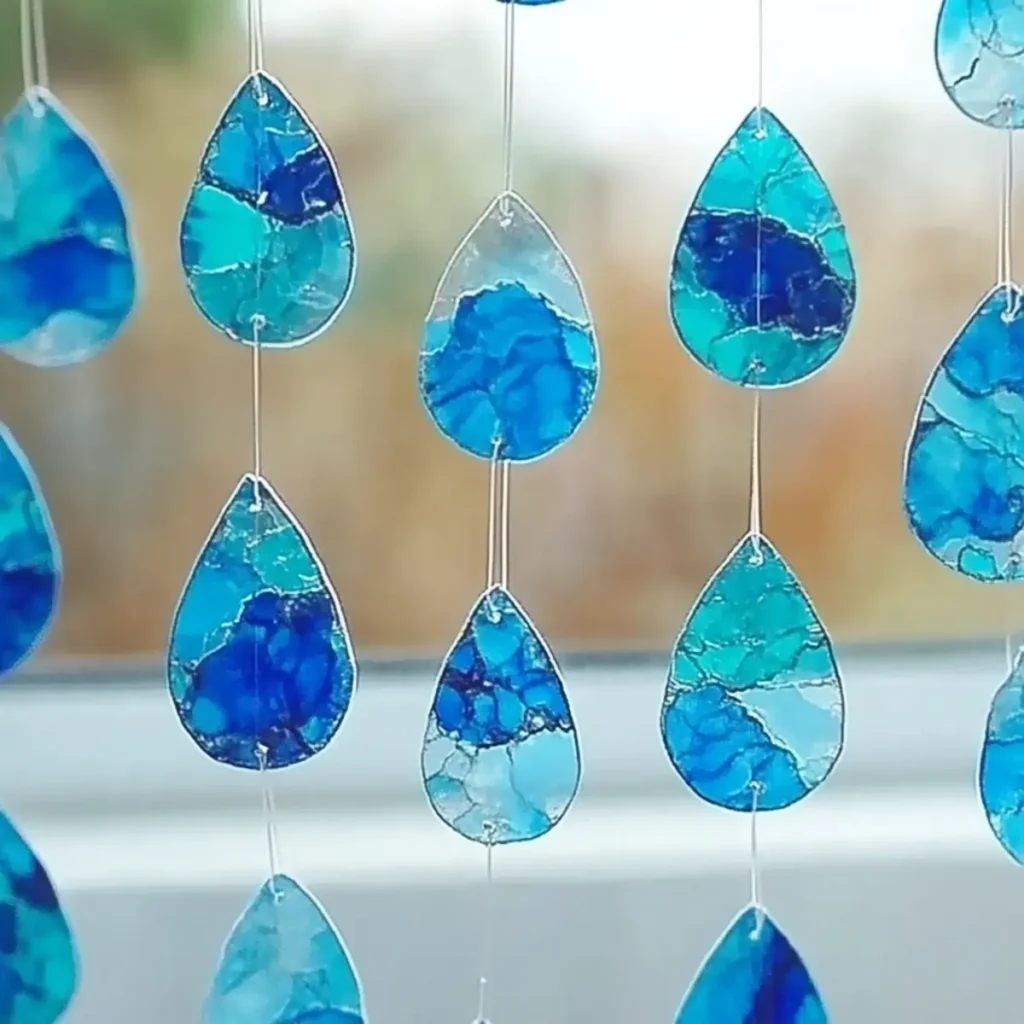
On those rainy days when the sky is as gray as a melting crayon, I find joy in bringing a splash of color indoors. There's something enchanting about transforming simple blue crayons into sparkling suncatchers that dance with light! Not only is this craft a delightful way to spend a cozy afternoon, but it also sparks creativity and imagination in kids, making it a perfect hands-on activity for families.
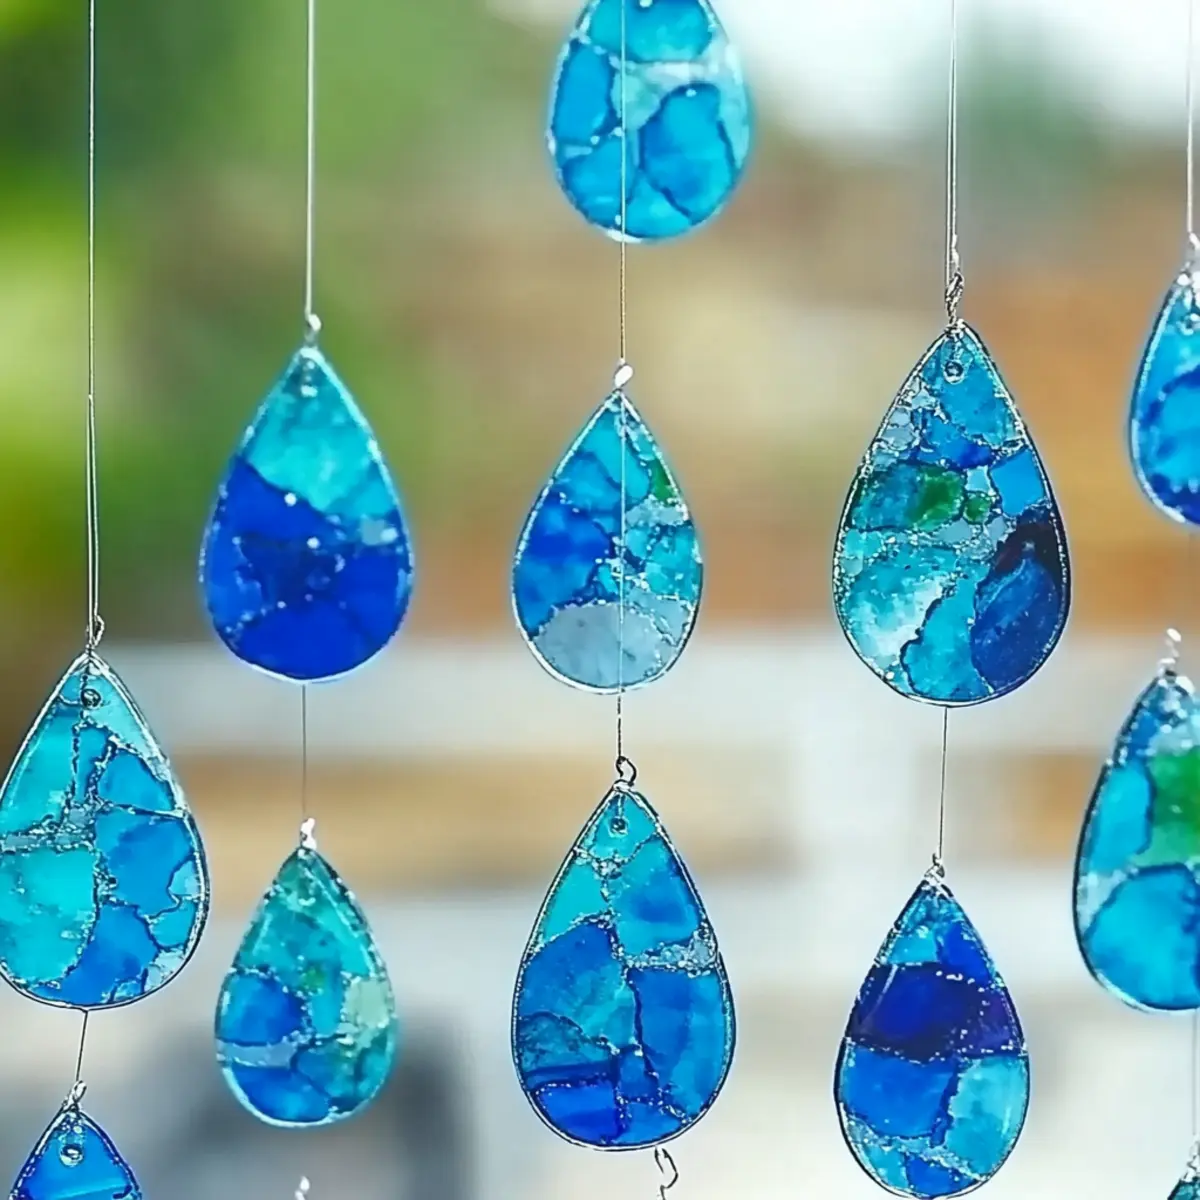
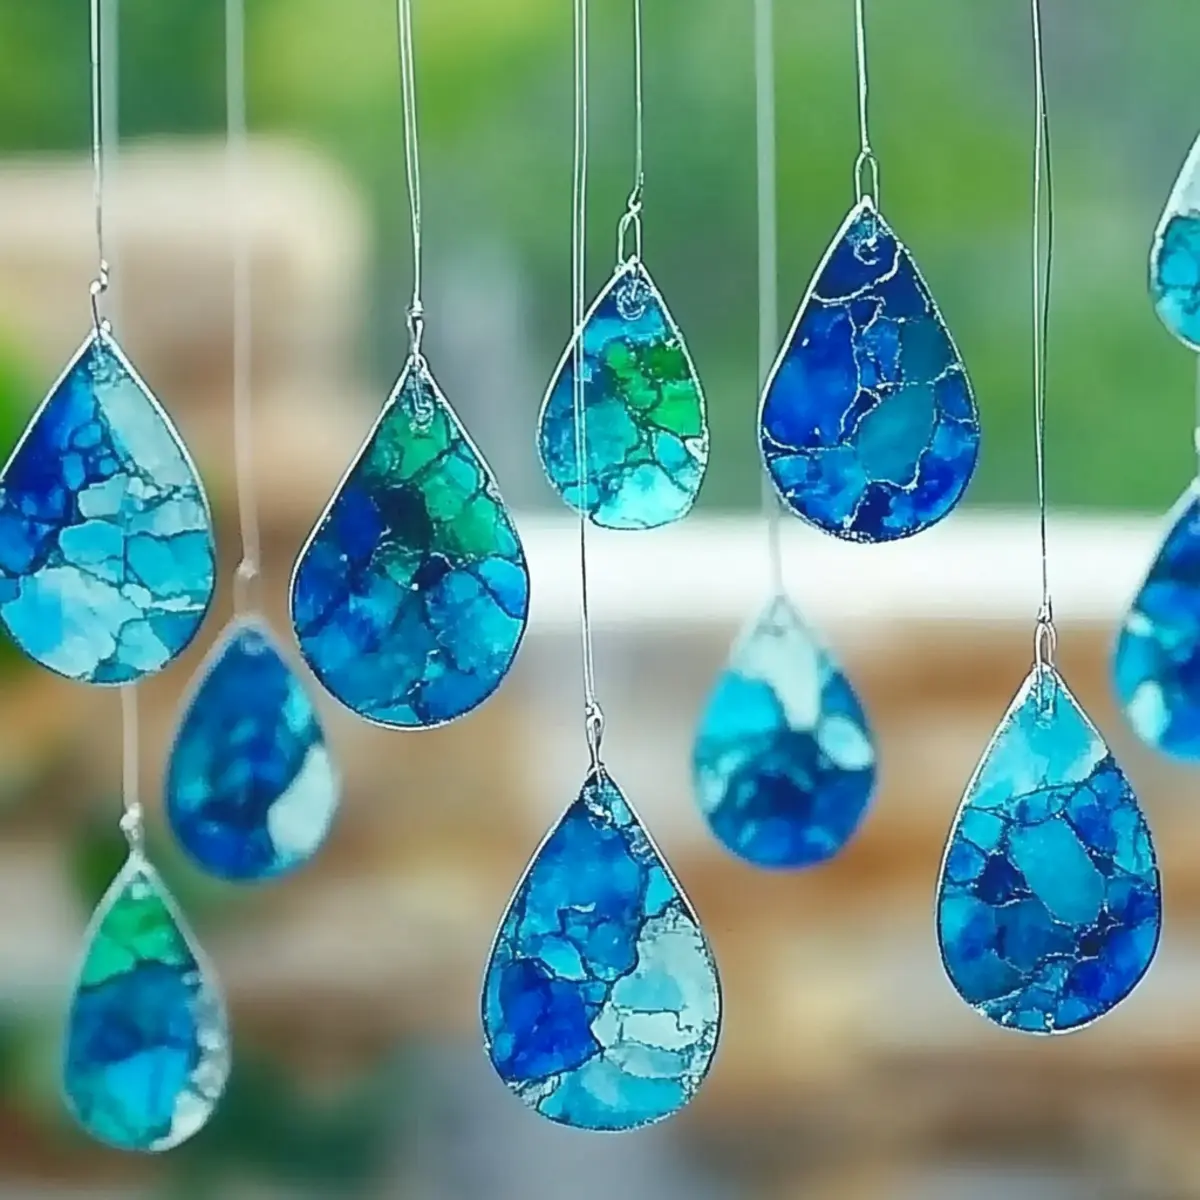
Imagine the soothing shades of blue glowing softly in your window, reminiscent of gentle raindrops, brightening even the dullest days. In just 30 minutes, you can create a mesmerizing decoration that offers a charming upgrade to any space. Plus, it's an opportunity to dive into DIY without the usual mess of paint or glue! So gather your crayons and let's start crafting these dreamy Blue Crayon Raindrop Suncatchers-your windows will thank you!
Why love Blue Crayon Raindrop Suncatchers?
Joyful creation: Crafting these suncatchers brings vibrant beauty to your space on gloomy days.
Quick and easy: This simple project takes just 30 minutes, making it perfect for a family activity.
Sparkling results: The shimmering blue hues mimic real raindrops, offering a stunning decoration.
Creative exploration: Kids will love experimenting with colors and shapes, fueling their imagination.
Mess-free fun: Enjoy the ease of crafting without the fuss of paints or adhesives.
Plus, consider creating additional variations for continued crafting joy!
Blue Crayon Suncatcher Ingredients
• Create magical Blue Crayon Raindrop Suncatchers effortlessly with these simple ingredients!
For the Suncatcher
- Blue Crayons - Essential for vibrant color; any leftover or broken crayons work beautifully.
- Waxed Paper - This is crucial for melting the crayon shavings without mess.
- Iron - Required for melting; remember, adult supervision is a must!
- Scissors - Perfect for crafting those dream-like raindrop shapes.
- Embroidery Floss or String - Ideal for hanging your dazzling creations.
- Hole Punch - Use this to create a clean hole for hanging the suncatchers.
- Optional Enhancements:
- Permanent Marker - For adding fun designs or outlines on your suncatchers.
- Glitter - Adds an extra sparkle, making your suncatchers truly shine!
- Clear Vinyl - Great for adding a protective layer or creative dimension if desired.
With these ingredients, you're all set to embark on a colorful crafting adventure!
How to Make Blue Crayon Raindrop Suncatchers
-
Prep Crayons:
Start by sharpening blue crayons using a pencil sharpener or grater to create vibrant shavings. This is the fun part where kids can help out and get creative with colors! -
Prepare Waxed Paper:
Lay out two sheets of waxed paper on a flat, clean surface. Make sure they are smooth and well-aligned to get the best melting results. -
Layer Crayon Shavings:
Sprinkle the crayon shavings evenly between the two sheets of waxed paper. Aim for a colorful mix, and don't be shy to add the different shades of blue! -
Melt Shavings:
With an adult's help, set an iron to low heat and gently press it down on the waxed paper. Hold it there for only a few seconds until the crayons melt into a solid piece. -
Cut Shapes:
Once the melted sheets have cooled, take a pair of scissors and cut out fun raindrop shapes. Let your imagination run wild; you can go for circles, stars, or any shape that inspires you! -
Punch Holes:
Use a hole punch to create a hole at the top of each suncatcher shape. This will make it easy to hang them beautifully in your window! -
Hang Suncatcher:
Thread some embroidery floss or string through the holes and tie them securely. Now, hang your whimsical raindrop suncatchers in the window to let the sunshine shine through!
Optional: Consider stringing multiple suncatchers together for a stunning window display!
Exact quantities are listed in the recipe card below.
Storage Tips for Blue Crayon Raindrop Suncatchers
- Room Temperature: Store your suncatchers in a cool, dry place, away from direct sunlight, to maintain their vibrant colors and prevent melting for up to 3 months.
- Fridge: If you notice any warping, placing the suncatchers in the fridge for an hour can help restore their shape.
- Freezer: For longer-lasting crafts, suncatchers can be kept in the freezer for up to 6 months, ensuring delightful decor for future seasons.
- Reheating: If they lose their sparkle, gently warm the suncatchers with an iron on low heat (with a cloth in between) to revitalize their glossy finish before displaying them again.
Make Ahead Options
These Blue Crayon Raindrop Suncatchers are perfect for busy home cooks looking to sprinkle a little creativity into their weeks! You can prepare the crayon shavings up to 3 days in advance by storing them in an airtight container at room temperature. Simply sharpen and mix your favorite blue crayons ahead of time, and they'll be ready to melt and craft. When you're ready to create, lay out the waxed paper, layer the shavings, and follow the melting and cutting steps as usual. This way, your family can jump right into crafting after a long day, making it a stress-free, delightful experience that's just as fun in the making!
What to Serve with Blue Crayon Raindrop Suncatchers?
Bring joy to a rainy day with these delightful crafts that enhance your creativity.
- Colorful Craft Station: Set up a variety of art supplies for kids to explore their creativity, allowing them to draw or color alongside their suncatchers.
- Cozy Hot Cocoa: Prepare warm mugs of rich hot cocoa topped with fluffy marshmallows for a sweet treat that perfectly matches the cozy crafting atmosphere.
- Nature-Inspired Snacks: Serve fruit skewers with blue and purple fruits like blueberries and grapes, reflecting the lovely colors of the suncatchers-healthy and colorful!
- Art-Themed Storybooks: Create a cozy storytime after crafting, with stories that inspire imagination and creativity, tying in perfectly with your artistic endeavors.
- Coloring Contest: Have a friendly coloring contest with printouts of designs that kids can color while waiting for their suncatchers to be made, adding fun to the day.
- DIY Decor Party: Invite family or friends for a suncatcher-making session followed by sharing ideas on how to display their creations. This builds camaraderie and shared creativity!
Variations & Substitutions for Blue Crayon Raindrop Suncatchers
Feel free to add your own personal touch to these charming suncatchers!
-
Rainbow Shavings: Mix in colorful crayon shavings along with blue for a vibrant suncatcher full of life!
-
Metallic Touches: Add metallic crayons to the mix before melting for a shimmering effect that catches the light beautifully.
-
Different Shapes: Get creative with your shapes; think stars, hearts, or even fish! This invites seasonal themes throughout the year.
-
Seasonal Colors: Swap out the blue crayons for seasonal hues like orange or red for autumn leaves and festive designs during holidays.
-
Texture Play: Try layering a thin sheet of fabric between the waxed paper before melting for a fun textured effect.
-
Glow-in-the-Dark: Add glow-in-the-dark crayon shavings for an enchanting twist-you'll have glowing suncatchers that dazzle at night!
-
Nature Imprints: Place leaves or flower petals between the sheets during melting to capture their shapes and patterns in the suncatcher.
-
Sparkling Glitter: Don't forget to sprinkle in some fine glitter for an extra twinkle that will bring joy and sparkle to any window.
Happy crafting!
Expert Tips for Blue Crayon Raindrop Suncatchers
- Supervise Melting: Ensure adult supervision is present when using the iron; safety is key during this fun activity!
- Color Mixing Magic: Try combining various shades of blue and even a touch of white or purple for charming effects in your suncatchers.
- Control the Melt: Don't press too hard or leave the iron on for too long; a few seconds is all it takes to create a smooth surface without over-melting.
- Vary the Shapes: Encourage creativity by cutting out different shapes-raindrops, flowers, or stars-to make your suncatchers truly unique and personalized.
- Store Smartly: Keep any extra crayon shavings in a sealed bag for future crafts, so you're always ready for more creative fun!

Blue Crayon Raindrop Suncatchers Recipe FAQs
What kind of blue crayons should I use?
Absolutely! You can use any shade of blue crayons you have on hand, including leftover or broken ones. Different shades create stunning variations, adding depth to your suncatchers. If the crayons are well-used and have nicks, don't worry! They'll still melt beautifully.
**
How should I store the finished suncatchers?**
To keep your suncatchers looking their best, store them in a cool, dry place, away from direct sunlight. This method helps maintain their vibrant colors for up to 3 months. If you notice any warping, a quick fix is placing them in the fridge for about an hour to regain their shape!
**
Can I freeze my crayon suncatchers?**
Yes, you can! If you'd like to preserve your suncatchers for an extended period, storing them in the freezer works wonderfully. Just make sure to wrap them in a secure bag, and they can last for up to 6 months. When ready to use, simply let them thaw to room temperature, and they'll be as good as new!
**
What if my crayon shavings don't melt completely?**
Very often, this can happen if the iron isn't hot enough or if it's not pressed down evenly. To troubleshoot, ensure your iron is set to low heat, and only apply light pressure for a few seconds. If the shavings haven't melted well, you can always reapply the iron while checking constantly to achieve a smooth result.
**
Are there any considerations for kids with allergies?**
Definitely! While the materials used are non-toxic, it's essential to make sure none of the children involved have sensitivities to crayons or wax. If allergies are a concern, consider using natural crayon alternatives available on the market. Just ensure active adult supervision during the crafting process for safety.
Blue Crayon Raindrop Suncatchers Recipe FAQs
Blue Crayon Raindrop Suncatchers: Spark Joy on Rainy Days
Equipment
- Iron
- Scissors
- Hole Punch
Ingredients
For the Suncatcher
- Blue Crayons any leftover or broken crayons Essential for vibrant color
- 2 sheets Waxed Paper Crucial for melting the crayon shavings without mess
- 1 pc Iron Required for melting; adult supervision is a must
- 1 pc Scissors Perfect for crafting shapes
- 1 string Embroidery Floss or String Ideal for hanging suncatchers
- 1 pc Hole Punch For creating holes for hanging
Optional Enhancements
- 1 pc Permanent Marker For adding designs or outlines
- 1 tablespoon Glitter Adds extra sparkle
- 1 sheet Clear Vinyl For a protective layer or creative dimension
Instructions
How to Make Blue Crayon Raindrop Suncatchers
- Prep Crayons: Start by sharpening blue crayons using a pencil sharpener or grater to create vibrant shavings.
- Prepare Waxed Paper: Lay out two sheets of waxed paper on a flat surface; ensure they are smooth and aligned.
- Layer Crayon Shavings: Sprinkle crayon shavings evenly between the sheets of waxed paper.
- Melt Shavings: With adult help, set an iron to low heat and press it down on the waxed paper.
- Cut Shapes: Once cooled, use scissors to cut out raindrop shapes or your choice of fun shapes.
- Punch Holes: Use a hole punch to create holes for hanging each suncatcher shape.
- Hang Suncatcher: Thread embroidery floss or string through the holes and tie securely to hang.


Leave a Reply