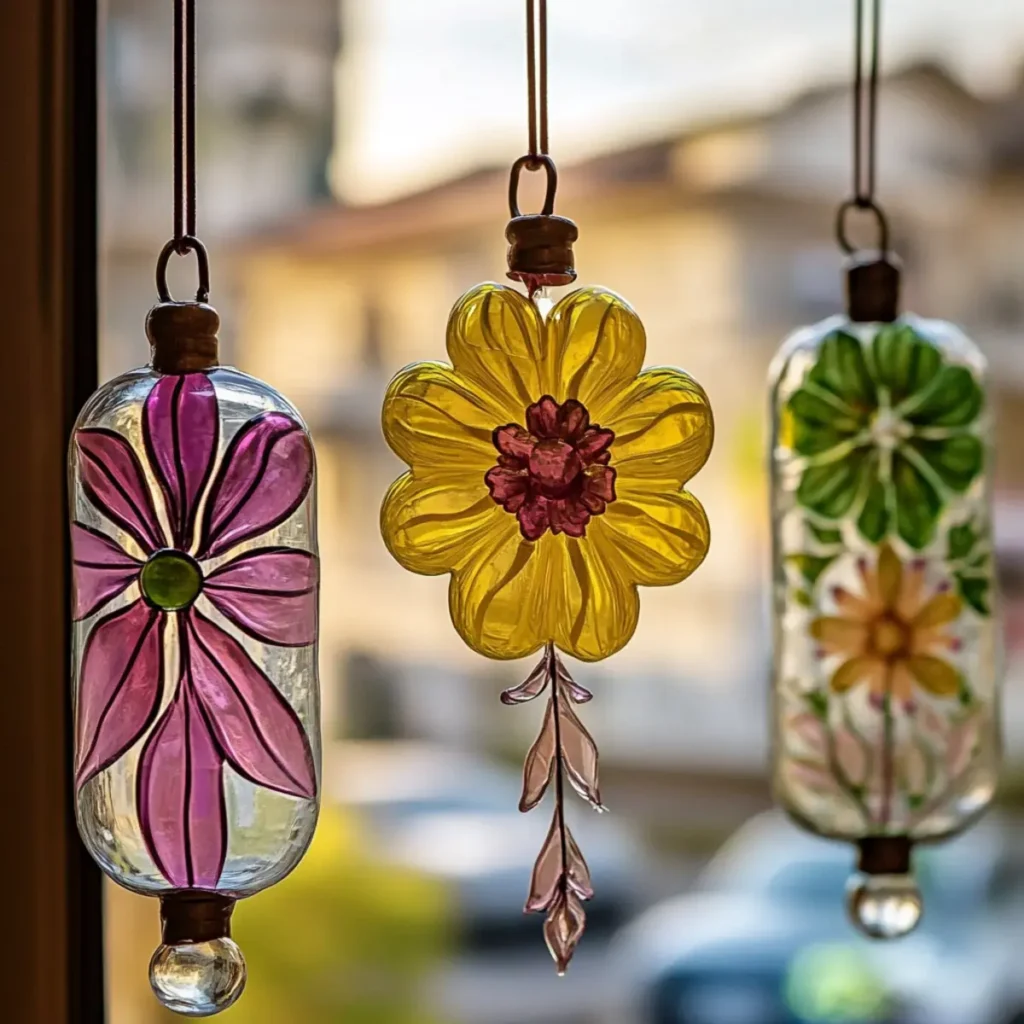
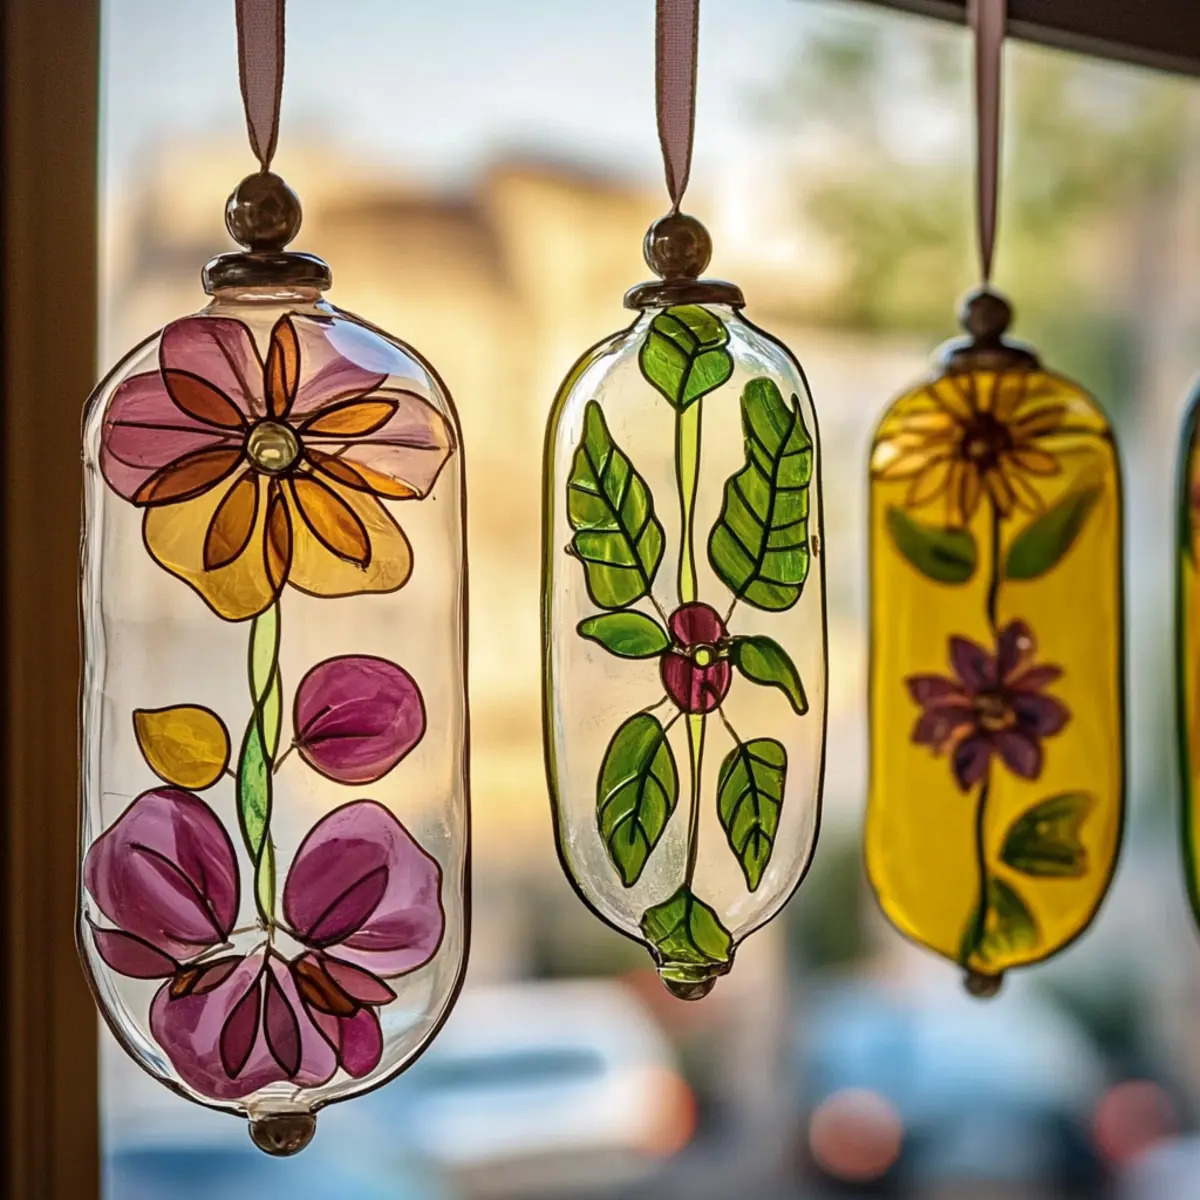
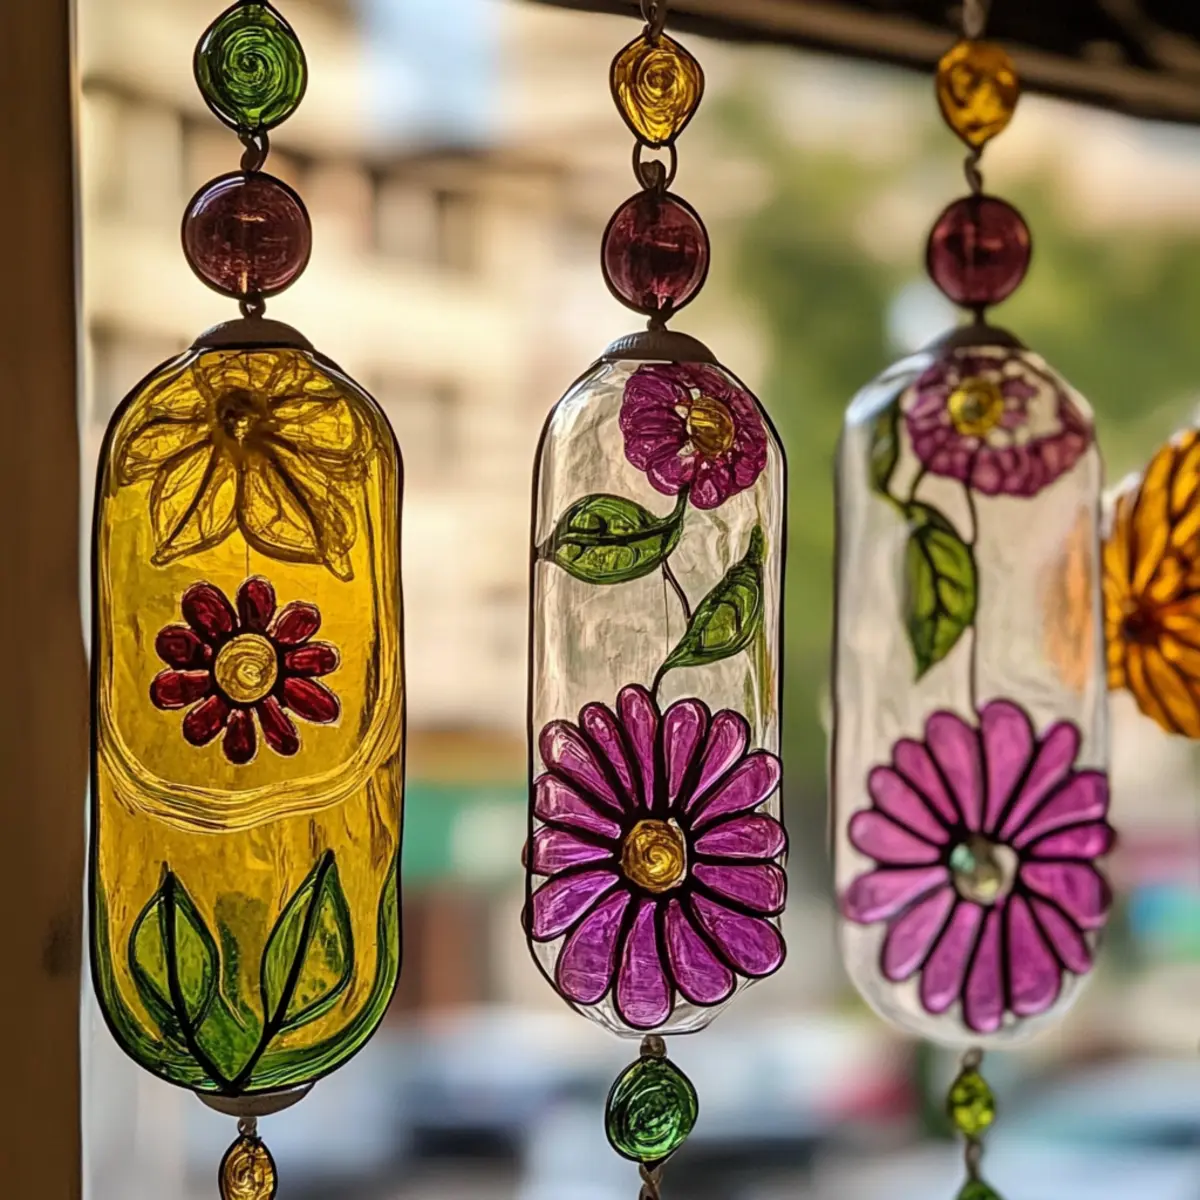
As the sunlight streams through my kitchen window, it's incredible how a simple craft can transform that light into a kaleidoscope of colors dancing across the room. I stumbled upon this wonderful technique for making bioplastic suncatchers while searching for eco-friendly ways to brighten up my home. These vibrant creations not only add beauty but also serve as a fantastic activity for kids and adults alike. With just a handful of everyday ingredients, you can craft stunning floral designs that catch the sun beautifully.
Whether you're looking to infuse your living space with some seasonal flair or seeking a creative project to enjoy with family, this easy-to-follow DIY will unleash your inner artist. Let's dive in and discover how to turn a few simple supplies into magnificent window art that celebrates your creativity and brightens any room!
Why will you love Bioplastic Suncatchers?
Easy and Fun: This craft is simple enough for kids and adults, making it a perfect family project.
Eco-Friendly Creation: Using bioplastics, you not only beautify your space but also contribute to the environment.
Vibrant Display: Witness the stunning colors as sunlight filters through your unique designs, transforming your room.
Seasonal Versatility: Easily switch up colors and themes to suit any season or occasion, keeping your decor fresh.
Budget-Friendly: With minimal and common ingredients, this craft is as kind to your wallet as it is delightful to your home.
Embark on this joyful journey of creativity and consider checking out other incredible DIY projects for more inspiration!
Bioplastic Suncatcher Ingredients
-
For the Base
• ½ cup water - Helps dissolve other ingredients and forms the gelatinous texture essential for your bioplastic suncatchers.
• 2 tablespoons cornstarch - Provides structure, ensuring the suncatcher holds its beautiful floral shape.
• 1 tablespoon white vinegar - Acts as a preservative, contributing to the clarity of your finished suncatcher.
• 1 tablespoon unflavored gelatin - Sets the mixture, giving it a firm yet flexible form ideal for crafts. -
For the Colors
• Natural or food-safe coloring (as needed) - Adds vibrant colors to your gel and allows for seasonal creativity in your bioplastic suncatchers.
• Fine glitter (as needed) - Enhances sparkle and visual interest, making your designs truly pop in the sunlight. -
For Decoration
• Pressed flower petals (as needed) - Brings a natural aesthetic, allowing your suncatchers to blend beautifully with the environment.
• Tissue paper pieces (as needed) - Provides added texture and layers for a unique aesthetic in your designs.
With these simple ingredients, you'll be well on your way to creating eye-catching bioplastic suncatchers that infuse your space with beauty and creativity!
How to Make Bioplastic Suncatchers
-
Prepare the Mixture: In a medium-sized saucepan, combine ½ cup water, 2 tablespoons cornstarch, 1 tablespoon white vinegar, and 1 tablespoon unflavored gelatin. Heat over low, stirring until fully combined and smooth.
-
Cool Down: Once mixed, remove the saucepan from heat and allow the gelatin mixture to cool slightly. This step is crucial to prevent burns when adding colors.
-
Add Colors and Glitter: Gently stir in your chosen natural or food-safe coloring and fine glitter into the cooled mixture. Get creative and mix until you achieve a beautiful shade that excites you!
-
Create Layers: Carefully pour the mixture into small bowls or spread it onto a countertop. Use a spoon or spatula to create thin layers, which will dry much faster and clearer.
-
Incorporate Decoratives: For an enchanting touch, place pressed flower petals and tissue paper pieces into the mixture before covering them. This will add depth and visual interest.
-
Drying Time: Allow your suncatchers to dry in a flat, dust-free area. Keep in mind that thinner layers will typically dry more quickly, usually within approximately 24 hours.
Optional: Hang them in windows for a sparkling display!
Exact quantities are listed in the recipe card below.

What to Serve with Bioplastic Suncatchers?
Bring a splash of joy to any crafting session with these colorful creations.
-
Bright Beverages: Serve refreshing lemonade or iced tea to keep the crafting energy flowing while adding a zesty kick to your project.
-
Mini Snack Plates: A mix of fresh fruits and nuts provides a healthy, vibrant option that boosts creativity and keeps little hands happy.
-
Artistic Aprons: Consider wearing fun, colorful aprons to enhance the crafting experience. They add excitement, especially for kids, while protecting clothes from any splashes.
-
Creative Music Playlist: Set the mood with a lively playlist that inspires creativity and makes the crafting time more engaging and fun for everyone.
-
Crafting Party Favors: Wrap up small creations in colorful bags or boxes to help share the joy of this fun activity with friends or family.
-
Seasonal Decorations: Complement your suncatchers with other seasonal crafts, showcasing a delightful array of handmade art throughout your home.
Make Ahead Options
These Bioplastic Suncatchers are perfect for busy home cooks and crafters looking to brighten their day with minimal effort! You can prepare the gelatin mixture up to 24 hours in advance, storing it in an airtight container in the refrigerator to maintain its quality (this helps prevent it from thickening too much). Additionally, you can cut and prep your pressed flower petals and tissue paper pieces ahead of time, keeping them in a cool, dry place to preserve freshness. When you're ready to craft, simply reheat the mixture gently, pour it into bowls, add your prepped decorations, and let them dry. This time-saving method ensures that you'll create stunning suncatchers with relative ease, making it a wonderful weekend project that brightens your home!
How to Store and Freeze Bioplastic Suncatchers
-
Room Temperature: Keep your finished bioplastic suncatchers flat or hang them to avoid bending or damage. They can be displayed immediately after drying.
-
Fridge: For any uncured mixtures, refrigerate in an airtight container for up to 3 days to maintain ingredient freshness before creating your suncatchers.
-
Freezer: It's best to avoid freezing bioplastic suncatchers as the texture will be compromised. Store them at room temperature or in the fridge instead.
-
Display Tips: When ready to showcase your creations, simply hang them in windows or on walls. Enjoy the colorful effects they produce as sunlight filters through!
Expert Tips for Bioplastic Suncatchers
-
Layer Thickness: Ensure your layers are thin to achieve quicker drying times; thick layers may never fully dry or lead to cloudy results.
-
Color Safety: Always opt for food-safe colorants to keep your bioplastic suncatchers safe for children and pets.
-
Clean Workspace: Prepare a clean countertop or covered tray for drying to avoid dust or unwanted debris in your suncatchers.
-
Embellishments: Mix in diverse items like tiny twigs or various paper types to enhance the beauty and texture of your designs uniquely.
-
Seasonal Adaptations: Feel free to adapt colors and themes for each season; for instance, warm hues for autumn or icy blues for winter suncatchers!
Bioplastic Suncatchers Variations & Substitutions
Unleash your creativity and personalize your suncatchers with these fun variations!
-
Seasonal Themes: Swap out colors for seasonal motifs, like vibrant oranges and browns for fall or icy blues for winter.
-
Glitter Mixes: Choose from different types of glitter such as holographic or gold for a dazzling twist that can create a whimsical sparkle.
-
Edible Flower Petals: Use edible flowers like nasturtiums for added color and texture; they provide a lovely natural touch and are safe to use.
-
Textured Paper: Incorporate various types of paper-think tissue paper with different textures or even fabric scraps-to enhance the visual interest in your suncatchers.
-
Color Layering: Experiment by layering different shades of the same color for a beautiful ombre effect that draws the eye.
-
Nature Finds: Add small, nature-found items like tiny twigs or leaves for a rustic, woodland feel that beautifully complements the floral designs.
-
Glow-in-the-dark Elements: Include glow-in-the-dark powder or paint in your mix to make nighttime displays even more magical.
-
Foil Accents: Place metallic foil under the gelatin mixture before it sets; it will shine through beautifully when held up to the light!
Explore these variations and watch your bioplastic suncatchers transform into unique pieces of art!
Bioplastic Suncatchers Recipe FAQs
What type of coloring can I use for the bioplastic suncatchers?
Absolutely! You can use either natural or food-safe coloring. I highly recommend the latter, especially if kids will be involved, to ensure safety. Various brands offer vibrant colors that can easily be incorporated into your mixture for those stunning designs!
How should I store my finished bioplastic suncatchers?
For best results, keep your finished bioplastic suncatchers flat or hang them in a dust-free area to avoid bending. They can be displayed immediately after drying, but be sure to keep them away from direct sunlight to maintain their colors!
Can I freeze bioplastic suncatchers?
It's best to avoid freezing bioplastic suncatchers, as the texture may become compromised. Instead, store them at room temperature or in the fridge if you have any uncured mixtures, making sure to keep them in an airtight container for up to 3 days before crafting.
What should I do if my suncatchers don't dry clear?
Very! If your suncatchers aren't drying clear, it usually means that the layers are too thick. To remedy this, ensure that you pour thin, even layers in future batches. If you notice any cloudy spots in your dried suncatchers, they may have been exposed to too much humidity while drying-try a clean, dry environment next time!
Are there any dietary considerations for this craft?
Absolutely! Since this craft uses food-safe ingredients, it's safe for kiddos. However, it's wise to avoid contact with pets, as the ingredients can still pose a risk if ingested in large quantities. Always supervise children when crafting to ensure they don't put any small pieces in their mouths.
Can I customize the decorations on the suncatchers?
The more the merrier when it comes to customization! Feel free to add various pressed flower petals, different types of glitter, or even bits of colorful tissue paper. These embellishments not only enhance beauty but also allow for personal creativity to shine through in every unique piece you make!
Bioplastic Suncatchers Recipe FAQs

Eco-Chic Bioplastic Suncatchers: A Fun Craft for Sunny Days
Equipment
- medium-sized saucepan
Ingredients
For the Base
- 0.5 cups water Helps dissolve other ingredients and forms the gelatinous texture.
- 2 tablespoons cornstarch Provides structure for the suncatcher.
- 1 tablespoon white vinegar Acts as a preservative.
- 1 tablespoon unflavored gelatin Sets the mixture.
For the Colors
- natural or food-safe coloring Adds vibrant colors.
- fine glitter Enhances sparkle and visual interest.
For Decoration
- pressed flower petals Brings a natural aesthetic.
- tissue paper pieces Provides added texture and layers.
Instructions
How to Make Bioplastic Suncatchers
- In a medium-sized saucepan, combine ½ cup water, 2 tablespoons cornstarch, 1 tablespoon white vinegar, and 1 tablespoon unflavored gelatin. Heat over low, stirring until fully combined and smooth.
- Once mixed, remove the saucepan from heat and allow the gelatin mixture to cool slightly.
- Gently stir in your chosen natural or food-safe coloring and fine glitter into the cooled mixture.
- Carefully pour the mixture into small bowls or spread it onto a countertop to create thin layers.
- Place pressed flower petals and tissue paper pieces into the mixture before covering them.
- Allow your suncatchers to dry in a flat, dust-free area for approximately 24 hours.


Leave a Reply