
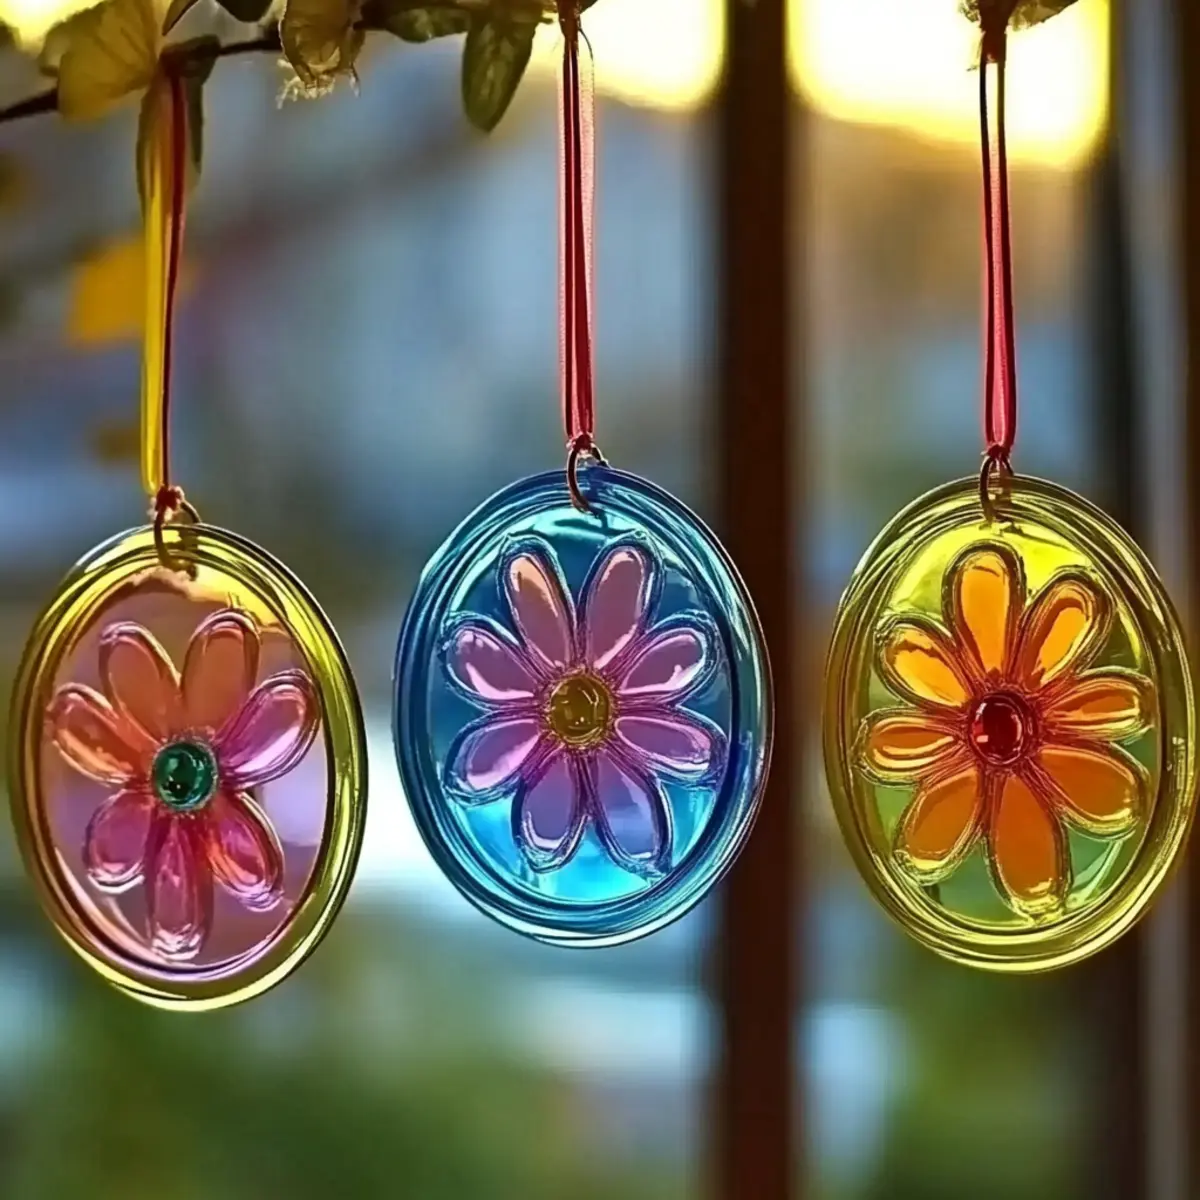
When the sun streams through my windows, it brings with it a sense of warmth and possibility. Recently, I discovered a delightful craft that transforms that glorious sunlight into a beautiful display of colors-bioplastic suncatchers! As I mixed together simple, compostable ingredients like cornstarch, vinegar, and a splash of vegetable glycerin, I felt like a kid again, diving into a project that perfectly blends creativity with eco-consciousness. These suncatchers not only brighten up your living space but also celebrate sustainability, making them a fabulous choice for everyone from seasoned crafters to curious kids.
With minimal prep and easy-to-follow steps, you'll find that crafting these vibrant decorations is as joyful as watching them dance in the sunlight. Perfect for adding a little whimsy to your home or gifting to friends who share a love for nature, this craft offers endless possibilities for personal expression. So roll up your sleeves, and let's create something beautiful together-your windows will thank you! 🌞
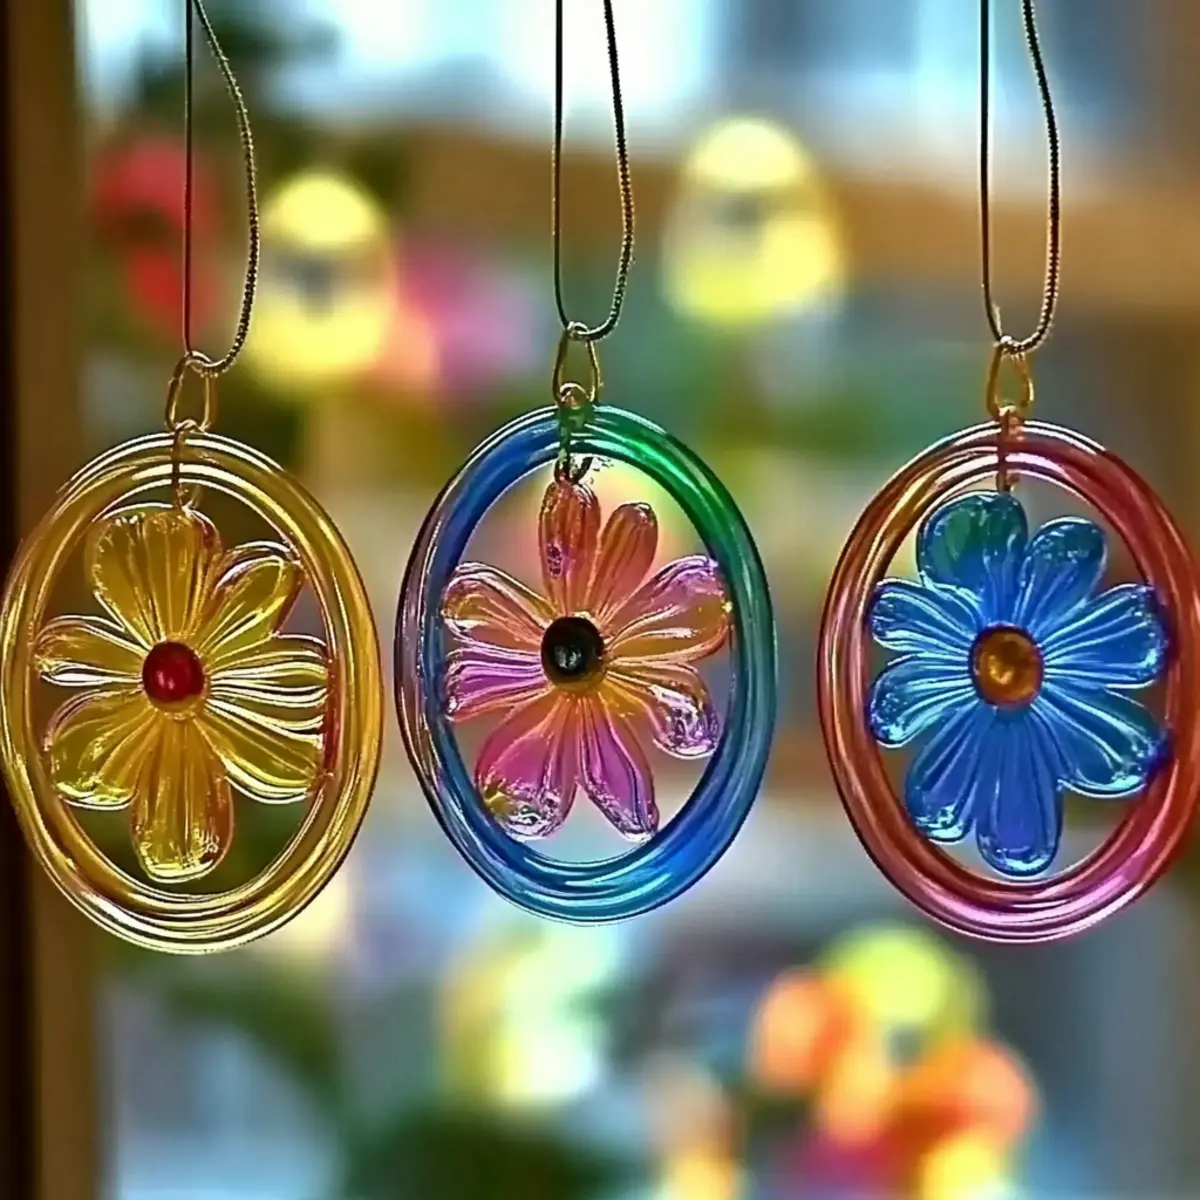
Bioplastic Suncatchers: Why Are They So Fun?
Simplicity and Fun: Crafting bioplastic suncatchers is a joyfully straightforward process that invites everyone to unleash their creativity, regardless of skill level.
Eco-Friendly Appeal: Made with compostable ingredients, they align perfectly with sustainable crafting goals.
Endless Customization: Experiment with colors and textures by incorporating natural dyes, glitter, or pressed flowers, giving your suncatchers a personalized touch.
Beauty in Every Beam: Their glossy finish creates stunning light displays, turning your home into a colorful gallery when sunlight shines through.
Looking for more creative ideas? Check out our guide on eco-friendly crafts to elevate your DIY experience!
Bioplastic Suncatcher Ingredients
• Make your own vibrant creations with ease by using these simple ingredients!
For the Mixture
- Cornstarch - Provides structure and thickness to the mixture; no substitutions recommended.
- Water - Acts as a solvent to dissolve and integrate other ingredients; use filtered water for the best results.
- White Vinegar - Helps in bonding and preserves the suncatchers; substitute with apple cider vinegar if needed.
- Vegetable Glycerin - Ensures a glossy finish and flexibility of the suncatchers; can be replaced with other plant-based glycerin sources.
Optional Additions
- Food Coloring - Adds vibrant hues to the mixture; natural dyes can be used as an alternative for a more eco-friendly option.
How to Make Bioplastic Suncatchers
-
Combine Ingredients: In a non-stick saucepan, mix ½ cup cornstarch, ½ cup water, 1 tablespoon white vinegar, and 1 tablespoon vegetable glycerin. Stir until smooth and well blended.
-
Heat Mixture: Cook the mixture over medium heat, stirring continuously for about 5-7 minutes. Watch for a thickened, gel-like paste to form as it heats.
-
Add Color: Remove the saucepan from heat and mix in food coloring or natural dyes at this point if you want to add a splash of color.
-
Spread the Mixture: Spoon the gel onto wax paper or a silicone mat. Spread it out into a thin layer for even drying.
-
Decorate: While the mixture is still wet, get creative by decorating with biodegradable glitter or small embellishments. You can also add additional colors for a marbled effect if desired.
-
Dry Thoroughly: Allow the suncatchers to dry for 24-48 hours. Ensure they are completely dry and glossy before handling to maintain shape.
-
Cut Out Shapes: Once dry, gently peel the suncatchers from the surface and cut them into your desired shapes for display.
-
Hang Your Art: Adhere the finished suncatchers to a sunny window using tape or suction hooks, letting the light create beautiful patterns in your home.
Optional: Try adding pressed flowers for an extra touch of natural beauty!
Exact quantities are listed in the recipe card below.
Expert Tips for Bioplastic Suncatchers
-
No Substitutions: Always use cornstarch as the base; it's essential for the structure and thickness of your bioplastic suncatchers.
-
Drying Time Matters: Allow suncatchers to dry completely for 24-48 hours to ensure they maintain their shape and durability; a damp suncatcher can crack easily during handling.
-
Eco-Friendly Additions: Use biodegradable glitter or pressed flowers for an eco-friendly touch; avoid synthetic materials that defeat the purpose of sustainable crafting.
-
Humidity Awareness: Keep your suncatchers away from high humidity environments to prevent them from becoming misshapen or degrading over time.
-
Artistic Freedom: Don't hesitate to mix natural dyes; experimenting with different color combinations can lead to unique, vibrant designs that truly reflect your personal style.
How to Store and Freeze Bioplastic Suncatchers
Cool, Dry Place: Store finished suncatchers in a cool, dry place, away from direct sunlight to prevent fading of colors and maintain their vibrant appearance.
Durability: If kept properly, bioplastic suncatchers can last for several months; however, check periodically for any signs of wear or damage.
Avoid Humidity: Keep them out of overly humid areas, as moisture can cause the suncatchers to warp or lose their beautiful shape.
Display Options: To rehang suncatchers, simply wipe them with a damp cloth to clean off any dust before adhering them to your windows anew.
What to Serve with Bioplastic Suncatchers?
Bring joy and creativity into your home as you craft these delightful, eco-friendly accents for your sunny spaces.
-
Crafting Playdates: Gather family and friends for a fun crafting day, letting everyone's creativity shine. Enjoy laughter and shared creativity while you make your suncatchers together!
-
Rainbow-Themed Treats: Pair your crafting with colorful, homemade snacks like fruit skewers or frosted cupcakes. These bright treats will mirror the vibrant suncatchers and add to the festive atmosphere.
-
Sunshine-themed Drinks: Serve refreshing lemonade or infused water with fresh fruits for a delightful sip that complements the sunny vibe of your suncatchers.
-
Art Display Areas: Designate a special spot in your home for displaying your suncatchers, perhaps alongside other art projects. Create a cheerful gallery that showcases both the craft and your family's artistic journey.
-
Eco-Friendly Gift Packaging: Use your suncatchers as unique and thoughtful gifts for friends or family who enjoy DIY projects. Package them in reusable bags adorned with twine or craft paper for an eco-conscious touch.
-
Nature Walks: After a fun crafting session, enjoy a stroll in nature to find inspiration for your next creative project. Observe the colors and textures around you that you can emulate in future suncatchers!
Make Ahead Options
These bioplastic suncatchers are perfect for busy crafters looking to save time! You can prepare the mixture (½ cup cornstarch, ½ cup water, 1 tablespoon white vinegar, and 1 tablespoon vegetable glycerin) up to 24 hours in advance. Simply store it in an airtight container at room temperature. When ready to use, gently reheat the mixture until it reaches the gel-like consistency again. You can also create the suncatcher layers, decorate them with glitter or embellishments, and let them dry completely for 24-48 hours to ensure they are glossy and sturdy. Just remember to keep them in a cool, dry place to maintain their vibrant colors and avoid any humidity-your suncatchers will be just as delightful when it's time to hang them!
Bioplastic Suncatchers: Delightful Variations
Feel free to explore these creative twists on your suncatcher project to make it uniquely yours!
- Natural Dyes: Use beet juice or turmeric for vibrant, non-toxic colors that celebrate nature's palette.
- Pressed Flowers: Incorporate small pressed flowers or leaves for a delightful texture and a touch of natural beauty. Create a garden in your window!
- Glittering Magic: Add biodegradable glitter to the wet mixture for a sparkling effect that shines in the sunlight. It's like capturing fairy dust!
- Freeform Shapes: Instead of using molds, try creating whimsical shapes using spatulas or craft sticks for a more artistic flair. Each suncatcher can tell its own story!
- Glass-like Effect: Use a mix of vegetable glycerin and water to create a glossier finish that mimics stained glass. Your windows will glow with enchanting colors!
- Scented Additions: A few drops of essential oils like lavender or citrus can give your suncatchers a lovely aroma while they catch the light. Enjoy a sensory feast!
- Recycled Paper: Consider adding pieces of colorful recycled paper for a patchwork effect that adds depth and vibrancy to your suncatcher art.
- Themed Colors: Craft several suncatchers with a specific color scheme for each season or holiday, allowing you to change them out and keep your décor fresh and festive.
Let your imagination run wild; these variations can help transform not just your windows but your whole crafting experience! 🌞

Bioplastic Suncatchers Recipe FAQs
How do I select the best ingredients for bioplastic suncatchers?
Absolutely! The quality of ingredients can impact your suncatchers. For cornstarch, opt for a fine powder without any additives to ensure a smooth mixture. Use filtered water for a cleaner mix and white vinegar to preserve the colors and maintain the suncatcher's integrity. If you're aiming for natural dye, consider beet juice or turmeric for vibrant hues, ensuring they are free of synthetic additives.
What is the best way to store finished bioplastic suncatchers?
To maintain their beauty, store your bioplastic suncatchers in a cool, dry place, away from direct sunlight. Keeping them in a cardboard box or a fabric pouch can help protect them from dust and fading. If stored properly, they can last up to several months. Just be sure to check them periodically for any signs of damage, especially if displayed in high-traffic areas.
Can I freeze bioplastic suncatchers for later use?
While freezing isn't recommended due to their delicate nature, you can create a freezer-safe environment by using a container with a tight lid to keep them safe from moisture. If you'd like to preserve the working mixture, you can refrigerate the uncooked paste for up to 1 week, but I'd recommend making suncatchers fresh for the best results.
What if my suncatchers are cracking when I peel them?
Very! If you encounter cracking, it's likely due to not allowing enough drying time. Ensure they dry for the full 24-48 hours before attempting to peel. If they still crack, consider adjusting your thickness when spreading the mixture next time-aim for a thinner layer for more flexibility after drying.
Are bioplastic suncatchers safe for pets and children?
Yes! The ingredients used in bioplastic suncatchers are non-toxic and safe for both pets and children. However, always supervise little ones while crafting, especially when using small embellishments like glitter. If your pet is prone to chewing, it might be best to display these creations out of their reach.
How do I get my colors to look more vibrant in the suncatchers?
To achieve brighter colors, try layering multiple shades of natural dye or using food coloring in concentrated amounts. When mixing, add more coloring gradually until you reach your desired vibrancy. You can also pair colors for a marbled effect while the mixture is still wet for unique designs that truly pop in the sunlight!

Bioplastic Suncatchers: A Bright, Fun Craft You’ll Love
Equipment
- non-stick saucepan
- wax paper or silicone mat
Ingredients
For the Mixture
- ½ cup cornstarch Provides structure; no substitutions recommended.
- ½ cup water Use filtered water for best results.
- 1 tablespoon white vinegar Preserves suncatchers; can substitute with apple cider vinegar.
- 1 tablespoon vegetable glycerin Ensures glossy finish; can replace with other plant-based sources.
Optional Additions
- food coloring Adds vibrant hues; natural dyes can be used as alternatives.
Instructions
How to Make Bioplastic Suncatchers
- In a non-stick saucepan, mix ½ cup cornstarch, ½ cup water, 1 tablespoon white vinegar, and 1 tablespoon vegetable glycerin. Stir until smooth and well blended.
- Cook the mixture over medium heat, stirring continuously for about 5-7 minutes until a thickened, gel-like paste forms.
- Remove the saucepan from heat and mix in food coloring or natural dyes if desired.
- Spoon the gel onto wax paper or a silicone mat, spreading it out into a thin layer for even drying.
- While the mixture is still wet, get creative by decorating with biodegradable glitter or small embellishments.
- Allow the suncatchers to dry for 24-48 hours until completely dry and glossy before handling.
- Once dry, gently peel the suncatchers from the surface and cut them into desired shapes.
- Adhere the finished suncatchers to a sunny window using tape or suction hooks.


Leave a Reply