
There's something truly uplifting about watching sunlight dance through vibrant colors-especially when that light refracts off your very own crafted suncatchers! I recently ventured into the world of eco-friendly crafting and discovered the joy of creating bioplastic suncatchers. These delightful projects use simple, biodegradable ingredients that are not only fun to make but also promote awareness about sustainability and creativity in our little ones.
Perfect for a weekend afternoon or an educational activity, this DIY craft allows kids and adults alike to unleash their inner artists while beautifying their spaces. As we gather around the kitchen table, mixing colors and adding personal touches like flower petals or glitter, we create more than just colorful ornaments-we cultivate memories and a love for our environment. So, gather your materials and let's transform ordinary moments into extraordinary ones with these easy, stunning suncatchers!

Why love Bioplastic Suncatchers for crafting?
Joyful Experience: Creating bioplastic suncatchers is a fantastic way to spend quality time with loved ones, crafting unique pieces while sharing laughter and creativity.
Eco-Friendly Fun: With biodegradable materials, this project not only entertains but also promotes environmental awareness, making it perfect for teaching kids the benefits of sustainability.
Customizable Designs: Let your imagination run wild! Mix and match colors, add glitter, or include natural decorations like flower petals to make each suncatcher truly one-of-a-kind.
Simple Process: The straightforward instructions make it accessible for all skill levels, ensuring that anyone can join in on the fun without feeling overwhelmed.
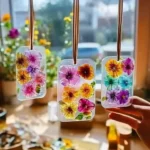
Stunning Visuals: Once dry, these vibrant creations sparkle in the sunlight, transforming ordinary spaces into colorful displays that bring joy to any room.
Get started with our easy instructions and unleash your creativity while making beautiful eco-conscious art!
Bioplastic Suncatcher Ingredients
To create the perfect bioplastic suncatchers, gather these simple ingredients:
- Water - serves as the base liquid for your mixture.
- Cornstarch - provides structure and thickness to the gel, making it firm yet flexible.
- White Vinegar - enhances texture and acts as a preservative; you can substitute it with lemon juice or apple cider vinegar for a different flair.
- Unflavored Gelatin Powder - solidifies the mixture into a firm gel; for a vegetarian twist, use agar-agar instead.
- Natural or Food-Safe Coloring (e.g., beet juice, spirulina, turmeric) - infuses vibrant colors into the suncatcher and elevates your creative expression.
- Optional Add-ins - consider fine glitter, dried flower petals, or bits of tissue paper to add personal touches and extra charm to your bioplastic suncatchers.
How to Make Bioplastic Suncatchers
-
Combine Ingredients: In a medium saucepan, mix ½ cup water, 2 tablespoon cornstarch, 1 tablespoon white vinegar, and 1 tablespoon gelatin. Stir the mixture until it's smooth and creamy, ensuring no lumps remain.
-
Heat Mixture: On medium-low heat, gently warm the mixture while continuously stirring for about 3-5 minutes. You'll know it's ready when it thickens to a gel-like consistency. Once thickened, remove it from the heat.
-
Color the Gel: Divide the thickened mixture into several bowls. Add natural colorants like beet juice or turmeric to each bowl, stirring until you achieve your desired shade.
-
Shape the Suncatchers: On a non-stick surface (like parchment paper), spread the colored gel using a spatula, creating fun shapes such as circles or stars. Aim for a thin, even layer for the best results.
-
Add Embellishments: Before the gel sets, sprinkle on your chosen decorations, like glitter or flower petals. Make sure they're evenly distributed but not too thick, to maintain a smooth surface.
-
Dry Suncatchers: Allow your creations to air dry in a well-ventilated space for about 24-48 hours. Remember to flip them halfway through to avoid curling during the drying process.
-
Finish and Display: Once completely dry, use a hole puncher to create holes for hanging. You can thread string through these holes or use suction cups for effortless display in windows.
Optional: Consider adding a touch of string or beads to your hanging method for added flair!
Exact quantities are listed in the recipe card below.

Expert Tips for Bioplastic Suncatchers
-
Smooth Mixture: Ensure that your gel mixture is completely smooth without lumps, as this will help the suncatchers achieve a beautiful glossy finish.
-
Thin Layers: Spread the gel in thin, even layers to create a delicate final product that dries properly and catches the sunlight beautifully.
-
Mid-Drying Flip: Remember to flip the suncatchers halfway through the 24-48 hours of drying to prevent curling and ensure they maintain their desired shape.
-
Creative Additions: Feel free to experiment with various natural colorants and decorations! Use biodegradable glitter or pressed flowers to add unique charm to your bioplastic suncatchers.
-
Storage Safety: Keep your completed suncatchers out of reach of small children, as they are not edible and should be treated as decorative items only.
-
Keep Ventilated: Ensure that the drying area is well-ventilated to speed up the drying process and enhance the final clarity of your eco-friendly creations.
What to Serve with Bioplastic Suncatchers?
Crafting bioplastic suncatchers is a delightful adventure, perfect for sunny afternoons bursting with creativity.
- Fresh Fruit Smoothies: A refreshing, fruity drink to keep everyone energized and cool while they craft. Blend ripe bananas and strawberries for a treat that even kids love!
- Veggie Sticks with Hummus: Crunchy and nutritious, these dippable veggies bring a satisfying crunch to your crafting session and keep hungry hands busy.
- Homemade Lemonade: The tangy, sweet sip of homemade lemonade adds a burst of refreshment, perfect for quenching your thirst during a sunny craft day.
- Popcorn with Nutritional Yeast: Light and airy, popcorn sprinkled with nutritional yeast makes for a fun, savory snack that's easy to munch on while adding color to your suncatchers.
- Cheese and Crackers Platter: A simple yet elegant spread beloved by all ages. Pair a variety of cheeses with whole-grain crackers for a satisfying bite!
- Baked Mini Pizzas: Fun to make and even more enjoyable to eat! Everyone can customize their toppings, making this a delightful addition to your crafting table.
- Garden Salad: A light, fresh side with vibrant colors makes for a healthful balance alongside your playful crafting. Toss in cherry tomatoes and cucumber for extra crunch.
- Fizzy Sparkling Water: For a bubbly refreshment, serve sparkling water with a splash of lemon or lime. It keeps the mood lively while everyone enjoys their creative time!
- Chocolate-Dipped Fruit: A sweet treat that's simply irresistible! Pairing strawberries or banana slices with a chocolate dip adds a delightful finish to your crafting adventure.
- Homemade Cookies: Warm, freshly baked cookies bring a cozy vibe and are perfect for rewarding your little artists after a crafty session!
How to Store and Freeze Bioplastic Suncatchers
Cool Place: Keep your dried bioplastic suncatchers in a cool, dry area away from direct sunlight to maintain their vibrant colors and integrity.
Airtight Container: Store them in an airtight container or a sealed bag to protect against moisture and dust; this helps prolong their lifespan.
Display Caution: Avoid hanging suncatchers in areas with extreme temperature fluctuations, as this may affect their appearance and structural integrity.
Reusing Materials: If you ever wish to create more suncatchers, you can safely store leftover gel mixture in an airtight container in the fridge for up to one week, ready for a new crafting session!
Bioplastic Suncatcher Variations
Discover delightful ways to spark creativity and make these suncatchers uniquely yours!
-
Floral Touch: Include fresh or dried flowers to create stunning, nature-inspired designs that add elegance to your suncatchers.
-
Glitter Glam: Mix in biodegradable glitter for a sparkly effect that catches and reflects light beautifully, enhancing the visual appeal of your creations.
-
Temperature Twist: Use warm colors like red or orange to create a cozy feel, or cool colors like blue and green for a calming look.
-
Fruit Infusion: Experiment with fruit juices like blueberry or carrot for vibrant, natural coloring while adding a delightful aroma to the mixture.
-
Texture Play: Add in small pieces of natural twine or beads into the gel for interesting textures that bring an extra dimension to your suncatchers.
-
Alphabet Fun: Press in alphabet pasta to personalize your suncatchers with names or phrases, turning your craft into a learning experience as well.
-
Seasonal Themes: Change up colors and decorations according to the seasons-think pastels for spring or oranges and browns for autumn, making each piece reflect the time of year.
-
Heat Levels: Incorporate a few drops of essential oils with uplifting scents like citrus or lavender, transforming your craft session into a sensory delight!
Make Ahead Options
Crafting Bioplastic Suncatchers is a delightful project that's perfect for meal prep enthusiasts! You can prepare the colored gel mixture up to 24 hours in advance and store it in airtight containers in the refrigerator to maintain its texture and vibrancy. Additionally, you can mix in your preferred natural colorants and even add optional decorations, ensuring they are well distributed. When you're ready to create, simply spread the gel onto the non-stick surface and allow it to air dry for 24-48 hours. Remember to flip them halfway through drying to prevent curling, and you'll be rewarded with stunning suncatchers that are just as beautiful as if made fresh!

Bioplastic Suncatchers Recipe FAQs
What type of ingredients should I use for the bioplastic suncatchers?
Absolutely! Use biodegradable and non-toxic ingredients like water, cornstarch, white vinegar, unflavored gelatin (or agar-agar for a vegetarian option), and natural food-safe colorants. This way, you will ensure that your suncatchers are both fun to make and eco-friendly!
How should I store my dried bioplastic suncatchers?
To maintain their vibrant colors and structure, keep your suncatchers in a cool, dry area away from direct sunlight. I recommend using an airtight container or a sealed bag to prevent dust and moisture from affecting them. This simple step will significantly extend their lifespan and keep them looking beautiful!
Can I freeze the leftover gel mixture for my bioplastic suncatchers?
Yes, you can store any leftover gel mixture! Place it in an airtight container and keep it in the refrigerator for up to one week. If you decide to freeze it instead, be sure to use a freezer-safe container and it should be good for up to 3 months. Just thaw it in the fridge overnight before using it again, and give it a good stir to restore its texture.
What should I do if my suncatchers curl during drying?
Don't worry; this can be easily avoided! Make sure to flip your suncatchers halfway through the drying process (after about 12-24 hours). This helps them dry evenly and prevents curling. If you notice any curling after they are completely dry, gently reshape them with a warm hand or carefully press them flat under a heavy, flat object for a short time.
Are the materials used in bioplastic suncatchers safe for kids?
Very! Though the suncatchers are made from non-toxic ingredients, they are not edible. Always supervise young children during the crafting process to avoid any mishaps. Ensuring safe crafting helps everyone enjoy the fun while keeping their environments clean and safe.
How can I customize my bioplastic suncatchers?
You can truly let your creativity shine! Mix and match different natural colorants, incorporate shapes, or add embellishments like biodegradable glitter or pressed flowers into your designs. The more unique touches you add, the more personal and delightful your suncatchers will be!
Brighten Your Day with Bioplastic Suncatchers: Eco-Friendly Fun!
Equipment
- Medium saucepan
- Spatula
- Non-stick surface (e.g., parchment paper)
- bowl
- Hole puncher
Ingredients
Bioplastic Suncatcher Ingredients
- ½ cup Water Base liquid for the mixture
- 2 tablespoon Cornstarch Provides structure and thickness
- 1 tablespoon White Vinegar Enhances texture; can substitute with lemon juice or apple cider vinegar
- 1 tablespoon Unflavored Gelatin Powder Solidifies the mixture; can use agar-agar for a vegetarian option
- as needed Natural or Food-Safe Coloring For vibrant colors (e.g., beet juice, spirulina, turmeric)
- as desired Optional Add-ins Fine glitter, dried flower petals, or tissue paper
Instructions
How to Make Bioplastic Suncatchers
- Combine Ingredients: In a medium saucepan, mix ½ cup water, 2 tablespoon cornstarch, 1 tablespoon white vinegar, and 1 tablespoon gelatin. Stir until smooth and creamy.
- Heat Mixture: Warm the mixture on medium-low heat while stirring for 3–5 minutes until thickened.
- Color the Gel: Divide thickened mixture into bowls and add natural colorants to each.
- Shape the Suncatchers: Spread colored gel on a non-stick surface, creating fun shapes.
- Add Embellishments: Sprinkle chosen decorations on the gel before it sets.
- Dry Suncatchers: Allow creations to air dry in a ventilated space for 24–48 hours, flipping halfway through.
- Finish and Display: Use a hole punch to create holes for hanging and display with string or suction cups.


Leave a Reply