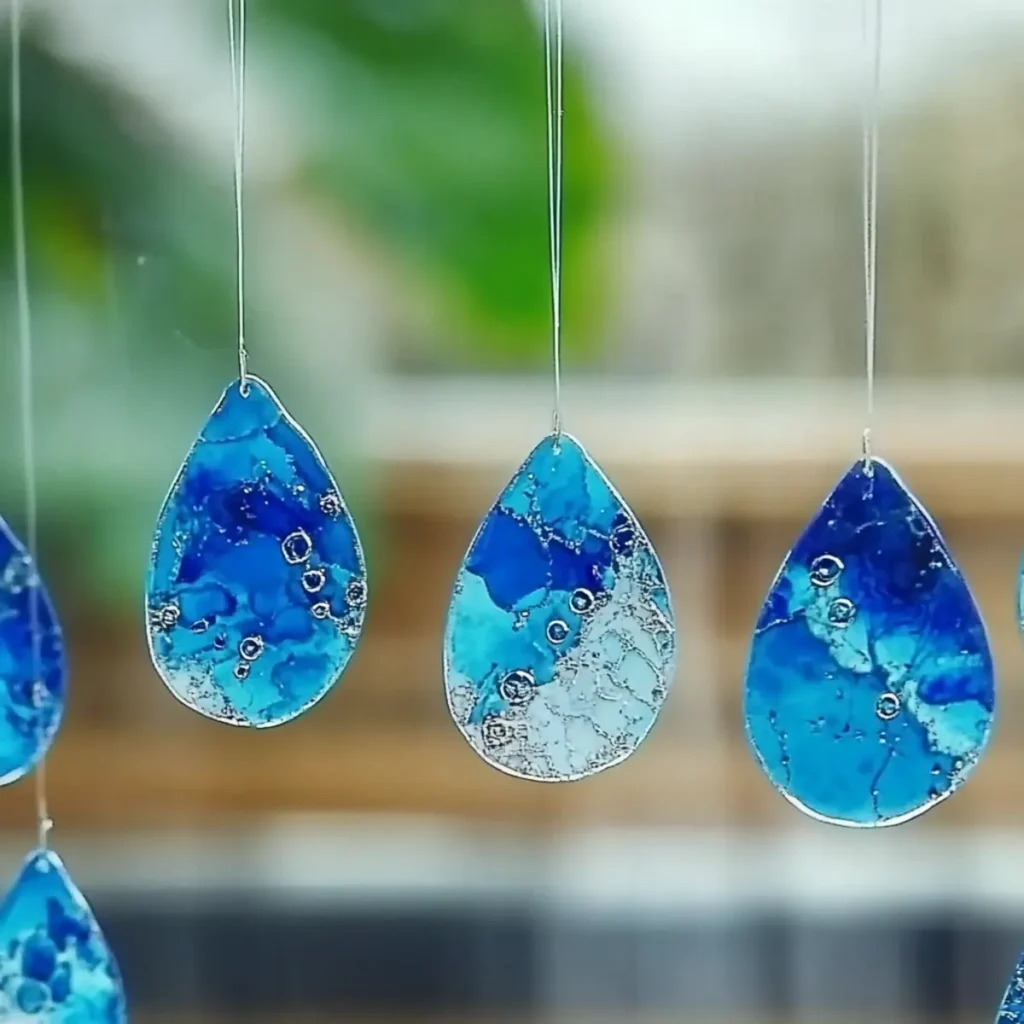
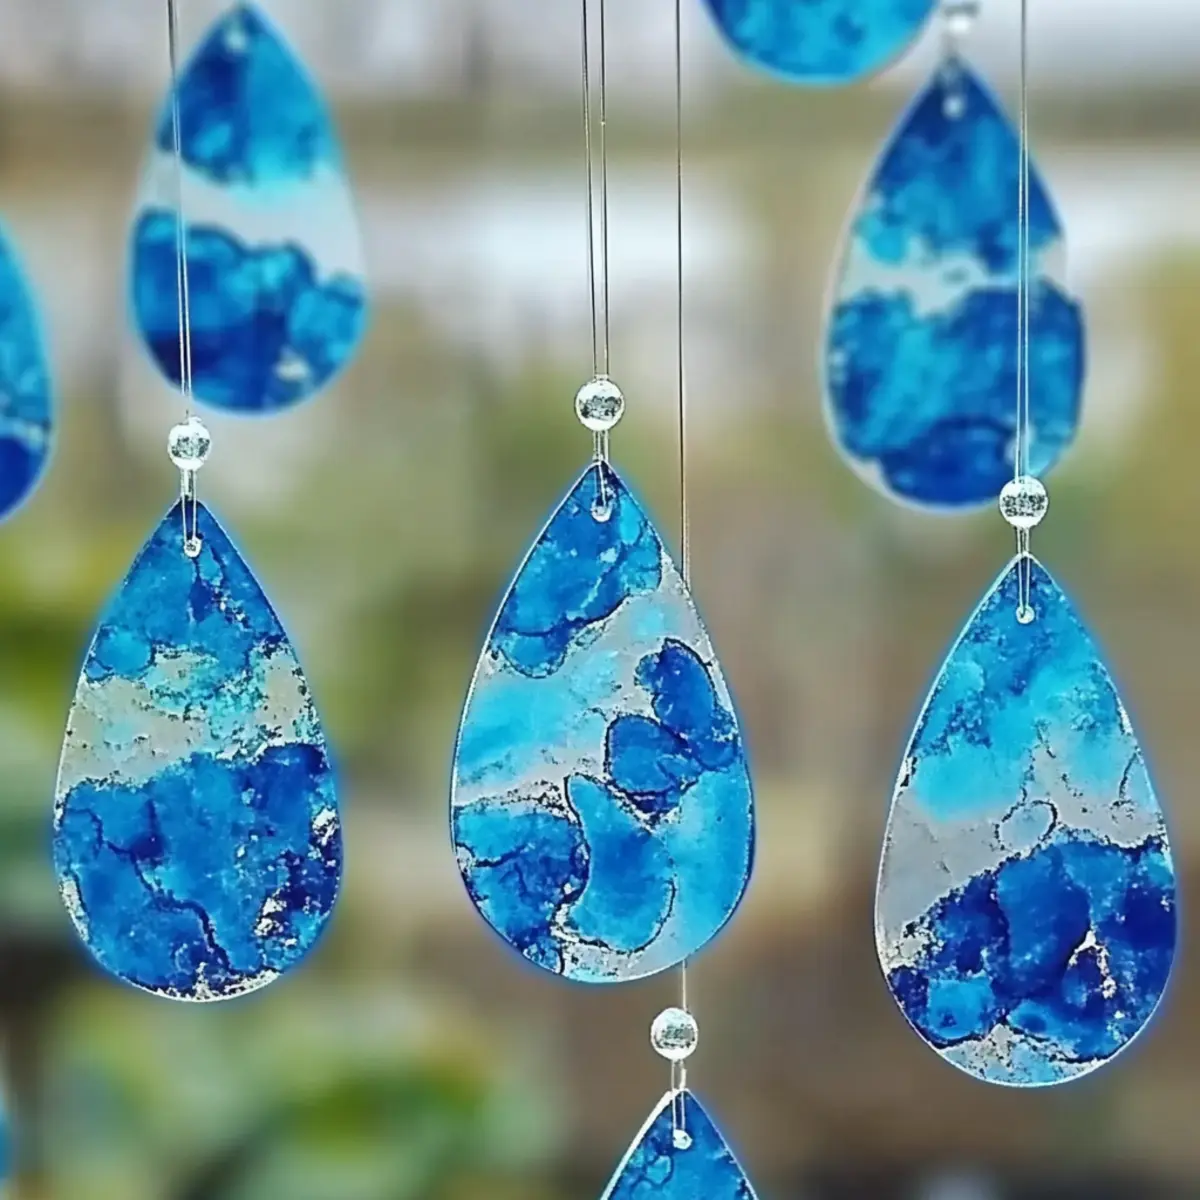
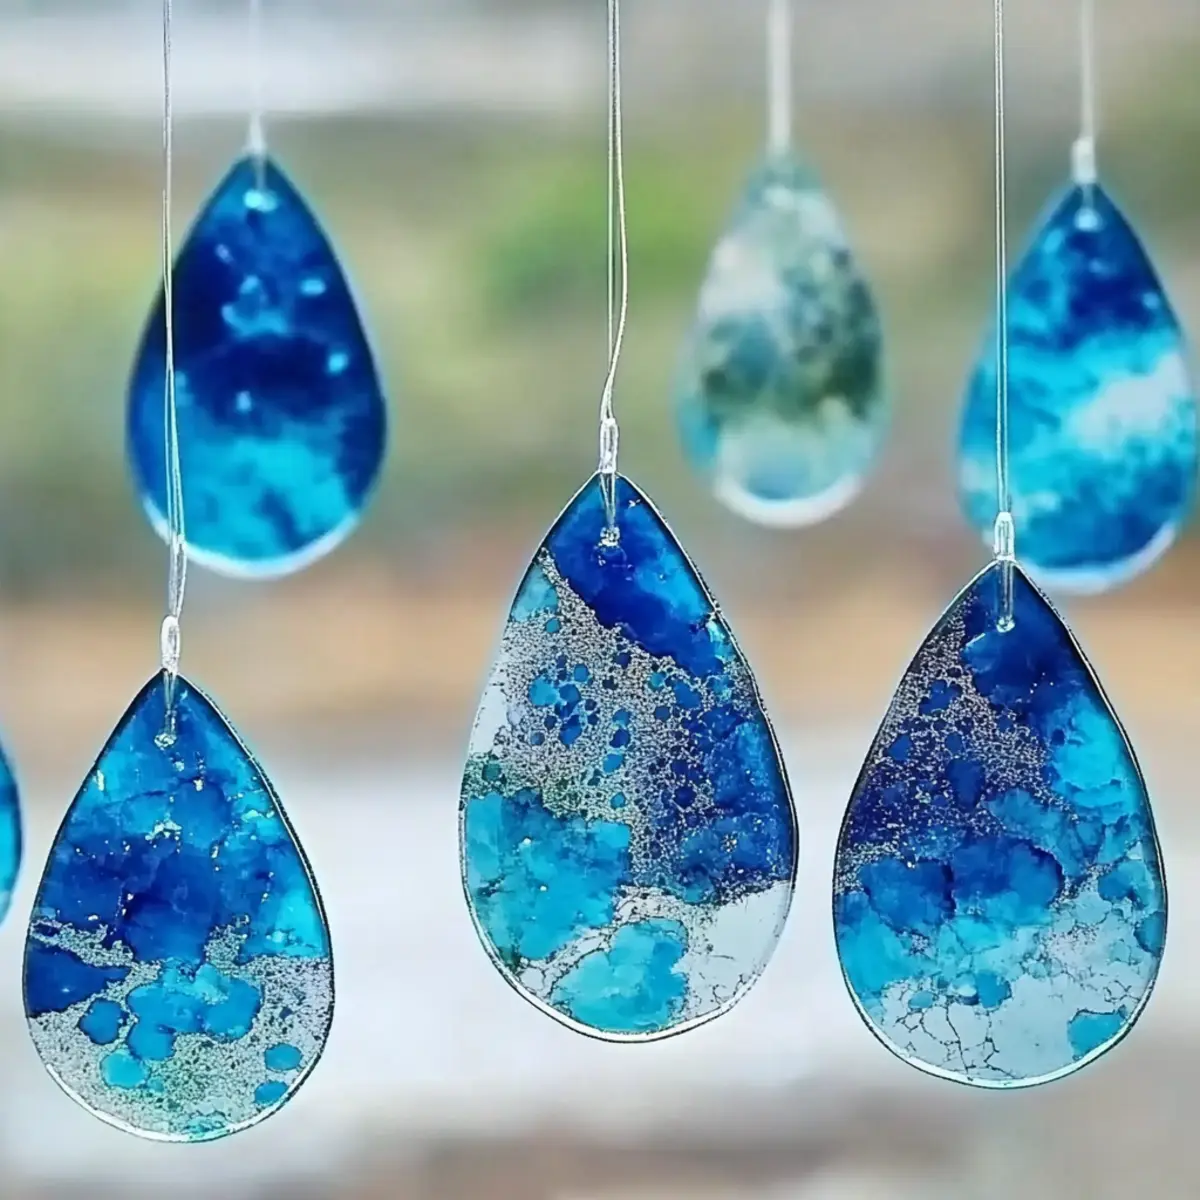
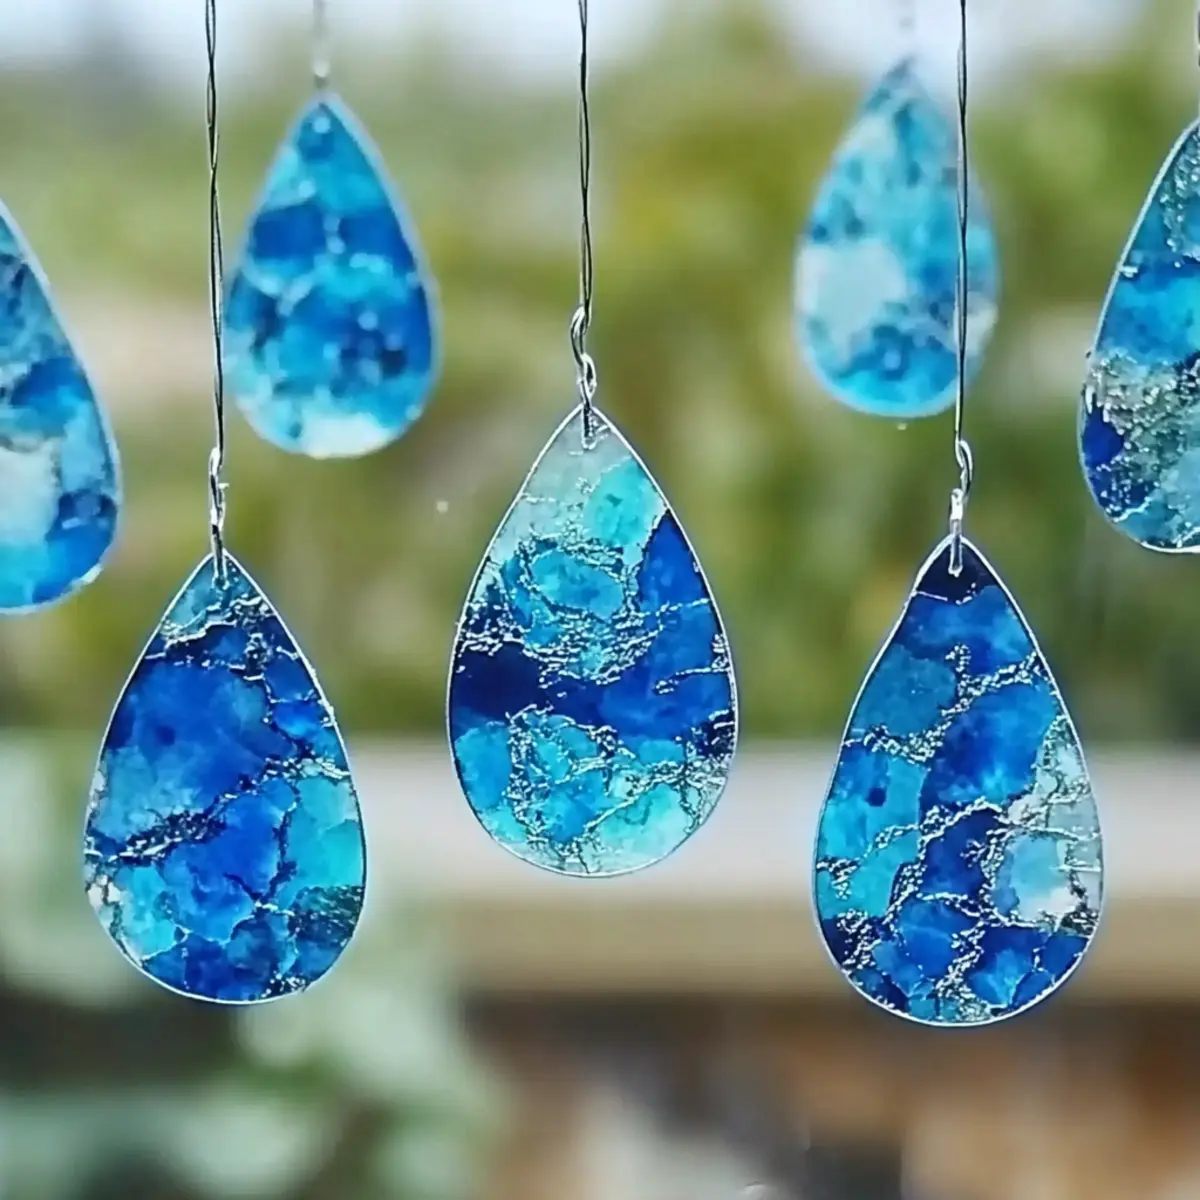
Rainy days have a way of getting us down, but I've discovered a delightful way to lift the spirits and brighten up our homes! Inspired by the sparkling waters of the ocean, these Blue Crayon Raindrop Suncatchers transform gloomy days into a kaleidoscope of color. Picture this: the rich blue hues swirling together, catching the light and casting a shimmering glow that seamlessly dances through your windows.
I stumbled upon this DIY craft idea while rummaging through old supplies, and I knew I had to share it. This family-friendly project is not just about creating something beautiful; it invites creativity, teamwork, and excitement into your home. Plus, it's incredibly simple to make! With just a few basic materials and some imaginative sparks, anyone-from the tiniest tots to crafty adults-can craft these gorgeous oceanic suncatchers.
So, gather up your blue crayons and let's dive into this fun-filled activity that guarantees to bring a splash of joy, even on the rainiest of days!
Why Blue Crayon Raindrop Suncatchers Will Delight You?
Transform your space: Blue Crayon Raindrop Suncatchers add a whimsical touch to any window, illuminating your home.
Family-friendly fun: This DIY project invites everyone to join in-perfect for kids and adults alike!
Easy & quick: You only need a few materials and minimal time to craft these stunning pieces.
Endless creativity: Customize shapes and shades to tailor your suncatchers to match your decor.
Mood-enhancing colors: The vibrant blues evoke the serene ocean, brightening even the dreariest days.
Experience this cheerful activity that encourages creativity and brings a splash of joy to your home!
Blue Crayon Raindrop Suncatchers Ingredients
For the Suncatchers
- Blue Crayons - Provides the vibrant ocean hues that make these suncatchers pop; mix shades for an amazing layered effect.
- Waxed Paper - Essential for creating your suncatcher; two sheets are needed to encapsulate the melted crayon layers.
- Iron - Necessary for melting the crayon shavings; always supervise children while using it to ensure safety.
- Scissors - For cutting the waxed paper into beautiful shapes once the suncatchers are complete.
- Embroidery Floss or String - Perfect for hanging your colorful suncatchers in windows or around the house.
- Hole Punch - Creates the hole needed for stringing up your delightful suncatchers.
- Marker - Useful for sketching outlines of raindrop shapes or other imaginative designs.
- Old Towel or Parchment Paper - Protects the ironing surface and prevents mess during the melting process.
- Pencil or Crayon Sharpener - Use this to get fine shavings from your blue crayons, essential for that radiant effect.
Dive into this wonderfully easy craft, and let your creativity run wild with these Blue Crayon Raindrop Suncatchers to brighten any rainy day!
How to Make Blue Crayon Raindrop Suncatchers
-
Prep Crayons: Start by using your pencil sharpener to shave down the blue crayons. Aim for fine shavings to achieve that lovely layered look. Set a cozy workspace, and get the kids involved in this fun step!
-
Layering Crayon Shavings: Lay one sheet of waxed paper flat on your ironing board. Sprinkle a generous amount of the crayon shavings, creating an even layer. Cover this with the second sheet of waxed paper to trap the colors inside.
-
Ironing: Carefully set your iron to low heat and gently press it over the top layer of waxed paper. Glide the iron back and forth to melt the crayon shavings into beautiful, blended designs. Keep an eye out for any smoke-if it occurs, lift the iron away and check.
-
Cooling & Cutting: Allow the melted creation to cool completely. Once it's cool, grab your scissors, and cut out fun shapes like raindrops or clouds-whatever makes you happy!
-
Creating Hanging Holes: With the hole punch, create a small hole at the top of each shape. This space is essential for threading your string or embroidery floss.
-
Finishing Touches: Thread the string or floss through the hole and tie a secure knot. Your delightful suncatchers are now ready to hang in sunny windows!
Optional: Try adding glitter to the crayon shavings for an extra sparkle effect!
Exact quantities are listed in the recipe card below.
Storage Tips for Blue Crayon Raindrop Suncatchers
- Room Temperature: If displayed, keep them out of direct sunlight to prevent melting and fading for an extended period.
- Flat Storage: If not hanging immediately, store assembled suncatchers flat between sheets of wax paper in a cool, dry place to maintain their shape and shine.
- Handling with Care: Be gentle while moving or storing to avoid any bending or damage to the delicate designs.
- Longevity: When properly stored, your Blue Crayon Raindrop Suncatchers can last for months, bringing sunshine to your home even on bleak days.
Make Ahead Options
These Blue Crayon Raindrop Suncatchers are not just a delightful craft; they can easily fit into your busy schedule with simple make-ahead options! You can prep the crayon shavings up to 24 hours in advance. Store the shavings in a sealed container to keep them fresh and avoid any mess. Additionally, you can layer the crayon shavings between sheets of waxed paper and secure them for up to 3 days until you're ready to iron and cut them into shapes. When you're ready to finish, simply proceed with the ironing step to melt the shavings, let them cool, and then cut them into your desired forms. This way, you'll enjoy a stress-free crafting session, even on the busiest days!
What to Serve with Blue Crayon Raindrop Suncatchers?
Brightening up rainy days with these charming crafts is sure to inspire warmth and creativity!
-
Sunny Lemonade: This refreshing drink mirrors the vibrant colors of your suncatchers, adding a splash of joy to any day. Garnish with mint for a fresh twist!
-
Tropical Fruit Salad: A delicious mix of juicy pineapple, mangoes, and blueberries will evoke sunny beach memories, complementing the ocean theme beautifully.
-
Artistic Canvas Decor: Consider creating beach-themed canvas paintings to display alongside your suncatchers. This enhances the whimsical atmosphere in your home.
-
Colorful Nature Walk: Organize a family outing to collect colorful leaves and flowers, inspiring your next crafting session and creating a connection with nature.
-
Playful Music Playlist: Set the mood while crafting with charming ocean-inspired tunes. Music can uplift spirits and enhance creativity during your suncatcher-making session!
Transform your rainy days into joyful crafting moments with these delightful pairings!
Blue Crayon Raindrop Suncatcher Variations
Get ready to add your personal flair to these delightful suncatchers and elevate your rainy-day crafting!
-
Rainbow Colors: Use a variety of crayons to mix in vibrant hues, creating a stunning rainbow effect that captures every color of the spectrum. Embrace the joy of color-each layer becomes a testament to your creativity!
-
Glitter Dust: Sprinkle some glitter among the crayon shavings before melting to add a sparkling touch, lighting up your suncatchers like stars in the night sky. This magical twist will mesmerize anyone who sees it!
-
Stained Glass Look: Replace waxed paper with clear plastic sheets for a bolder, more transparent design that mimics stained glass. This eye-catching alternative allows light to shine through brilliantly and brings an elegant touch to any space.
-
Thematic Shapes: Instead of traditional raindrops, get adventurous with thematic shapes like fish, shells, or even waves for a deeper ocean feel. This will foster creativity and make your suncatchers even more unique!
-
Layer Textures: Mix in different textures by adding small beads or sequins within the crayon shavings, creating visual intrigue and sensory elements that make your suncatchers pop. Each creation becomes a sensory experience!
-
Scented Crayons: Crush scented crayons or use scented markers to create a delightful aroma alongside your vibrant designs. Imagine being surrounded by the scent of fresh ocean breezes while you enjoy your stunning artwork!
-
Seasonal Themes: Adjust the color palette and shapes based on the seasons-think warm oranges and yellows for autumn leaves or snowy whites and blues for winter flakes. Every season can bring a new splash of creativity!
-
Nature-Inspired Twists: Incorporate elements like leaf patterns or floral designs to blend natural themes effectively. This connection to nature shines through your creations while celebrating the beauty of the world around us!
Expert Tips for Blue Crayon Raindrop Suncatchers
- Iron Settings: Be sure to set your iron on low heat; this prevents the waxed paper from burning and ensures smooth melting.
- Layering Colors: For an eye-catching ocean effect, layer different shades of blue crayon shavings when creating your suncatchers.
- Shape Creativity: Use cookie cutters or templates for uniform shapes like fish or starfish to add a fun twist to your suncatchers.
- Cooling Safely: Allow the melted suncatchers to cool completely before handling to prevent burns and ensure the shape holds well.
- Storage Tips: If not hanging immediately, store your completed suncatchers flat between sheets of wax paper to keep them pristine.
Blue Crayon Raindrop Suncatchers Recipe FAQs
What kind of blue crayons should I use?
Absolutely any brand will do, but I recommend using a combination of shades to achieve a rich and layered ocean effect. Look for vibrant blues that will melt well and create that stunning visual impact!
How do I store the finished Blue Crayon Raindrop Suncatchers?
To keep your beautiful creations in perfect condition, store them flat between sheets of wax paper in a cool, dry place. Avoid direct sunlight, as it can cause the colors to fade over time. If displayed, try to place them away from any bright beams to preserve their brilliance!
Can I freeze Blue Crayon Raindrop Suncatchers?
While it's not typical to freeze these suncatchers, if you need to store them long-term and are worried about them bending or warping, you could try wrapping them flat in wax paper and placing them in a freezer-safe container. Just remember to thaw them gradually at room temperature before displaying!
What should I do if the crayon shavings don't melt properly?
If your crayon shavings aren't melting as expected, ensure your iron is set to low heat and that you're pressing it evenly across the waxed paper. If you notice any smoke, lift the iron immediately to prevent burning but resume after checking the temperature. Sometimes, adding a thin piece of parchment paper above the crayon layer can help disperse heat evenly and avoid scorching.
Are these suncatchers safe for young children to make?
Very! While the crafting process is great for kids, parental supervision is essential, especially when using the iron. Encourage them to help with the crayon sharpening and layering but handle the melting and cutting tasks yourself for safety. It's a fun way to bond and inspire creativity together!

Brighten Rainy Days with Blue Crayon Raindrop Suncatchers! ☔💙
Equipment
- Iron
- Scissors
- Hole Punch
- Pencil sharpener
Ingredients
For the Suncatchers
- 8 crayons Blue Crayons Mix shades for layered effect.
- 2 sheets Waxed Paper Essential for encapsulating melted crayons.
- 1 Iron Necessary for melting crayon shavings.
- 1 piece Old Towel or Parchment Paper Protects the ironing surface.
- 1 Embroidery Floss or String For hanging suncatchers.
- 1 Marker For sketching shapes.
- 1 Pencil or Crayon Sharpener To achieve fine shavings.
- 1 Scissors For cutting waxed paper shapes.
- 1 Hole Punch For creating holes for hanging.
Instructions
How to Make Blue Crayon Raindrop Suncatchers
- Prep Crayons: Use your pencil sharpener to shave down the blue crayons into fine shavings.
- Layering Crayon Shavings: Lay one sheet of waxed paper flat and sprinkle a generous layer of crayon shavings, cover with another sheet.
- Ironing: Set your iron to low heat and gently press it on the top waxed paper layer to melt the crayon shavings.
- Cooling & Cutting: Allow melted creation to cool completely, then cut out fun shapes using scissors.
- Creating Hanging Holes: Use a hole punch to create holes at the top of each shape for hanging.
- Finishing Touches: Thread the string or floss through the hole and tie a knot to hang.


Leave a Reply