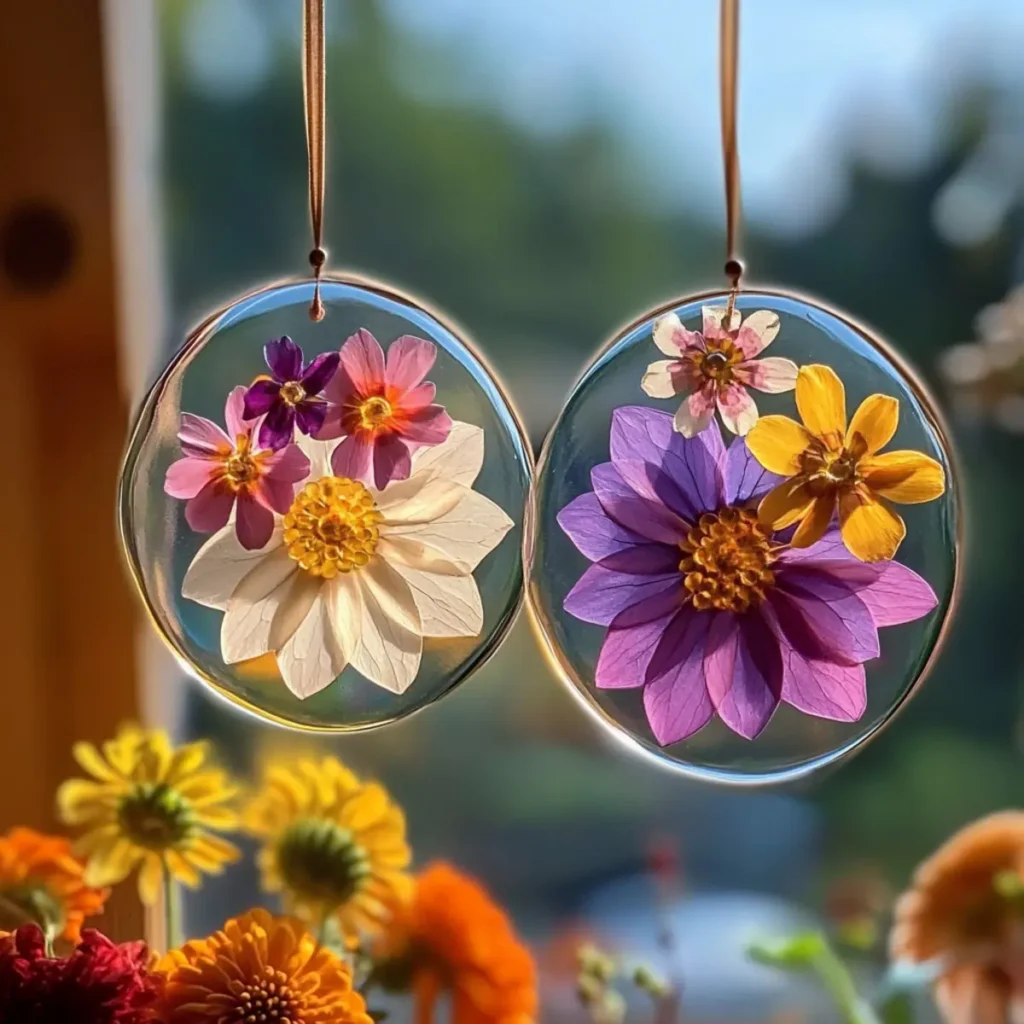
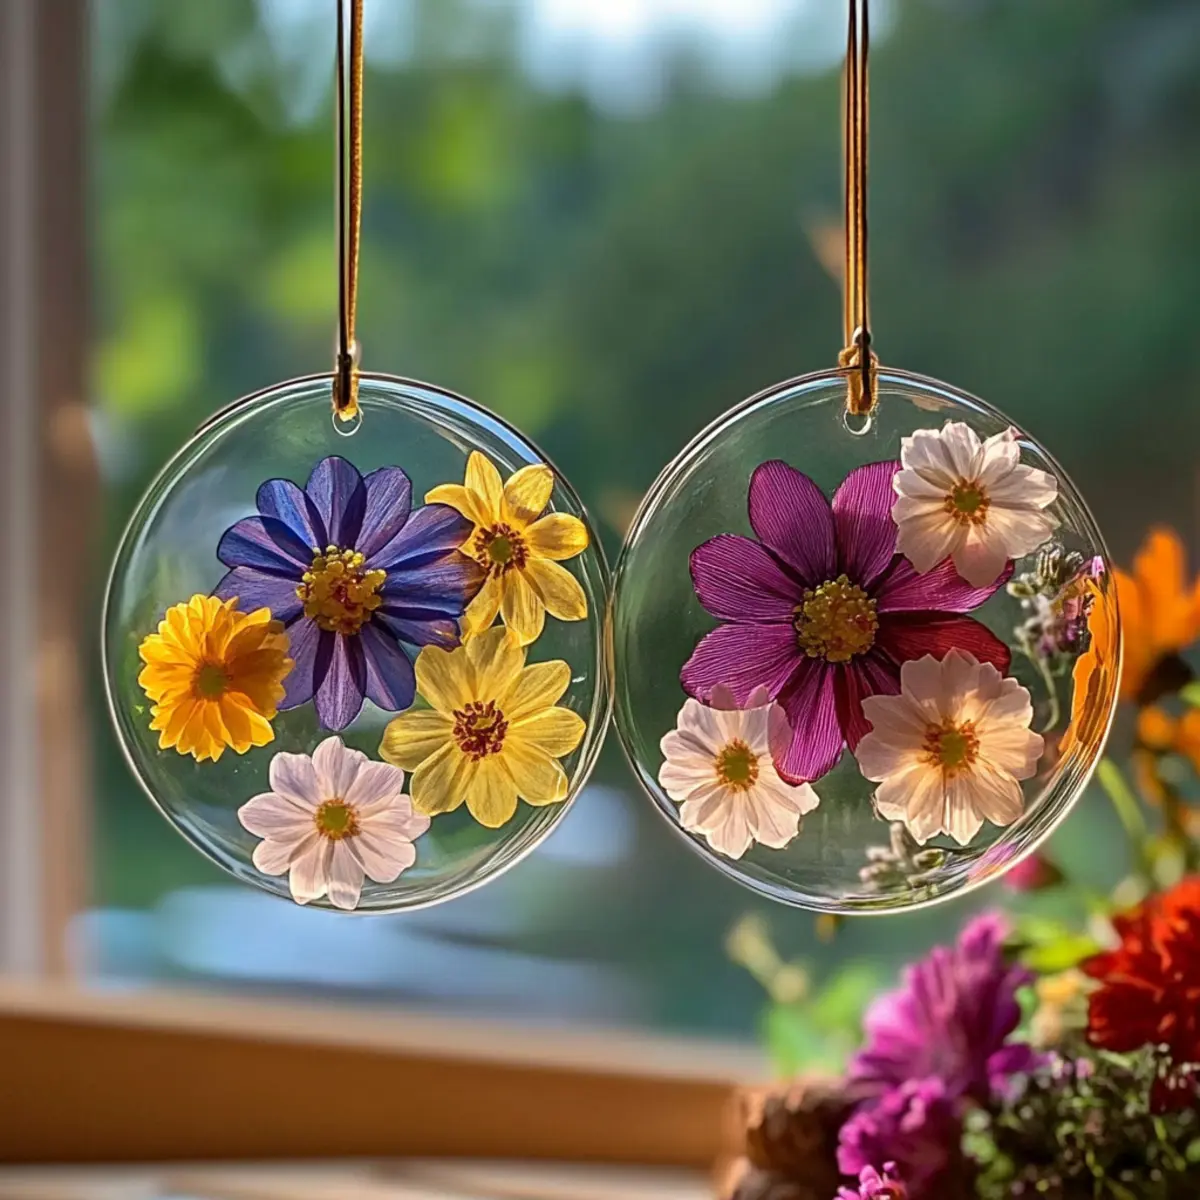
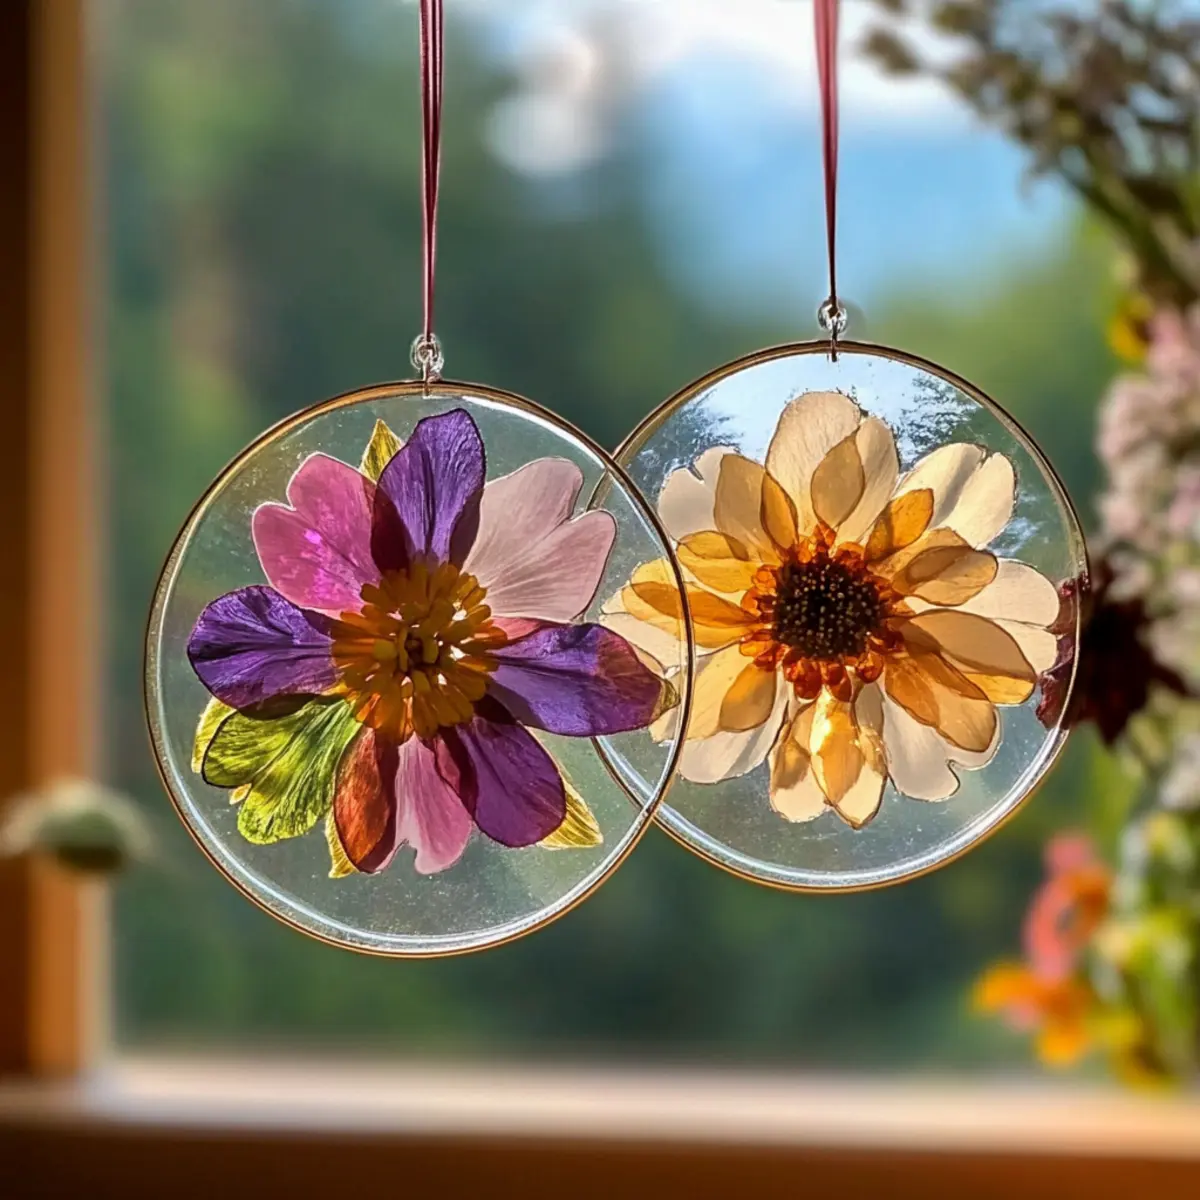
As the sun begins to peek through the clouds and the flowers bloom in vibrant colors, there's nothing quite like the joy of bringing a piece of that beauty indoors. I recently revived my love for crafting and stumbled upon the delightful art of making Clear Glue Flower Suncatchers-a fun, simple project that transforms every glint of sunlight into a colorful masterpiece. This craft isn't just for seasoned artists; it's perfect for everyone, from kids eager to explore their creativity to adults seeking a relaxing way to celebrate nature.
Imagine lounging by the window, sipping your morning coffee, and being greeted by the sight of pressed flowers dancing in the light. Not only do these suncatchers brighten your space, but they also allow for endless creativity-they can be personalized with tissue paper scraps, sequins, or any natural elements you love. Join me in turning your home into a gallery of sunshine and color with this easy DIY craft!
Why Are Clear Glue Flower Suncatchers So Special?
Simple and Fun: This craft is a breeze to make, perfect for all skill levels, turning quiet afternoons into creative adventures.
Nature's Beauty Inside: Pressed flowers add a personal touch, showcasing what you love about nature right in your home.
Versatile Variations: Mix and match tissue papers and sequins to create endless designs! Use different seasonal elements for a fresh look throughout the year.
A Captivating Glow: Watch how sunlight illuminates your creations, filling any space with vibrant colors and cheerful vibes.
Perfect for All Ages: Whether you're crafting with kids or enjoying some "me time," these suncatchers offer a delightful way to unwind.
Elevate your crafting game and discover more amazing DIY ideas!
Clear Glue Flower Suncatcher Ingredients
• Gather your crafting supplies for the perfect Clear Glue Flower Suncatchers, an artful way to brighten your home!
For the Base
- Clear school glue - Use Elmer's for best adherence and transparency.
- Plastic lid or clear acetate sheet - Acts as a mold; a yogurt container lid gives excellent shape.
For the Decoration
- Pressed flowers - Choose seasonal blooms for their vivid colors.
- Tissue paper scraps - Use colorful pieces to create a vibrant mosaic effect.
- Glitter - Sprinkle fine or chunky glitter to add that extra sparkle.
- Sequins - Choose various shapes for an engaging visual twist.
- Dried leaves - Incorporate these for a natural, autumnal feel; thin leaves work best.
For Finishing Touches
- String, ribbon, or suction cup hook - Essential for hanging your beautiful creation; pick based on your style!
- Scissors - Handy for trimming any excess materials to the perfect size.
- Wax paper or parchment - Protects surfaces while crafting.
- Hole punch - Used for creating a hanging hole once your suncatcher is finished.
- Black marker (optional) - Great for outlining edges and enhancing that stained-glass effect.
Combine these ingredients and let your creativity flow as you create your unique Clear Glue Flower Suncatchers!
How to Make Clear Glue Flower Suncatchers
-
Prepare your workspace: Start by setting up a clean, flat area and cover it with wax paper. This protects your surface and makes cleanup easy after your fun crafting session.
-
Pour the glue: Take your clear school glue and pour a thin layer into the plastic lid or onto the acetate sheet. Aim for an even distribution to make a smooth base for your beautiful design.
-
Arrange your decorations: Begin placing your pressed flowers and colorful tissue paper scraps on top of the glue layer. Let your creativity shine as you combine different colors and shapes!
-
Add sparkle: Gently sprinkle glitter and sequins over your design, letting your imagination run wild. The more, the merrier when it comes to adding some sparkle to your suncatcher!
-
Seal your design: Carefully pour another thin layer of clear glue over your decorations to seal everything in place. This will give your suncatcher a glossy, finished look once it dries.
-
Dry completely: Allow your suncatcher to dry in a warm, flat area, which can take up to 24 hours. This waiting time is essential to ensure everything adheres properly and looks beautiful!
-
Remove from mold: Once dry, gently peel your suncatcher away from the mold. Take your time here to avoid any damage while revealing your colorful creation.
-
Create a hanging hole: Use a hole punch to carefully create a hole for hanging your masterpiece. Then, attach your preferred string, ribbon, or suction cup hook to get your suncatcher ready to shine in your window.
Optional: Consider using colorful strings or ribbons that match your suncatcher theme for a cohesive look!
Exact quantities are listed in the recipe card below.

Clear Glue Flower Suncatcher Variations
Feel free to get creative with your suncatcher designs and explore these fun ideas!
-
Seasonal Blooms: Use different pressed flowers based on the season, like daffodils for spring or maple leaves for fall, to capture nature's changing beauty.
-
Colorful Tissue Paper: Swap in vibrant colored tissue paper scraps for a more dynamic mosaic effect, adding layers of color that catch the light beautifully.
-
Metallic Touch: Incorporate metallic sequins for a modern twist. Their shine adds a chic elegance that sparkles in the sunlight, creating a stunning visual impact.
-
Nature Impressions: Try using small, leaf-shaped objects or petals pressed into the glue. This adds texture and an organic feel, turning your suncatcher into a nature-inspired art piece.
-
Outlining Details: Use a black marker to outline around the edges for a stained-glass effect. Not only does this highlight your design, but it also enhances the vivid colors of your flowers.
-
Mixed Media: Add elements like beads or fabric scraps for a truly unique design, giving your suncatcher a 3D feel that stands out against the sun.
-
Floral Silhouettes: Use only silhouette flowers, such as flat daisies or ferns, for an airy effect. This lets light pass through while showcasing nature's delicate forms.
-
Thematic Suncatchers: Create a themed suncatcher for holidays-think red and green for Christmas or vibrant pastels for Easter. This personal touch makes them perfect decorations for any occasion.
Expert Tips for Clear Glue Flower Suncatchers
-
Choose Fresh Flowers: Select flowers that are fully dried to prevent mold growth; using partially dried flowers increases the risk of spoilage over time.
-
Control Glue Application: Avoid pouring too much glue; excess can drip and ruin your design. A thin, even layer is best for a smooth finish.
-
Color Combinations: Experiment with color contrasts among tissue paper scraps and flowers. Pair bright and pastel shades for a stunning visual effect in your Clear Glue Flower Suncatchers.
-
Drying Time Matters: Be patient! Allow at least 24 hours for the suncatcher to dry completely to ensure all elements stick firmly and achieve that glossy look.
-
Careful Removal: When peeling your suncatcher from the mold, do it slowly to prevent tearing. This reveals your beautiful creation without mishaps.
-
Personalize Your Design: Add unique elements like beads or fabric pieces. The more personal touches you include, the more vibrant and special your Clear Glue Flower Suncatchers will be!
Make Ahead Options
These Clear Glue Flower Suncatchers are a fantastic project for busy home cooks and crafters looking to save time! You can prepare the pressed flowers and tissue paper scraps up to 3 days in advance. Simply keep the flowers and paper in an airtight container in a cool, dry place to maintain their freshness and prevent wilting. When you're ready to create, pour a layer of glue into your mold, arrange your prepped decorations, sprinkle glitter, and seal it with another layer of glue. Allow the suncatcher to dry completely (which can take up to 24 hours) before popping it out of the mold and creating a hanging hole for display. This way, you can enjoy crafting these delightful decorations without any last-minute rush!
Storage Tips for Clear Glue Flower Suncatchers
-
Room Temperature: Keep your suncatchers in a dry, cool place away from direct sunlight to prevent fading and deterioration of the flowers.
-
Fridge: For extended preservation, you can store them in the refrigerator, but make sure they are wrapped in a breathable material to avoid moisture build-up-good for up to 2 weeks.
-
Display: Once dried, hang your Clear Glue Flower Suncatchers in windows or on walls to enjoy their beauty while keeping them safe from potential damage.
-
Reheating: If you notice any warping after storage, gently warm them with a hairdryer set on low to reshape them, but avoid overheating to maintain their integrity.
What to Serve with Clear Glue Flower Suncatchers?
Set the mood for a delightful crafting session with these charming additions. They'll enhance the fun of creating beautiful art pieces while complementing the joyful atmosphere of your DIY project.
-
Bright Fruit Juice: Freshly squeezed orange or apple juice brings a burst of sweetness that energizes your creative spirit. Pair them with refreshing fruits as an easy snack!
-
Herbal Tea: A soothing cup of chamomile or mint tea provides a calming backdrop, perfect for focusing on your artistic endeavors. Its warmth can inspire creativity with every sip.
-
Cheese and Crackers Platter: Simple yet delightful, a platter with assorted cheeses and crunchy crackers keeps your energy up during your crafting marathon. The mix of flavors and textures is irresistible!
As you lounge by the window, savoring the vibrant sight of your suncatchers reflecting the sun's rays, why not treat yourself to these delightful snacks? They will make your crafting experience even more enjoyable!
-
Veggie Sticks with Hummus: Crunchy vegetables like carrots and bell peppers paired with creamy hummus create a healthy, satisfying treat to munch on while you create.
-
Mini Sandwiches: These easy-to-make bites give a taste of comfort-try fillings like cucumber and cream cheese or ham and cheese for variety. They're perfect for a quick energy boost!
-
Scented Candles: While not a snack, lighting a cheerful candle can create a cozy atmosphere. Choose floral or citrus scents to uplift your mood as you craft in comfort!
Brighten your afternoon crafting sessions with these pairing ideas that harmonize beautifully with the joy of making Clear Glue Flower Suncatchers!
Clear Glue Flower Suncatcher Recipe FAQs
What type of pressed flowers should I use?
Absolutely! It's best to use flowers that are fully dried to prevent mold growth. Seasonal blooms like daisies, pansies, or violets work wonderfully as they retain vivid colors. Try to pick flat, thin flowers for easier pressing and optimal adhesion when crafting.
How long do Clear Glue Flower Suncatchers last?
Very! If stored correctly in a dry, cool place away from direct sunlight, your suncatchers can happily last for years. If you need to preserve them for a particular occasion, placing them in the refrigerator in breathable wrapping can extend their life for up to 2 weeks.
Can I freeze my Clear Glue Flower Suncatchers?
While these suncatchers are not suitable for freezing due to the nature of the materials used, you can keep them in a cool and dry space rather than in cold storage. Avoid exposing them to moisture, which could damage them over time.
What should I do if my glue dripped while drying?
No worries! If you find that the glue has dripped, you can gently trim away any excess once fully dried with scissors for a neat finish. Alternatively, you can add decorative touches like colored tape or a black marker around the edges to mask any imperfections.
What's the best method for hanging my suncatcher?
For a delightful hanging presentation, use a suction cup hook, which allows for easy adjustments. Ensure to punch a hole at the top center of your suncatcher for balanced hanging. You can also get creative with colorful strings or ribbons that complement your design!
Can my pets interact with these suncatchers?
While the materials used in Clear Glue Flower Suncatchers aren't toxic, it's best to keep them out of reach of pets. Curious animals might chew on them or inadvertently knock them down, which can result in potential mess and damage to both the decor and your home.
Clear Glue Flower Suncatchers: Easy Art to Brighten Your Home
Equipment
- Plastic lid or clear acetate sheet
- Scissors
- Hole Punch
- Wax paper or parchment
Ingredients
For the Base
- 1 bottle Clear school glue Use Elmer's for best adherence and transparency.
- 1 Plastic lid or clear acetate sheet Acts as a mold.
For the Decoration
- Varies Pressed flowers Choose seasonal blooms for vivid colors.
- Varies Tissue paper scraps Use colorful pieces for a mosaic effect.
- 1 bag Glitter Fine or chunky for sparkle.
- Varies Sequins Various shapes for visual twist.
- Varies Dried leaves Thin leaves work best for autumn feel.
For Finishing Touches
- 1 String, ribbon, or suction cup hook For hanging your creation.
- 1 Scissors For trimming materials.
- 1 sheet Wax paper or parchment Protects surfaces while crafting.
- 1 Hole punch For creating a hanging hole.
- 1 Black marker (optional) For outlining edges.
Instructions
DIY Steps
- Prepare your workspace by setting up a clean area and covering it with wax paper.
- Pour a thin layer of clear school glue into the plastic lid or acetate sheet.
- Arrange pressed flowers and colorful tissue paper on top of the glue layer.
- Sprinkle glitter and sequins over your design.
- Seal your design with another thin layer of clear glue over the decorations.
- Allow your suncatcher to dry in a warm, flat area for up to 24 hours.
- Once dry, peel your suncatcher away from the mold.
- Use a hole punch to create a hole for hanging and attach string, ribbon, or hook.


Leave a Reply