
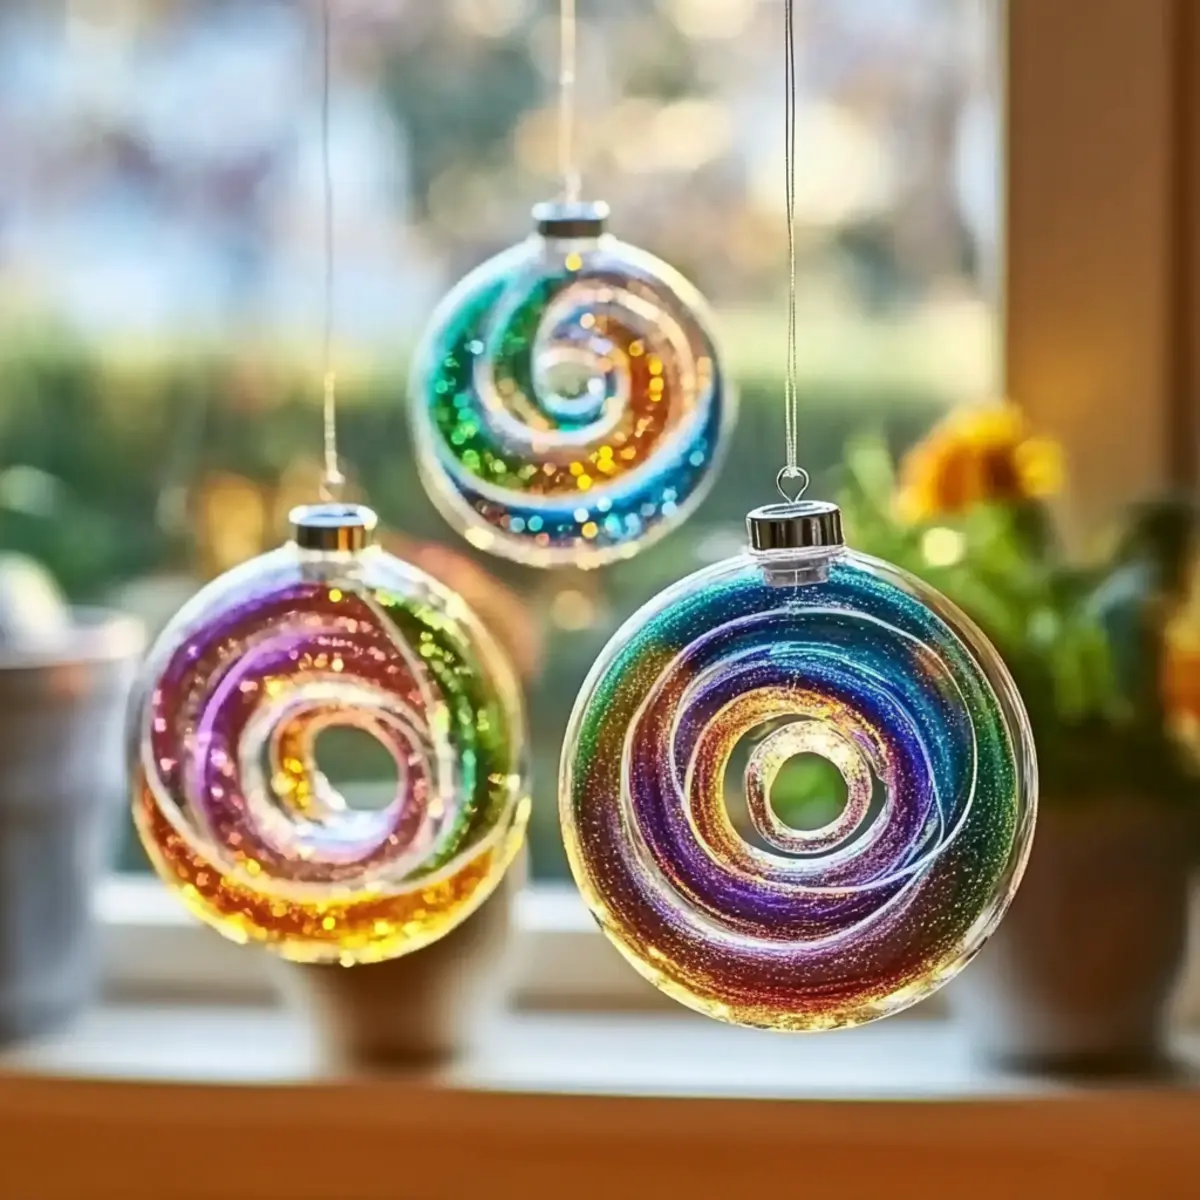
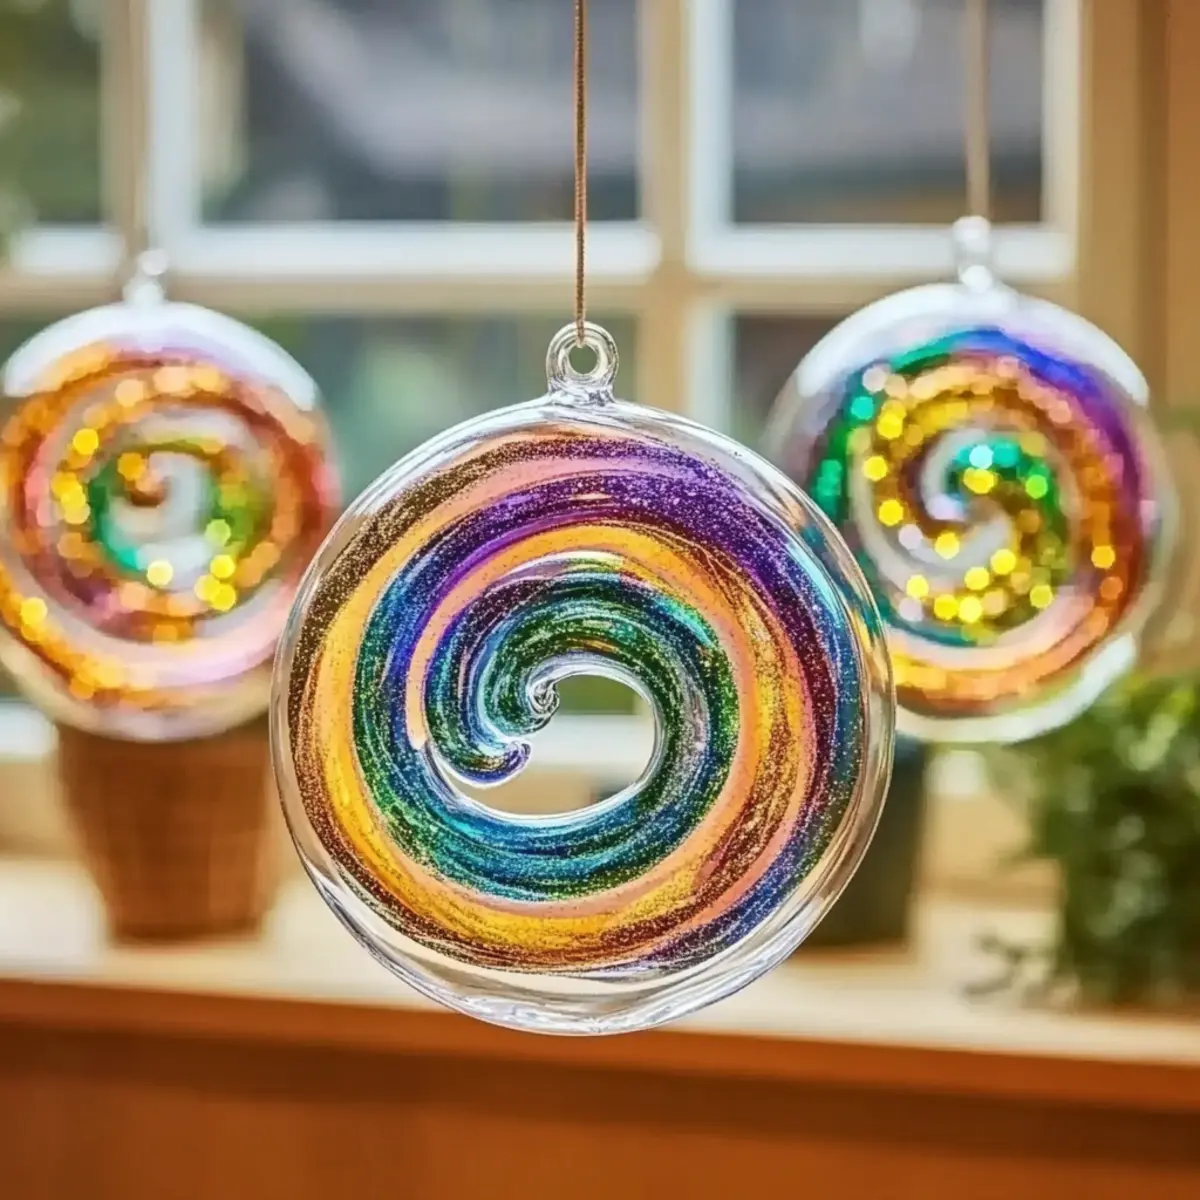
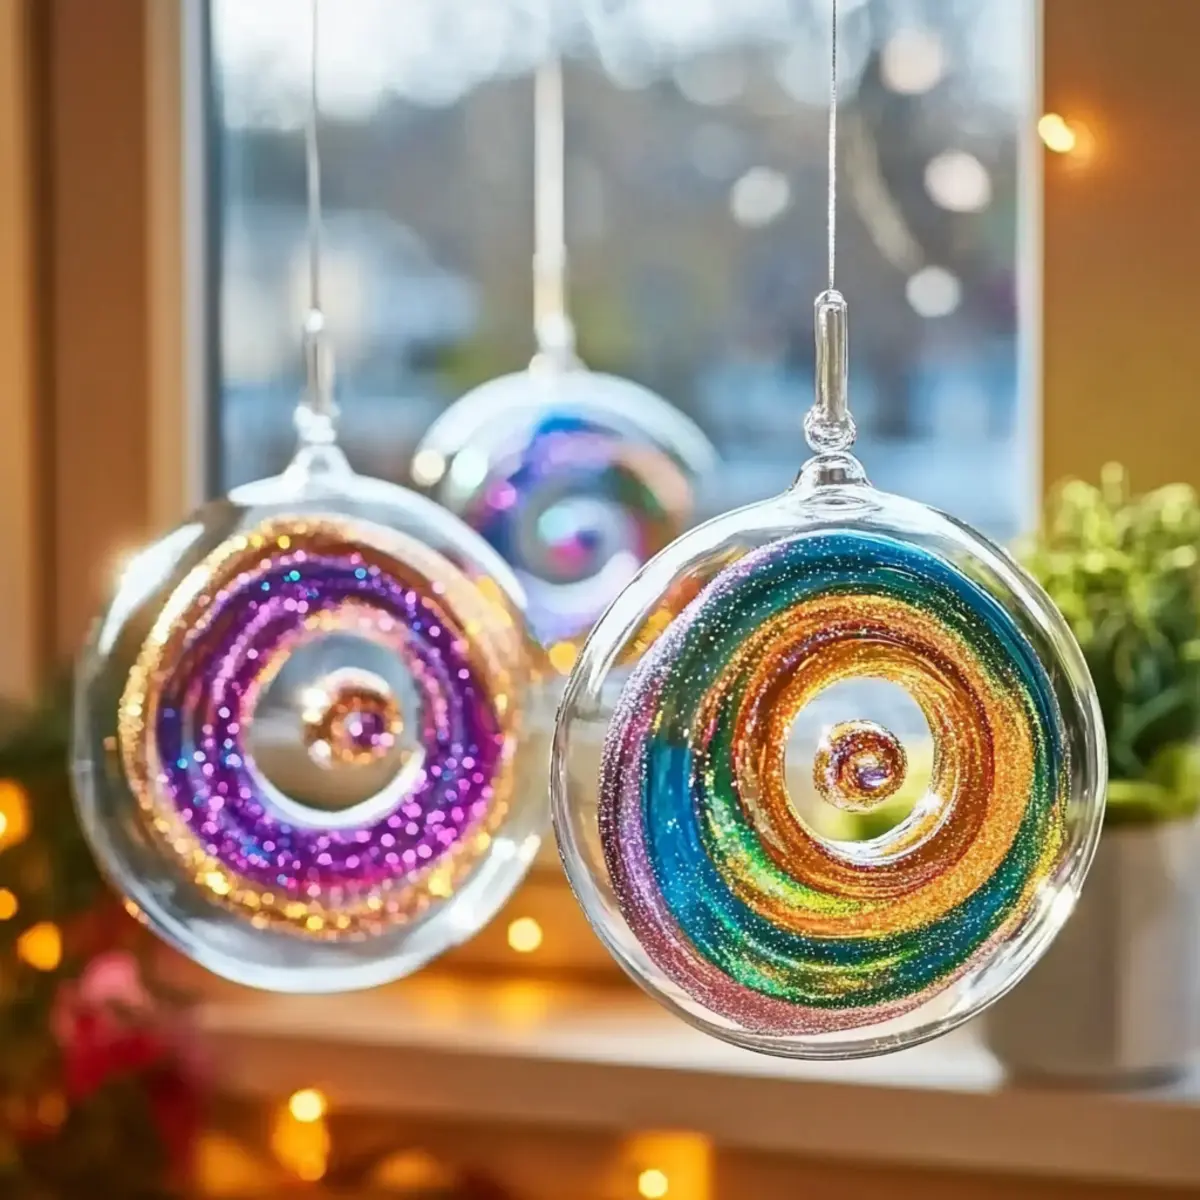
The glow of sunlight filtering through a kaleidoscope of colors has a special way of brightening any space. That's exactly what you'll create with this DIY Clear Glue Suncatcher Craft! Perfect for connecting with kids or tapping into your inner artist, this delightful project transforms everyday materials into a stunning window wonder. Just imagine the joy of watching the vibrant swirls catch the light, each hue dancing in harmony to create a mesmerizing effect akin to stained glass.
With just a few simple supplies you already have at home, you can unleash your creativity and make seasonal suncatchers that can be cherished year after year. Whether you choose to add sparkling glitter, playful sequins, or colorful beads, each suncatcher becomes a unique expression of art. So gather your crafting essentials, roll up your sleeves, and let's get started on making a whimsical centerpiece for your home that everyone will admire!
Why is Clear Glue Suncatcher Craft a Must-Try?
Creativity Unleashed: This craft is a fantastic way for kids and adults alike to express their artistic flair with vibrant colors and fun shapes.
Simple Supplies: Using everyday materials you likely have at home makes this project budget-friendly and accessible, ideal for spontaneous crafting sessions.
Sensory Appeal: The tactile experience of swirling colors and adding sparkles provides a delightful sensory activity that captivates everyone involved.
Seasonal Versatility: Customize your suncatchers to reflect the seasons by changing colors and adding themed decorations. Once you get the hang of it, explore new styles or even use a DIY template!
Family Bonding Time: Engage in quality time as you create together, making beautiful memories while brightening up your living spaces.
Clear Glue Suncatcher Ingredients
Transform everyday materials into a colorful masterpiece!
For the Suncatcher Base
- Clear school glue - Provides the sticky foundation for your suncatcher; Elmer's is a great choice for vibrant clarity.
- Plastic lid - Acts as the mold for your design; You can repurpose yogurt or sour cream lids for this.
For the Color
- Food coloring or liquid watercolor paints - Adds gorgeous hues to your creation; Remember, less is more for a beautiful swirl effect.
- Toothpick or paintbrush - Helps create swirling patterns; Get creative with different tools to make unique designs.
For the Decor
- Glitter (optional) - Sprinkles added sparkle to your suncatcher; Choose your favorite glitter for extra bling.
- Sequins (optional) - Cute embellishments for added flair; These can be layered for an interesting texture.
- Beads (optional) - Embed them in the glue for a pop of color; Use various sizes to enhance your design.
For Finishing Touches
- String or suction cup hook - Essential for hanging your suncatcher; Consider clear string for a seamless look.
- Wax or parchment paper - Protects your workspace during crafting; A must-have for easy cleanup after the fun.
With these ingredients in hand, you're well on your way to delightfully creating your very own Clear Glue Suncatcher Craft!
How to Make a Clear Glue Suncatcher
-
Prepare Your Workspace: Clear a safe and clean area, then lay down wax or parchment paper. This will protect your surfaces and make cleanup a breeze.
-
Pour the Glue: Take your clear school glue and pour it into the plastic lid, filling it about halfway. This will be the base of your colorful creation, so get ready for fun!
-
Add Color: Squeeze a few drops of food coloring or liquid watercolor paints into the glue. Feel free to mix and match to create your favorite hues, keeping in mind that less is more for a lovely swirl effect.
-
Swirl the Colors: Use a toothpick or paintbrush to gently swirl the colors together in the glue. Aim for a marbled effect, combining the colors delicately to create beautiful patterns.
-
Add Decorations (Optional): If you'd like extra sparkle, sprinkle in some glitter, sequins, or beads now. These fun additions will bring your suncatcher to life, making it truly unique!
-
Let It Dry: Allow your glue mixture to sit undisturbed for at least 24 hours in a cool, dry place. This ensures it dries clear and holds its shape beautifully.
-
Remove and Hang: Once dry, carefully peel the suncatcher out of the lid. Use string or a suction cup hook to hang your masterpiece in a sunny spot, where it can shine!
Optional: Add an extra layer of flair by using colored glue for even more vibrant effects.
Exact quantities are listed in the recipe card below.
What to Serve with DIY Colorful Suncatcher?
Crafting doesn't just leave you with a beautiful creation; it inspires a cozy atmosphere filled with joy and laughter.
-
Glue and Glitter Activities:
Pair this suncatcher craft with other glue and glitter activities for an all-out glitter party. Kids will revel in the chance to get creative! -
Nature Walk:
Before crafting, take a stroll outdoors to collect flowers or leaves for inspiration. This connection with nature enriches the crafting experience. -
DIY Playdate:
Invite friends over for a crafting afternoon! Sharing supplies and ideas makes the project even more enjoyable and imaginative. -
Storytime Hour:
After making suncatchers, gather for a group reading of a colorful story. It enhances the experience, allowing imaginations to flourish. -
Snack Break:
Prepare easy, colorful snacks like fruit kebabs that match the suncatcher's hues. It's a fun way to keep the energy up during crafting. -
Seasonal Decor Ideas:
Discuss seasonal themes and colors for future suncatchers while crafting. This brainstorming session can spark creativity for upcoming holidays. -
Art Showcase:
Host a mini art gallery at home to display everyone's creations after the project! Celebrate each artist and their unique suncatchers with a fun reveal.
Make Ahead Options
These DIY Clear Glue Suncatcher crafts are perfect for busy home cooks looking to plan ahead! You can prepare the glue and color mixture up to 24 hours in advance. Simply combine the clear school glue and desired food coloring or watercolor paints in a plastic lid, then cover it tightly. To maintain the quality of your mixture, store it in a cool, dark place to prevent any light exposure. When you're ready to create, simply swirl the colors together and proceed with adding optional glitter, sequins, or beads before letting it dry. This way, you'll have a delightful and colorful project ready to go when you need a fun activity!
Expert Tips for Clear Glue Suncatcher Craft
-
Mix Slowly: Avoid over-stirring the glue mixture; this can create bubbles that will disrupt the smooth, glossy finish of your suncatcher.
-
Color Balance: Use a few drops of food coloring at a time to find the perfect balance and prevent muddy colors that don't pop.
-
Drying Care: Place your suncatcher in a shaded spot while it dries; direct sunlight can warp the glue, affecting the final appearance.
-
Layer Wisely: If adding sequins or beads, layer them evenly in the glue to make sure they're well-embedded; this prevents them from floating to the top.
-
Storage Savvy: Store your finished suncatchers flat between sheets of wax paper to protect their shape and prevent sticking.
Storage Tips for Clear Glue Suncatcher Craft
Room Temperature: Keep your finished suncatchers in a cool, dry place to avoid warping or damage from heat or moisture.
Fridge: If storing for an extended period, place the suncatcher in an airtight container to protect it from dust and humidity for up to 3 days.
Freezer: Avoid freezing your suncatcher, as the cold can damage the glue and colors, leading to a less attractive outcome.
Reheating: If your suncatcher loses shape, gently warm it with your hands (do not use heat sources) before hanging to restore its form.
Clear Glue Suncatcher Variations
Feel free to let your imagination soar and customize this suncatcher craft to make it truly your own!
-
Seasonal Themes: Create suncatchers that reflect the beauty of each season by using pastels for spring or warm tones for autumn.
-
Colored Glue: For a unique twist, swap out clear glue for colorful glue that can give your suncatcher a fun, vibrant look right from the start.
-
Shape Shifters: Use different plastic lids or trays to mold suncatchers into various shapes, such as hearts for Valentine's Day or stars for festive occasions.
-
Nature-Inspired: Add dried flowers or leaves between the glue mixture to bring the beauty of nature into your artwork. These can create a lovely organic touch.
-
Interactive Sparkles: Instead of glitter, consider using glow-in-the-dark paint mixed into the glue for a magical evening glow effect.
-
Embossed Patterns: Before pouring the glue, use a textured item to press into the plastic lid, creating embossed designs that add depth to your suncatcher.
-
Layered Colors: Pour different colors of glue one at a time to create layered effects. This technique allows for a stunning gradient that captures the eye.
-
Sparkling Beads: Use a variety of bead sizes, embedding them in the glue for added dimension and sparkle. They will create a beautiful play of light when hung up!
Each of these variations will help make your DIY suncatcher a personalized piece of art that tells your story. Enjoy the crafting adventure!
Clear Glue Suncatcher Craft Recipe FAQs
What type of clear glue should I use for the suncatcher?
Absolutely! I recommend using Elmer's clear school glue for the best results. It dries clear, providing the perfect base for your colorful creation and ensuring a vibrant finish.
How long should I let the suncatcher dry?
You should allow your suncatcher to dry undisturbed for at least 24 hours. This longer drying time ensures that the glue sets properly, achieving a clear finish and maintaining its shape. Make sure to place it in a cool, shaded area away from direct sunlight to avoid warping.
How should I store my finished suncatchers?
Store your finished suncatchers flat between sheets of wax paper in a cool, dry place. This way, they maintain their shape and avoid sticking together. If you want to keep them out of the dust, you can place them in an airtight container, but only for up to 3 days to ensure they remain fresh and vibrant.
Can I freeze my suncatcher for storage?
I advise against freezing your suncatcher, as the cold can compromise the glue and colors, making them less attractive. However, if you notice it has lost its shape, you can gently warm it with your hands to restore its form without using heat sources.
What should I do if my colors look muddy?
Very! If your colors aren't turning out well, start over and use fewer drops of food coloring or liquid watercolor paints. This helps in preventing muddy colors and allows the vibrant hues to shine through. Mix slowly with a toothpick or paintbrush to maintain distinct color swirls.
Is there a safe way to let kids participate in this craft?
Absolutely! Engage kids by letting them choose their preferred colors and decorations while supervising the swirling process. Always ensure that they're using non-toxic arts-and-crafts materials, making it a safe and fun bonding experience!
Clear Glue Suncatcher Craft: A Colorful Wonder for Everyone
Equipment
- Plastic lid
- Toothpick or paintbrush
- Wax or parchment paper
Ingredients
For the Suncatcher Base
- 1 bottle Clear school glue Elmer's is a great choice for vibrant clarity.
- 1 Plastic lid You can repurpose yogurt or sour cream lids for this.
For the Color
- few drops Food coloring or liquid watercolor paints Remember, less is more for a beautiful swirl effect.
- 1 Toothpick or paintbrush Get creative with different tools to make unique designs.
For the Decor
- to taste Glitter (optional) Choose your favorite glitter for extra bling.
- to taste Sequins (optional) These can be layered for an interesting texture.
- to taste Beads (optional) Use various sizes to enhance your design.
For Finishing Touches
- 1 String or suction cup hook Consider clear string for a seamless look.
- 1 sheet Wax or parchment paper A must-have for easy cleanup after the fun.
Instructions
Basic Instructions
- Prepare Your Workspace: Clear a safe and clean area, then lay down wax or parchment paper to protect your surfaces.
- Pour the Glue: Take your clear school glue and pour it into the plastic lid, filling it about halfway.
- Add Color: Squeeze a few drops of food coloring or liquid watercolor paints into the glue.
- Swirl the Colors: Use a toothpick or paintbrush to gently swirl the colors together in the glue.
- Add Decorations (Optional): Sprinkle in some glitter, sequins, or beads now.
- Let It Dry: Allow your glue mixture to sit undisturbed for at least 24 hours in a cool, dry place.
- Remove and Hang: Once dry, carefully peel the suncatcher out of the lid.


Leave a Reply