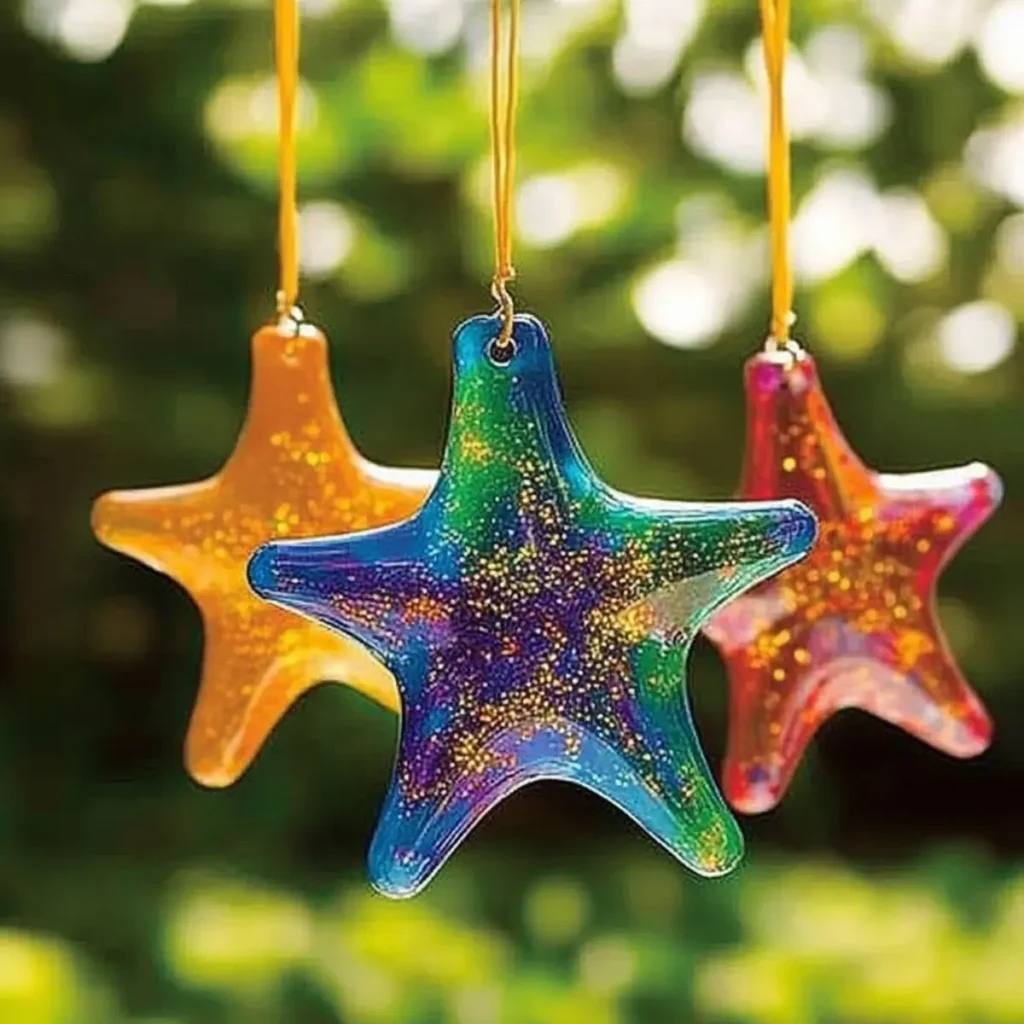
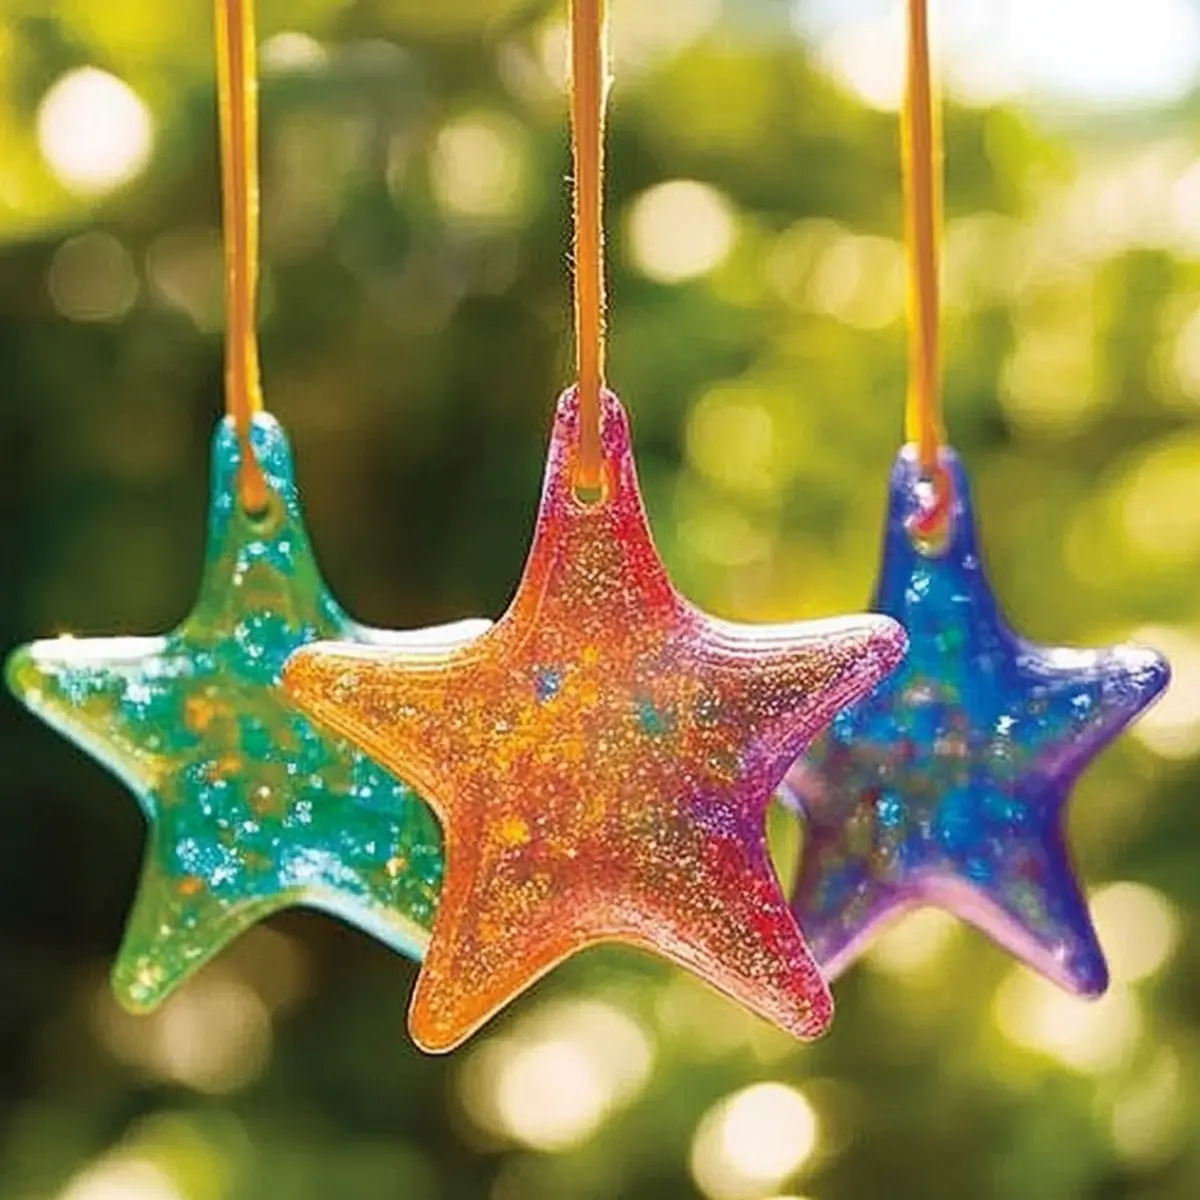
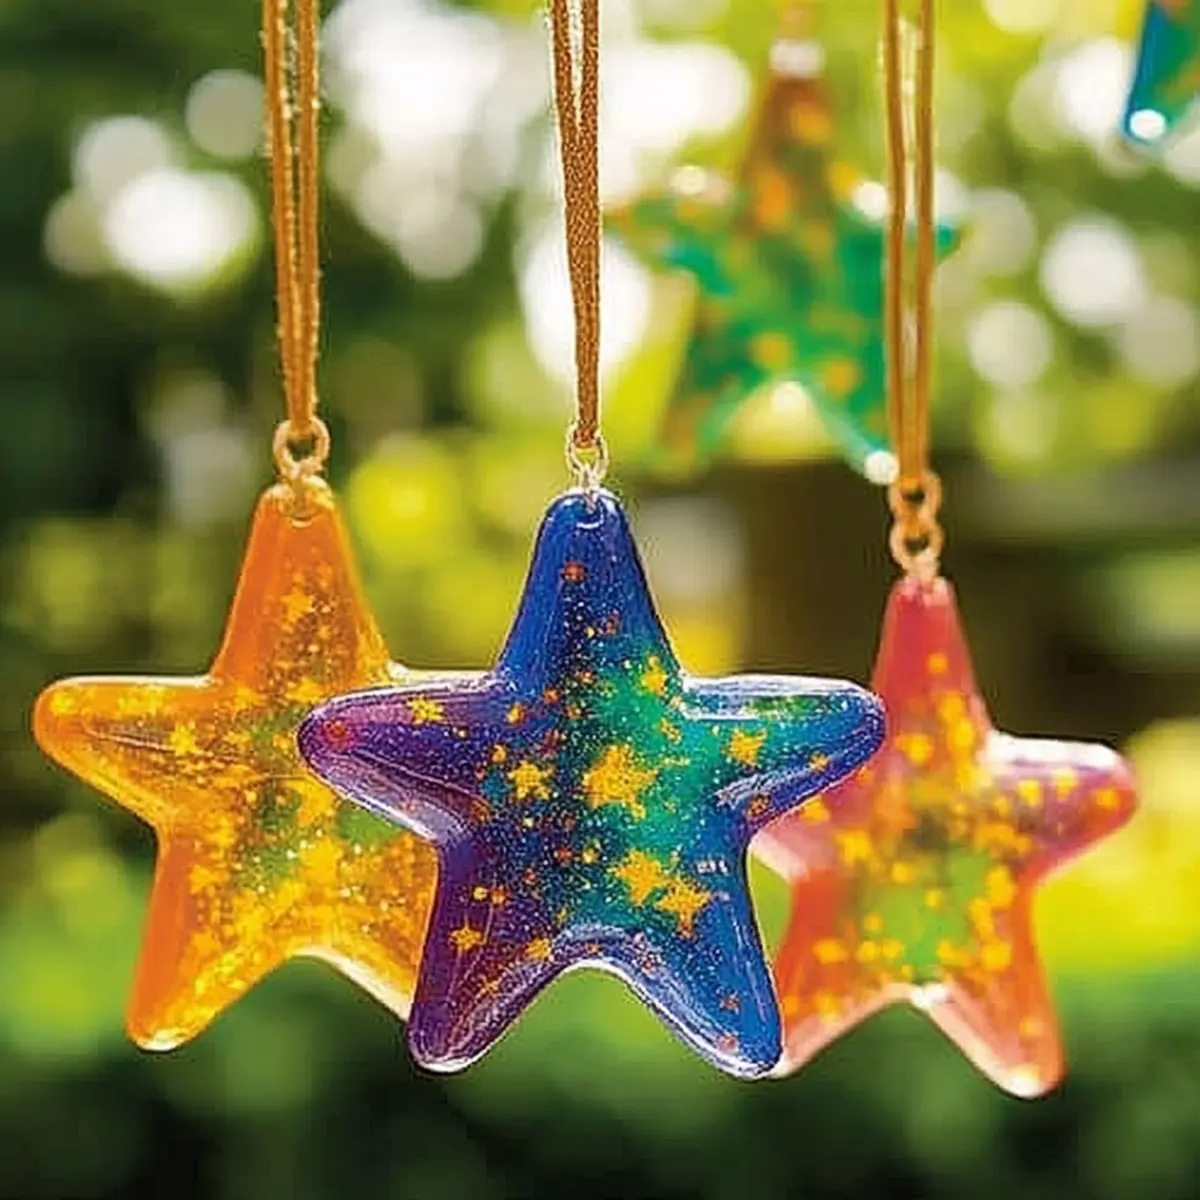
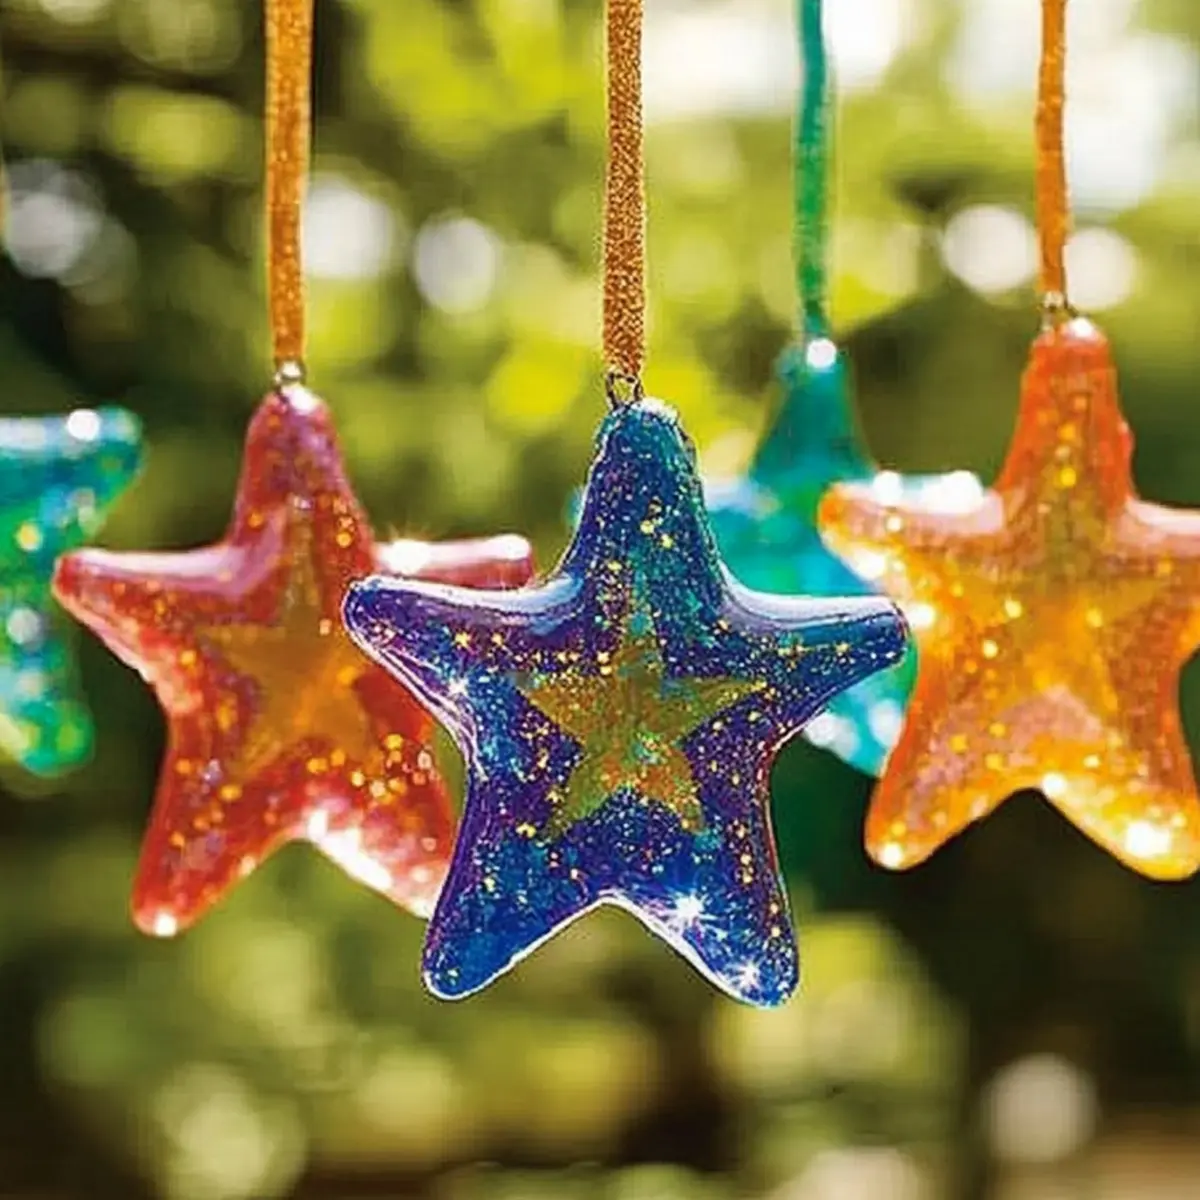
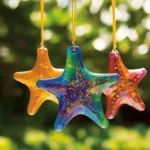
There's something truly enchanting about turning everyday items into delightful pieces of art. When I first discovered the joy of melted crayon art, I was instantly captivated by the vibrant colors and unique shapes that unfolded before me. Picture this: a sunny afternoon, the sound of laughter filling the air, and your children eagerly gathering their forgotten crayons. In just 30 minutes, you can transform these old remnants into stunning Crayon Star Suncatchers that dance with light and color in your windows!
This easy DIY craft not only sparks creativity but also gives those abandoned crayons a new life. With simple materials and a little adult supervision, your kids will have a blast customizing their suncatchers while you enjoy the delightful scent of melting wax. Whether you choose to create whimsical shapes or start a colorful garland, these suncatchers are a perfect way to brighten up your home and bring a smile to everyone's face. So roll up your sleeves and let's get started on this colorful adventure! ☀️⭐️
Crayon Star Sun Catchers: Why Choose This DIY?
Vibrant colors explode as you transform old crayons into beautiful suncatchers, creating unique decorations. Quick and easy, this project takes just 30 minutes, making it a perfect afternoon activity. Perfect for kids and adults, everyone can join in on the fun, sparking creativity and laughter. Eco-friendly by reusing materials, you're not just crafting; you're promoting sustainability! Don't forget to display your creations in sunny spots for maximum impact-these suncatchers truly brighten any space!
Crayon Star Sun Catchers Ingredients
• Gather your supplies for this vibrant DIY craft!
For the Suncatcher Design
- Old crayons - Adds color and variety; any colors will do, but the more variety, the better!
- Wax paper - Holds the melted crayon design securely so you can cut unique shapes.
- Parchment paper - Protects your iron and work surface from crayon residue during the melting process.
For Shaping and Hanging
- Star stencil or cookie cutter - Used for creating fun star shapes from the melted crayon art.
- Baker's twine or string - Ideal for hanging your completed suncatchers in windows to catch the light.
- Hole punch - Create a hole for threading the string through your suncatcher easily.
For Preparation and Melting
- Manual sharpener or knife - Perfect for creating fine crayon shavings; remember, adult supervision is required!
- Iron - Set to low heat for melting the crayons; keep a close watch to prevent burning.
How to Make Crayon Star Sun Catchers
-
Prep Crayons: Start by using a sharpener or knife to shave your old crayons into fine shavings. This will maximize melting and ensure vibrant colors.
-
Layer on Wax Paper: Spread the crayon shavings on a sheet of wax paper, arranging them in a fun pattern. Mix colors for a delightful marbled effect!
-
Cover and Iron: Carefully place another sheet of parchment paper over your wax paper. Heat your iron to low and gently press down, melting the crayon shavings evenly-watch for those beautiful colors to blend!
-
Cut Out Shapes: While the melted crayon design is still warm, use your star stencil or cookie cutter to cut out star shapes. Enjoy the fun shapes taking form!
-
Punch and Hang: Use a hole punch to create a hole at the top of each star. Thread your baker's twine or string through and hang your suncatchers in a sunny spot to catch the light beautifully.
Optional: For additional charm, create a garland by stringing multiple shapes together.
Exact quantities are listed in the recipe card below.
How to Store and Freeze Crayon Star Sun Catchers
Storage Tips:
- Room Temperature: Keep your suncatchers in a cool, dry area, away from direct sunlight, to maintain their vibrant colors.
- Fridge: If you're not displaying the suncatchers right away, you can store them in the fridge for up to a week to keep them cool and fresh.
- Freezer: While freezing isn't necessary, if you choose to do so, wrap them in wax paper and store in an airtight container for up to a month. This method isn't typical, but it can preserve their charm during long-term storage.
- Reheating: If your suncatchers lose their shine, you can briefly warm them with low iron heat, covered with parchment paper, to restore the glossy effect.
Make Ahead Options
These Crayon Star Suncatchers are perfect for busy home cooks looking to save time on crafty weekends! You can create the crayon shavings and lay them out on wax paper up to 24 hours in advance; just be sure to cover them with parchment paper to keep them fresh and prevent dust. Then, when you're ready to finish, heat your iron and melt the crayon shavings as directed. Alternatively, you can store the completed suncatchers in a cool, flat space for up to 3 days before hanging them, ensuring they look just as vibrant when it's time to decorate. By prepping ahead, you can carve out quality time with your kids while still enjoying the wonderful world of melted crayon art!
What to Serve with Bright & Colorful Melted Crayon Suncatchers?
Elevate your crafting experience with delightful additions that enhance your creative time spent together.
- Colorful Paper Plates: Add a playful touch to your crafting area with vibrant plates that reflect the joy of your melting crayons.
- Refreshing Lemonade: Serve chilled lemonade to cool off while you craft. Its zesty taste keeps energy high during your fun-filled session!
- Snack Platter: Offer a mix of finger foods like fruit slices and cheese cubes. Perfect for little hands and keeps the creativity flowing.
- Creative Aprons: Encourage messy fun with colorful, kid-sized aprons. They add an extra layer of excitement and protect outfits from crayon drips.
- Inspiring Music Playlist: Create a light-hearted playlist to set the mood-lively tunes will keep spirits high while crafting.
- Nature Walk: After your craft, take a stroll outside to gather inspiration from nature's colors, perfect for future projects.
- Photo Session: Don't forget to take pictures of your creations! Capture these moments to cherish the joy, laughter, and creativity together.
Expert Tips for Crayon Star Sun Catchers
-
Color Combinations: Mix and layer different crayon colors for a marbled effect, ensuring a vibrant finish in your melted crayon art.
-
Iron Temperature: Always keep your iron on low heat to avoid burning the wax paper and ruining your beautifully crafted shapes.
-
Adult Supervision: When preparing with kids, supervise closely during the melting process to prevent accidents with the iron or sharp tools.
-
Shape Variety: Don't limit yourself to stars! Experiment with hearts, circles, or leaves for diverse, playful suncatchers.
-
Display Tips: Hang your crayon star sun catchers in direct sunlight for the best effect-watch them catch the light and brighten your home!
Crayon Star Sun Catchers: Fun Variations & Substitutions
Feel free to unleash your creativity and put your personal twist on these colorful designs!
- Shape Variety: Try cutting out different silhouettes like hearts, circles, or even animals to brighten your windows in unique ways.
- Rainbow Mix: Combine a variety of crayon colors for a bold rainbow effect. Each suncatcher will dance with vibrant hues!
- Texture Additions: Layer some glitter or small beads between the wax layers for an extra shimmering effect that catches the sun beautifully.
- Glow-in-the-Dark: Use glow-in-the-dark crayons in your mix! These fun additions will give your suncatchers a magical appearance at night.
- Aroma Enhancement: Add a few drops of essential oils to the crayon shavings before melting for an aromatic delight that adds a soothing scent to your space.
- Mini Garland: Instead of single stars, create smaller shapes and string them together to make a cheerful garland that can hang across a room or a window.
- Double-Layered: Sandwich two layers of crayon shavings in between two sheets of wax paper for a sturdier suncatcher that can display colors on both sides.
- Seasonal Themes: Change the colors based on the season, like pastel shades for spring or warm tones for autumn, making them a seasonal delight!
With these variations, your crafting adventure is sure to be filled with even more joy and inspiration!
Crayon Star Sun Catchers Recipe FAQs
What type of crayons work best for this project?
Absolutely! Any old crayons work great for this craft. I often mix different colors to create vibrant designs. Just gather whatever crayons you have on hand-there's no need to stick to any one color palette!
How should I store my Crayon Star Suncatchers?
To keep your suncatchers looking vibrant, store them in a cool, dry place away from direct sunlight, which can fade the colors. An ideal storage duration is about 3 to 4 weeks. If you're not ready to display them immediately, consider placing them in the fridge for a neat and tidy option until you're set to hang them up.
Can I freeze Crayon Star Suncatchers?
While not necessary, you can freeze your suncatchers! Simply wrap them in wax paper and place them in an airtight container. They should stay fresh for up to 3 months in the freezer. When you're ready to use them, let them thaw at room temperature before hanging. If they've lost a little shine, you can gently warm them with an iron covered in parchment paper to restore that glossy finish.
What should I do if the melted crayon doesn't come out well?
Very! If the crayon hasn't melted evenly, don't worry-this can happen sometimes. You can try a few troubleshooting methods: make sure your iron is set to low heat and press gently while moving it around for even melting. If it's melted too much and is too runny, let it cool for a moment and then reheat it briefly with the iron covered in parchment paper to achieve the desired effect.
Are there any safety precautions to take when making these suncatchers?
Absolutely! Make sure to supervise children closely while they use the sharpener or knife and during the melting process with the iron. It's best to keep the work area clear of clutter to avoid any accidents. Always use the iron on its low setting to prevent burns to both the suncatchers and the workspace.
Can my pets safely be around while doing this project?
Very! It's best to keep pets away during the melting process, as the wax can be a choking hazard if ingested. Once everything is cool and finished, the suncatchers should be safe for displaying in your home where pets can enjoy the light dancing through them, but just observe if they try to play with them!
Feel free to dive into this colorful adventure knowing that you're creating a delightful piece of art that will not only look beautiful but will also bring joy for days to come. Happy crafting!
Gorgeous Crayon Star Sun Catchers: Brighten Your Windows!
Equipment
- Iron
- sharpener
- Hole Punch
Ingredients
For the Suncatcher Design
- as needed Old crayons Adds color and variety; any colors will do, but the more variety, the better!
- 1 sheet Wax paper Holds the melted crayon design securely.
- 1 sheet Parchment paper Protects your iron and work surface.
For Shaping and Hanging
- 1 Star stencil or cookie cutter Used for creating fun star shapes.
- as needed Baker's twine or string Ideal for hanging your completed suncatchers.
- 1 Hole punch Create a hole for threading the string.
For Preparation and Melting
- 1 Manual sharpener or knife For creating fine crayon shavings; adult supervision required!
- 1 Iron Set to low heat for melting the crayons.
Instructions
Instructions
- Start by using a sharpener or knife to shave your old crayons into fine shavings.
- Spread the crayon shavings on a sheet of wax paper, arranging them in a fun pattern.
- Carefully place another sheet of parchment paper over your wax paper. Heat your iron to low and gently press down.
- While the melted crayon design is still warm, use your star stencil or cookie cutter to cut out star shapes.
- Use a hole punch to create a hole at the top of each star. Thread your baker's twine or string through.


Leave a Reply