
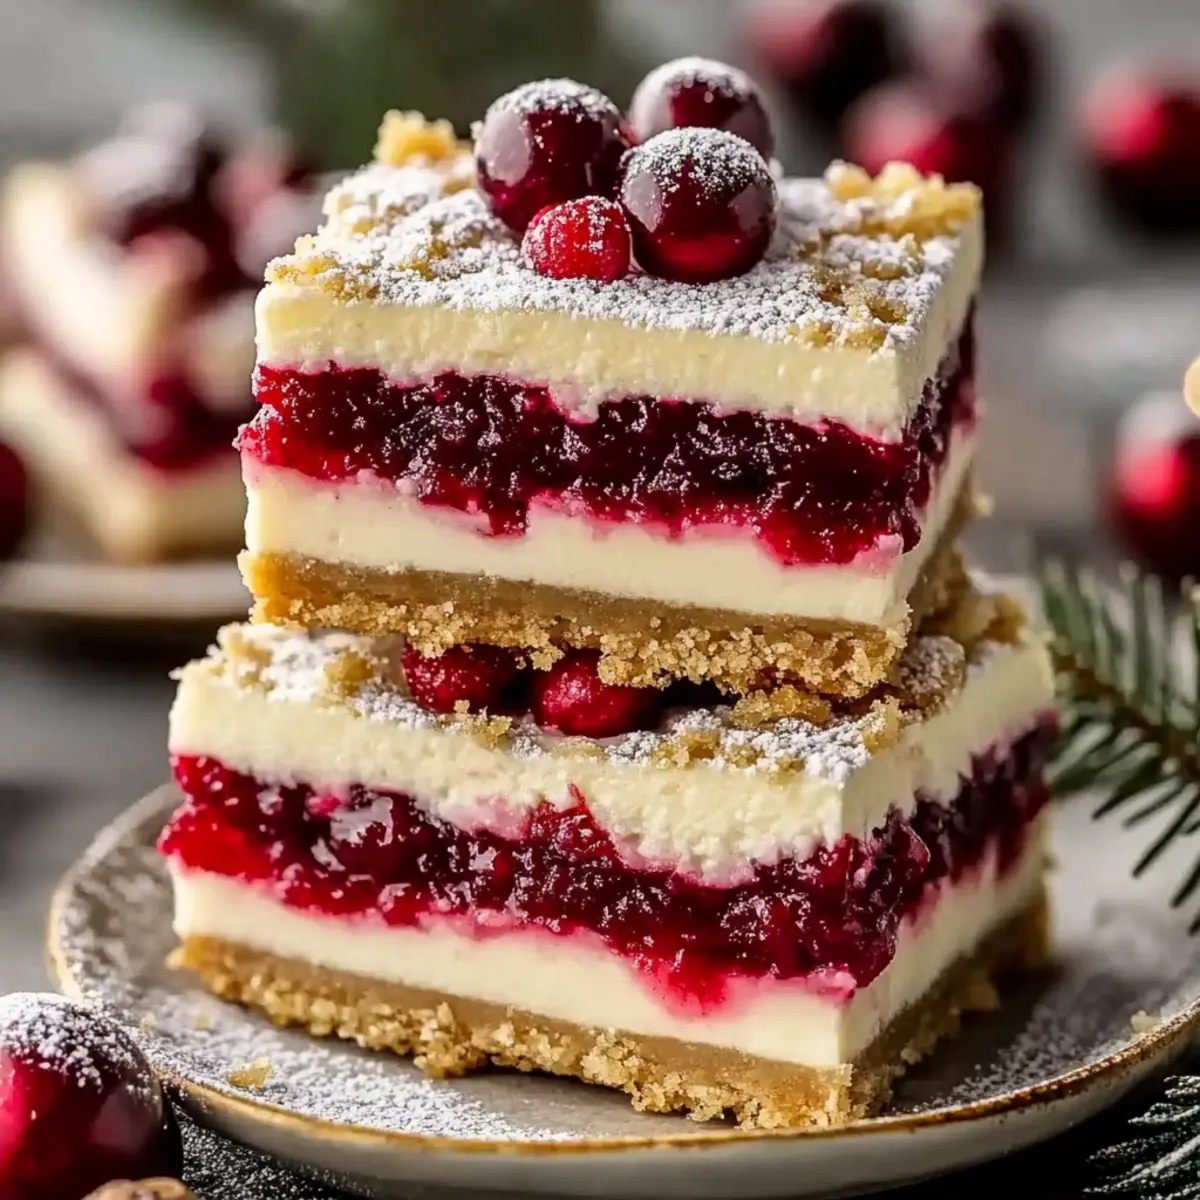
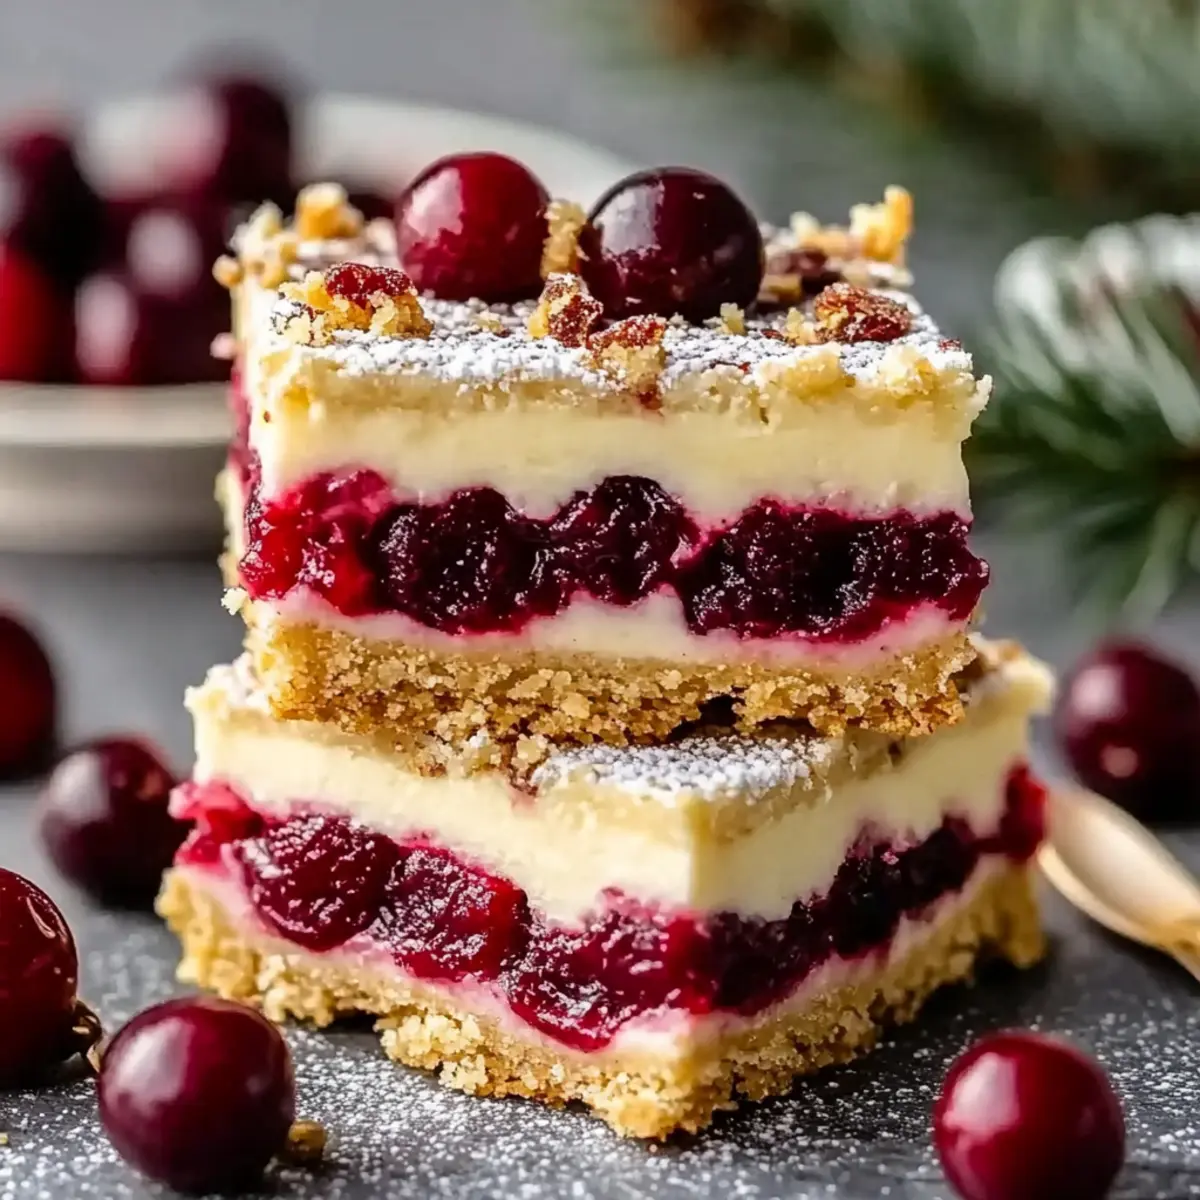
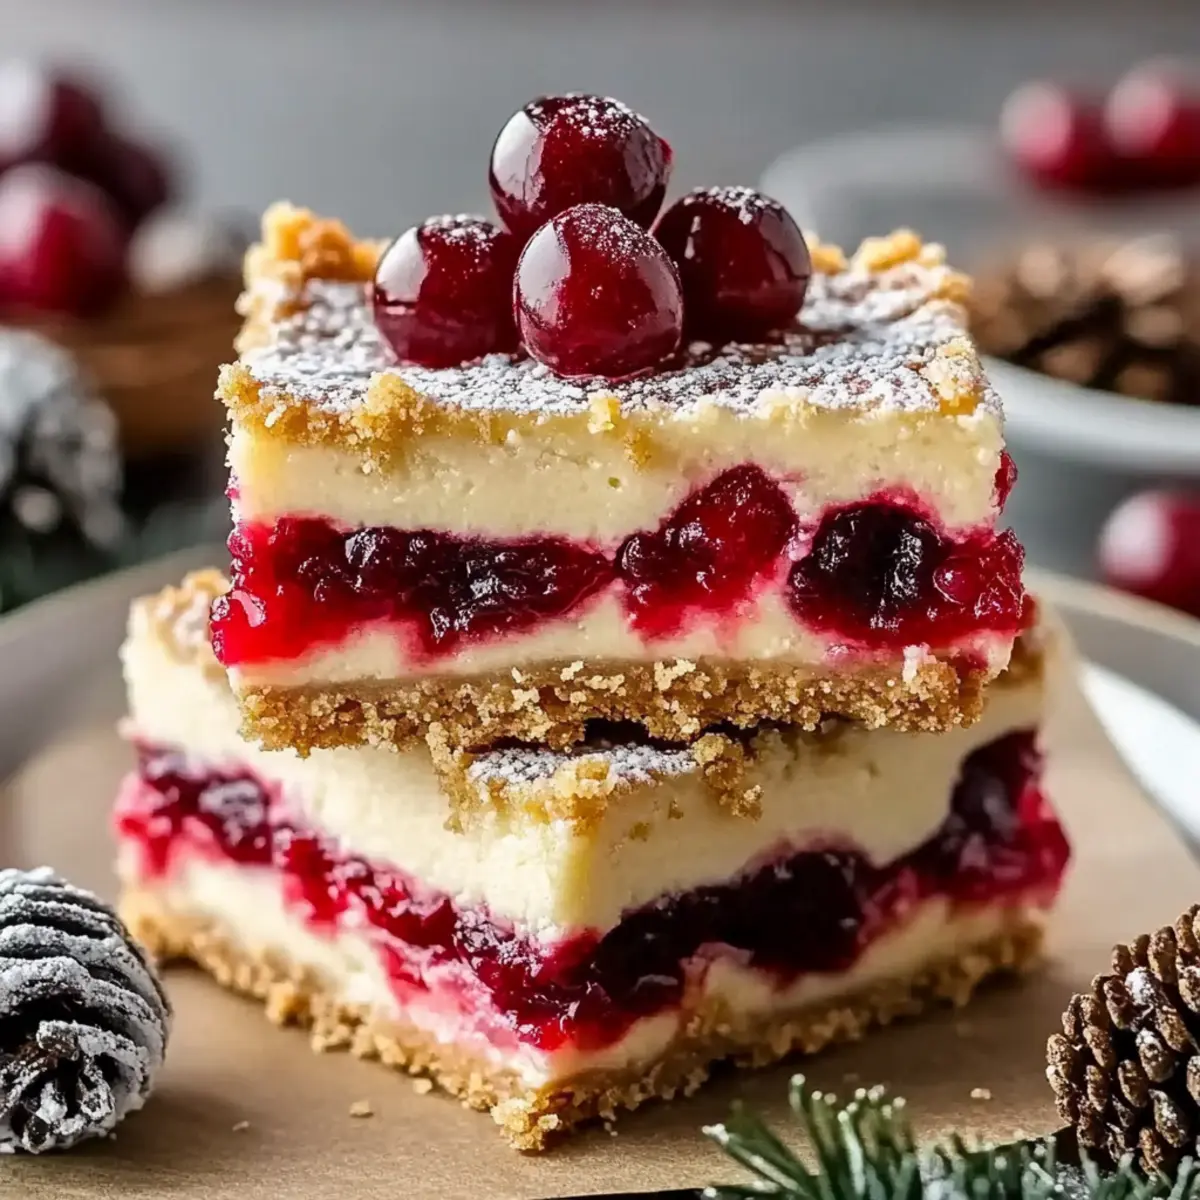
As the holiday season approaches, there's a certain kind of joy that fills the air-flavors of cinnamon, nutmeg, and of course, sweet cherries that make every moment feel extra special. Picture this: the laughter of friends gathered around your table, cozy lights twinkling, and an enticing aroma wafting through the room. That's where my Christmas Cherry Cheesecake Bars come in. This delightful dessert is not only visually stunning, with its creamy filling resting atop a buttery graham cracker crust, but it also boasts a rich flavor that's simply irresistible.
You know those moments when you need something festive that won't take all day to prepare? These bars are the answer! With a velvety cheesecake layer enhanced by the juicy sweetness of cherry pie filling, they strike the perfect balance between decadence and ease. Whether it's a holiday party or a cozy night in, these treats promise to steal the spotlight and warm your heart. Let's dive into making this unforgettable festive delight!
Why Choose Christmas Cherry Cheesecake Bars?
Irresistible Flavor Experience: Each bite transports you to a holiday wonderland, where sweet cherries and creamy cheesecake meet in delightful harmony.
Simple Yet Elegant: These bars combine the classic cheesecake experience with the ease of bar preparation, making them perfect for any skill level.
Perfect for Gatherings: Their festive appearance and rich taste make them a hit at holiday parties, ensuring they'll be the star of your dessert table.
Flexible Adaptations: Feel free to switch out cherry pie filling for other fruits or even add a hint of almond extract for a personalized twist.
Quick Prep Time: With minimal effort, you can whip up this delicious treat, freeing up more time to spend with family and friends during the holidays.
Chill, Slice, Serve: Easily prepare them in advance and serve chilled for convenience-perfect for those busy festive days.
Christmas Cherry Cheesecake Bars Ingredients
Here's everything you need to create these festive delights!
For the Crust
- Graham Cracker Crumbs - Provides structure and a crunchy base; substitute with gluten-free crumbs for a gluten-free option.
- Melted Butter - Binds crust ingredients and adds richness; coconut oil can be used for a dairy-free alternative.
- Sugar - Sweetens the crust perfectly; try brown sugar for a richer flavor.
For the Cheesecake Filling
- Cream Cheese - Creates that deliciously creamy filling; consider Neufchâtel cheese for a lighter option.
- Eggs - Enhances richness and binds everything together; make sure they're at room temperature for optimal mixing.
- Vanilla Extract - Adds depth to the flavor; use pure vanilla extract for the best results.
- Sour Cream - Contributes tanginess and creaminess; Greek yogurt can work as a substitute for similar texture.
- Flour - Helps stabilize the cheesecake filling; gluten-free flour blends can replace regular flour if necessary.
For the Topping
- Cherry Pie Filling - Provides that sweet and fruity essence; fresh cherries can also be used for a homemade topping.
- White Chocolate Shavings, Crushed Peppermint, Festive Sprinkles - Decorative toppings that enhance the festive look; use colors that match your holiday themes.
These Christmas Cherry Cheesecake Bars are not just a treat for the taste buds, but a true festive experience for the whole family!
How to Make Christmas Cherry Cheesecake Bars
-
Preheat the Oven: Preheat your oven to 325°F (160°C) to get it ready while you prepare your crust.
-
Prepare the Crust: In a bowl, mix graham cracker crumbs, melted butter, and sugar until well combined. Press this mixture firmly into a lined 9x13-inch pan and bake for 10 minutes until lightly golden.
-
Make the Cheesecake Layer: In a large bowl, beat the cream cheese until smooth. Gradually add sugar, mixing in the eggs one at a time, followed by vanilla extract, sour cream, and flour until everything is creamy and consistent.
-
Assemble the Bars: Pour the cheesecake batter over the cooled crust. Using a spoon, drop dollops of cherry pie filling on top and gently swirl it to create a beautiful marbled effect.
-
Bake: Place your assembled dish in the oven and bake for 35-40 minutes. You want the center to be slightly jiggly, then turn off the oven and leave the door ajar for about 10 minutes to help prevent cracks.
-
Chill to Set: Allow the bars to cool to room temperature. Once cooled, refrigerate for at least 4 hours, or ideally overnight, to allow the flavors to deepen and the filling to fully set.
-
Slice and Decorate: Lift the cheesecake bars out using the parchment. Cut into squares and sprinkle with white chocolate shavings, crushed peppermint, or festive sprinkles for that holiday charm.
Optional: Add a dollop of whipped cream on the side for an extra creamy touch.
Exact quantities are listed in the recipe card below.
What to Serve with Christmas Cherry Cheesecake Bars?
Create a festive spread that complements the creamy delight of these cheesecake bars.
- Whipped Cream: A fluffy dollop adds a light and airy contrast, perfectly balancing the rich cheesecake goodness.
- Hot Cocoa: The warm, chocolaty sweetness pairs delightfully with the tart cherries, making for a comforting holiday treat.
- Fresh Berries: Strawberries or raspberries bring a fresh, zesty element, enhancing the dessert's vibrant flavors.
- Gingerbread Cookies: Their spicy warmth contrasts beautifully with the sweet cherry bars, making every bite a cozy experience. A crunchy cookie alongside each bar offers a delightful textural twist.
- Sparkling Cider: Bubbles and sweetness create a festive atmosphere, elevating your dessert table to holiday celebration heights.
- Chocolate Drizzle: A silky drizzle on top not only looks stunning but adds a deeper flavor note that pairs perfectly with cherries.
- Minty Greens: Garnish with fresh mint leaves for a splash of color and a refreshing taste that brightens your dessert presentation.
- Festive Fruit Platter: A mix of seasonal fruits like pomegranate and clementines can balance out the richness of the cheesecake bars.
- Caramel Sauce: A drizzle of warm caramel provides an indulgent twist, enhancing the sweetness of the cherry topping and crust.
- Nutty Biscotti: Serve these crunchy delights alongside for a coffee-sipping treat, offering a delightful contrast with each bite of creamy cheesecake.
Christmas Cherry Cheesecake Bars Variations
Feel free to explore these delightful alternatives and make the recipe truly yours!
- Gluten-Free: Use gluten-free graham cracker crumbs and flour for a deliciously inclusive dessert option.
- Dairy-Free: Substitute cream cheese with a vegan cream cheese alternative and use coconut oil for the crust.
- Sugar-Free: Experiment with sugar substitutes like erythritol or stevia to reduce sweetness without sacrificing taste.
- Different Fruit: Swap out cherry pie filling with blueberry, raspberry, or even peach for a fruity twist. Each option brings its own charm!
- Nutty Crunch: Add chopped nuts like walnuts or pecans into the crust for an extra layer of flavor and texture.
- Chocolate Bliss: Incorporate chocolate chips into the cheesecake layer for a decadent chocolate-cherry experience that will leave everyone craving more.
- Spiced Up: Enhance flavors by adding ground cinnamon or nutmeg to the cheesecake mix, capturing the heartwarming essence of the holiday season.
- No-Bake Version: For an easier approach, set the cheesecake layer with gelatin instead of baking-perfect for hot holiday gatherings.
Embrace your creativity and let your taste buds lead the way!
Expert Tips for Christmas Cherry Cheesecake Bars
-
Softened Cheese: Ensure your cream cheese is truly softened for easy mixing; room temperature cream cheese creates the smoothest filling.
-
Watch the Bake Time: Avoid overbaking by checking for a slight jiggle in the center. This keeps your Christmas Cherry Cheesecake Bars creamy and luscious.
-
Chilling Is Key: Chill the bars overnight to enhance their flavor and texture. Patience pays off; these bars taste better after a good rest!
-
Swirl Technique: When adding the cherry pie filling, use a gentle swirling motion. This creates beautiful marbling without overwhelming the cheesecake flavor.
-
Decorative Toppings: Get creative with toppings! White chocolate shavings, crushed peppermint, or colorful sprinkles not only enhance the look but also add festive flair.
How to Store and Freeze Christmas Cherry Cheesecake Bars
Fridge: Store the cheesecake bars in an airtight container in the refrigerator for up to 5 days. This will keep them fresh and delicious for your holiday gatherings.
Freezer: If you want to freeze the bars, wrap them tightly in plastic wrap or aluminum foil and place them in a freezer-safe container for up to 2 months.
Thawing: To enjoy frozen Christmas Cherry Cheesecake Bars, thaw them in the refrigerator overnight before serving for best texture and taste.
Reheating: These bars are best served chilled, but if you prefer them slightly warmed, heat for about 10-15 seconds in the microwave-just be careful not to overdo it!
Make Ahead Options
These Christmas Cherry Cheesecake Bars are perfect for meal prep, allowing you to enjoy more time with your loved ones this holiday season. You can prepare the crust and cheesecake filling up to 24 hours in advance. Simply store the cooled crust in an airtight container at room temperature, and keep the cheesecake batter in the refrigerator. Before serving, pour the cheesecake batter over the crust and add the cherry pie filling, then bake as directed. For best results, chill the bars overnight after baking-they'll be just as delicious and set perfectly over time! Having these festive treats ready ahead of time ensures a stress-free holiday dessert experience.
Christmas Cherry Cheesecake Bars Recipe FAQs
How do I choose ripe cherries for the topping?
Absolutely! When selecting cherries for your topping, look for plump, bright red cherries without dark spots or bruises. They should feel firm but slightly yielding to the touch. If using canned cherry pie filling, ensure the can is not dented and that the filling is vibrant in color, indicating freshness.
How should I store leftover cheesecake bars?
Very easy! Store your Christmas Cherry Cheesecake Bars in an airtight container in the refrigerator for up to 5 days. If you want to keep them longer, you can freeze them. It's a great way to enjoy this festive dessert later!
Can I freeze Christmas Cherry Cheesecake Bars?
Of course! To freeze your cheesecake bars, first, wrap them tightly in plastic wrap, making sure there's no air exposure. Then, place them in a freezer-safe container for up to 2 months. When you're ready to enjoy, simply thaw in the refrigerator overnight for the best texture and flavor.
What if my cheesecake bars crack while baking?
Don't worry! If cracks form, it's often due to overbaking or the sudden temperature change. To troubleshoot, ensure you're not baking them too long - the center should still jiggle slightly. Also, leave the oven door ajar for about 10 minutes after baking to gradually cool, which can help minimize cracks.
Can I make these bars gluten-free?
Absolutely! To make your Christmas Cherry Cheesecake Bars gluten-free, just substitute the graham cracker crumbs with a gluten-free alternative. You can find ready-made gluten-free graham cracker crumbs or make your own from gluten-free cookies. This ensures everyone can enjoy them!
Do these bars contain common allergens?
The recipe does contain common allergens, including dairy (cream cheese, eggs) and gluten (flour, graham crackers). For a dairy-free version, use coconut cream or lactose-free cream cheese, and for gluten-free, opt for gluten-free flour and graham cracker alternatives. Always check labels to avoid cross-contamination.

Irresistibly Creamy Christmas Cherry Cheesecake Bars Delight
Equipment
- 9x13-inch pan
- Mixing bowls
- electric mixer
Ingredients
For the Crust
- 1.5 cups Graham Cracker Crumbs Substitute with gluten-free crumbs for a gluten-free option.
- 0.5 cups Melted Butter Coconut oil can be used for a dairy-free alternative.
- 0.25 cups Sugar Try brown sugar for a richer flavor.
For the Cheesecake Filling
- 16 oz Cream Cheese Consider Neufchâtel cheese for a lighter option.
- 2 large Eggs Make sure they're at room temperature for optimal mixing.
- 1 teaspoon Vanilla Extract Use pure vanilla extract for the best results.
- 0.5 cups Sour Cream Greek yogurt can work as a substitute for similar texture.
- 0.5 cups Flour Gluten-free flour blends can replace regular flour if necessary.
For the Topping
- 21 oz Cherry Pie Filling Fresh cherries can also be used for a homemade topping.
- White Chocolate Shavings Decorative toppings that enhance the festive look.
- Crushed Peppermint Use colors that match your holiday themes.
- Festive Sprinkles Use colors that match your holiday themes.
Instructions
Preparation
- Preheat your oven to 325°F (160°C) to get it ready while you prepare your crust.
- In a bowl, mix graham cracker crumbs, melted butter, and sugar until well combined. Press this mixture firmly into a lined 9x13-inch pan and bake for 10 minutes until lightly golden.
- In a large bowl, beat the cream cheese until smooth. Gradually add sugar, mixing in the eggs one at a time, followed by vanilla extract, sour cream, and flour until everything is creamy and consistent.
- Pour the cheesecake batter over the cooled crust. Using a spoon, drop dollops of cherry pie filling on top and gently swirl it to create a beautiful marbled effect.
- Place your assembled dish in the oven and bake for 35-40 minutes. You want the center to be slightly jiggly, then turn off the oven and leave the door ajar for about 10 minutes to help prevent cracks.
- Allow the bars to cool to room temperature. Once cooled, refrigerate for at least 4 hours, or ideally overnight, to allow the flavors to deepen and the filling to fully set.
- Lift the cheesecake bars out using the parchment. Cut into squares and sprinkle with white chocolate shavings, crushed peppermint, or festive sprinkles for that holiday charm.
Leave a Reply