
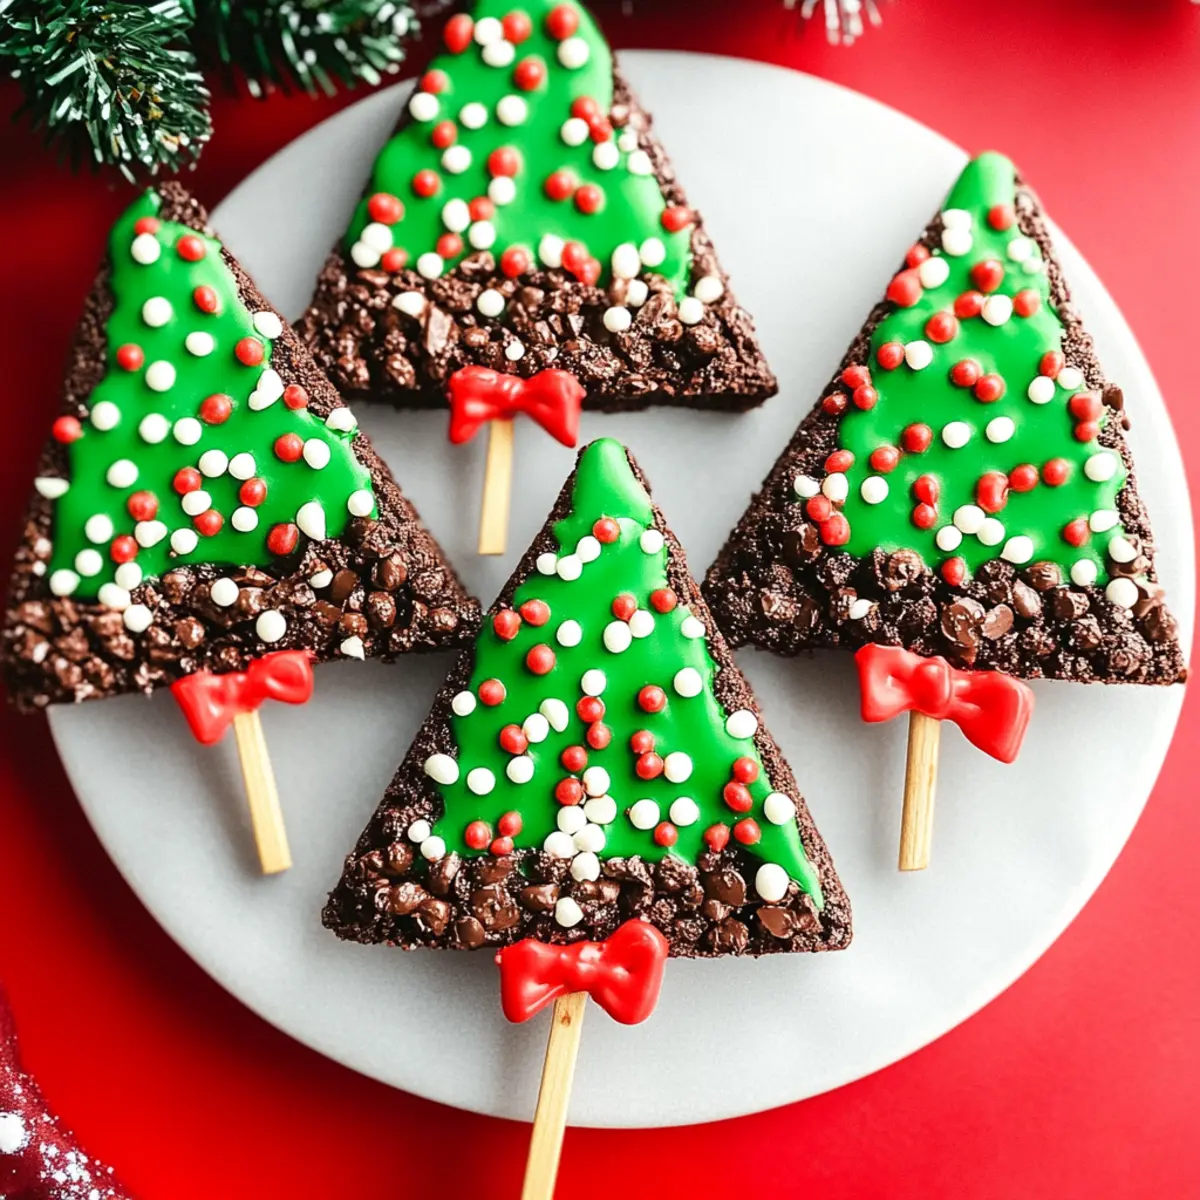
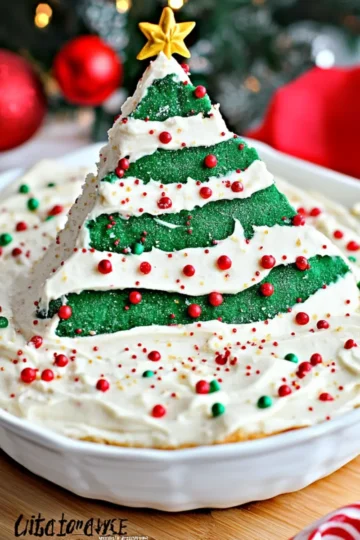
When the holiday season rolls around, I'm always on the lookout for festive treats that can brighten up any gathering. This year, my search led me to a delightful discovery: Easy Brownie Christmas Trees! Imagine sinking your teeth into rich, fudgy brownies shaped like Christmas trees, each adorned with vibrant green frosting and a sprinkle of festive cheer. They not only look adorable but also pack a delicious cookie dough filling that delights with every bite.
Perfect for baking with loved ones or bringing joy to your holiday parties, these whimsical treats are incredibly simple to make, allowing you to spend more time enjoying the spirit of the season. Whether you're a seasoned chef or just starting out in the kitchen, these brownies will impress both kids and adults alike, turning any dessert table into a festive wonderland. So grab your apron and let's dive into creating these charming Brownie Christmas Trees that are sure to become a cherished part of your holiday traditions!
Why love this Easy Brownie Christmas Trees Recipe?
Delightful Presentation: These charming tree shapes are perfect for holiday gatherings or as gifts.
Decadent Flavor: The gooey cookie dough filling takes these brownies to a whole new level of indulgence.
Effortless Fun: Even novice bakers can whip these up easily, making them a great family project-and they're stress-free to decorate!
Versatile Treats: Customize with plaid sprinkles or different toppings to match your festive theme.
** crowd-pleaser:** Everyone, from kids to adults, will fall in love with these delightful treats that bring cheer to any table!
Easy Brownie Christmas Trees Ingredients
Get ready to create festive magic with these delightful treats!
For the Brownies
- Unsalted Butter (1 cup / 2 sticks) - Adds richness and moisture; for best flavor, choose high-quality butter.
- Granulated Sugar (2 cups) - Sweetens the brownies and gives them a chewy texture; feel free to adjust based on your taste preference.
- Eggs (4 large) - Provide essential structure and richness; make sure they're at room temperature for better mixing.
- Vanilla Extract (1 teaspoon) - Enhances the chocolate flavor; using pure vanilla will yield the best results.
- All-Purpose Flour (1 ⅓ cups) - Gives the brownies structure; no need for specialty flours.
- Unsweetened Cocoa Powder (¾ cup) - The key to the rich chocolate flavor; opt for Dutch-processed cocoa for a deeper taste.
- Baking Powder (½ teaspoon) - Helps with texture and rise without making brownies too cake-like.
- Salt (¼ teaspoon) - Balances sweetness and enhances the overall flavor.
- Chocolate Chips (1 cup) - Use semi-sweet or dark chocolate for pockets of molten goodness; they add a delightful texture contrast.
For the Cookie Dough Filling
- Unsalted Butter (¼ cup, softened) - Adds a creamy base for the filling.
- Light Brown Sugar (½ cup, packed) - Infuses caramel notes into the cookie dough layer.
- Granulated Sugar (¼ cup) - Sweetens the filling; feel free to adjust for taste.
- Egg Yolk (1 large) - Enhances richness, helping bind the filling together effectively.
- Vanilla Extract (1 teaspoon) - Matching the brownies, it offers a wonderful flavor boost.
- All-Purpose Flour (½ cup) - Forms the foundation for the filling.
- Mini Chocolate Chips (¼ cup) - Provides a delightful surprise element in every bite.
For the Glaze
- Powdered Sugar (1 cup, sifted) - The sweet touch to glaze your brownies; sifting ensures a smooth finish.
- Milk (2-3 tablespoons) - Adjusts the glaze's consistency; start with less for a thicker glaze.
- Vanilla Extract (¼ teaspoon) - For that extra flavor boost.
- Green Food Coloring - Makes the glaze festive; gel form is preferred for vibrant color.
- Christmas Sprinkles - The final touch for decoration; they add visual appeal and holiday cheer.
How to Make Easy Brownie Christmas Trees
-
Preheat Oven: Set your oven to 350°F (175°C). Prepare a 9x13 inch baking pan by greasing it and lining with parchment paper for easy release.
-
Mix Dry Ingredients: In a medium bowl, whisk together all-purpose flour, cocoa powder, baking powder, and salt until well combined. Set this mixture aside for later.
-
Combine Wet Ingredients: In a large bowl, blend melted butter and granulated sugar until smooth. Beat in the eggs one at a time, followed by the vanilla extract to create a cohesive mixture.
-
Combine Mixtures: Gradually fold the dry ingredients into the wet mixture until just combined. Remember, don't overmix! Now, gently fold in the chocolate chips for that extra gooeyness.
-
Bake Brownies: Pour the batter into your prepared pan and smooth the top. Bake in the oven for 25-35 minutes, checking with a toothpick for moist crumbs. Allow the brownies to cool completely.
-
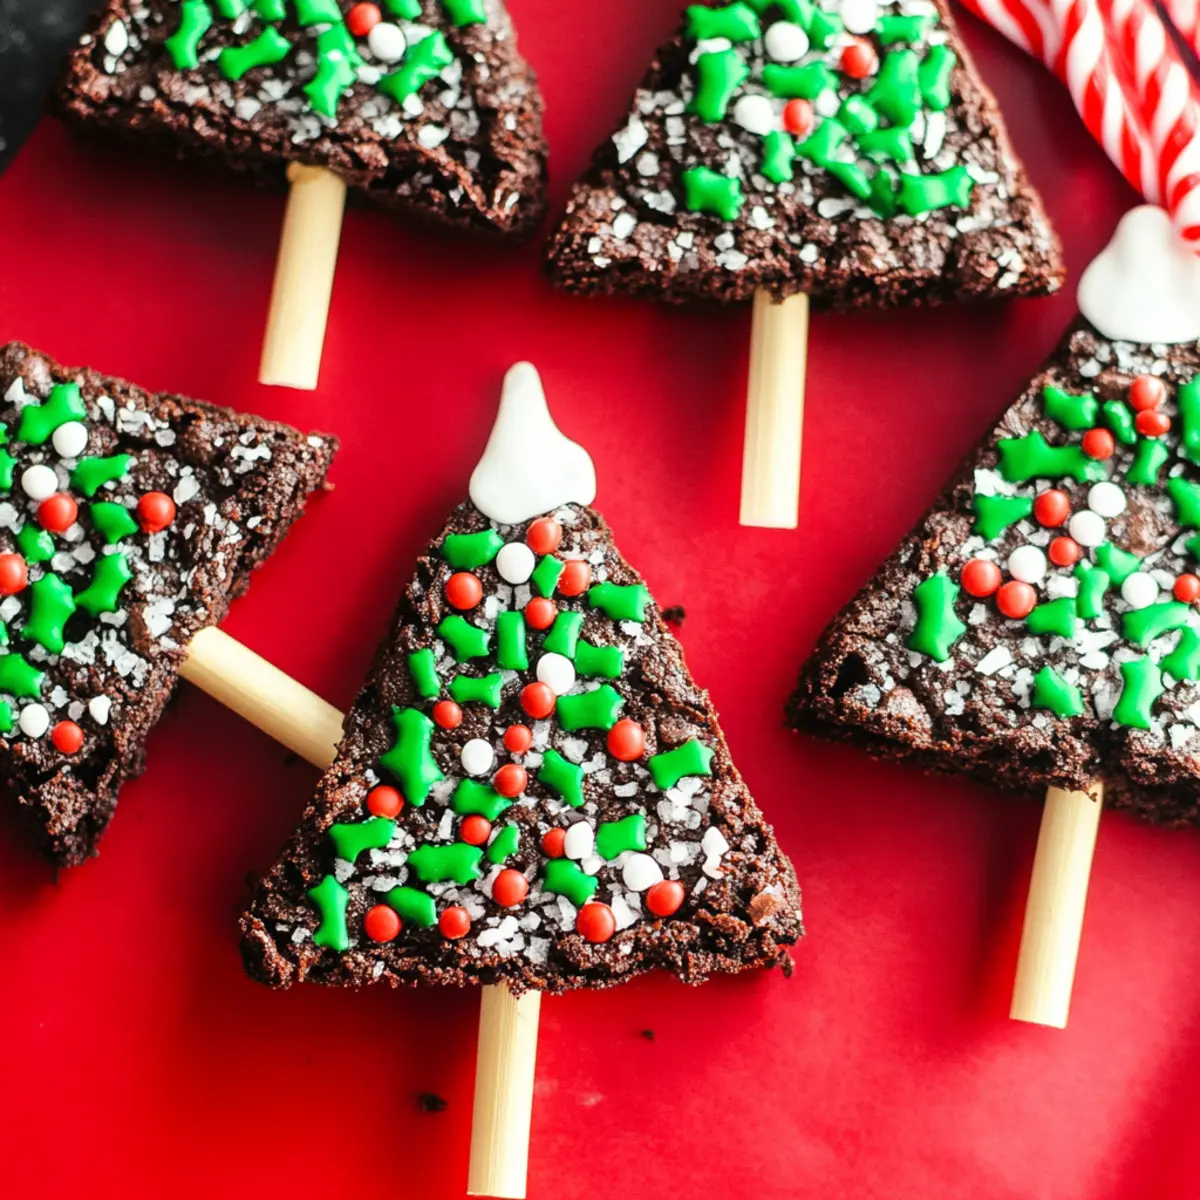
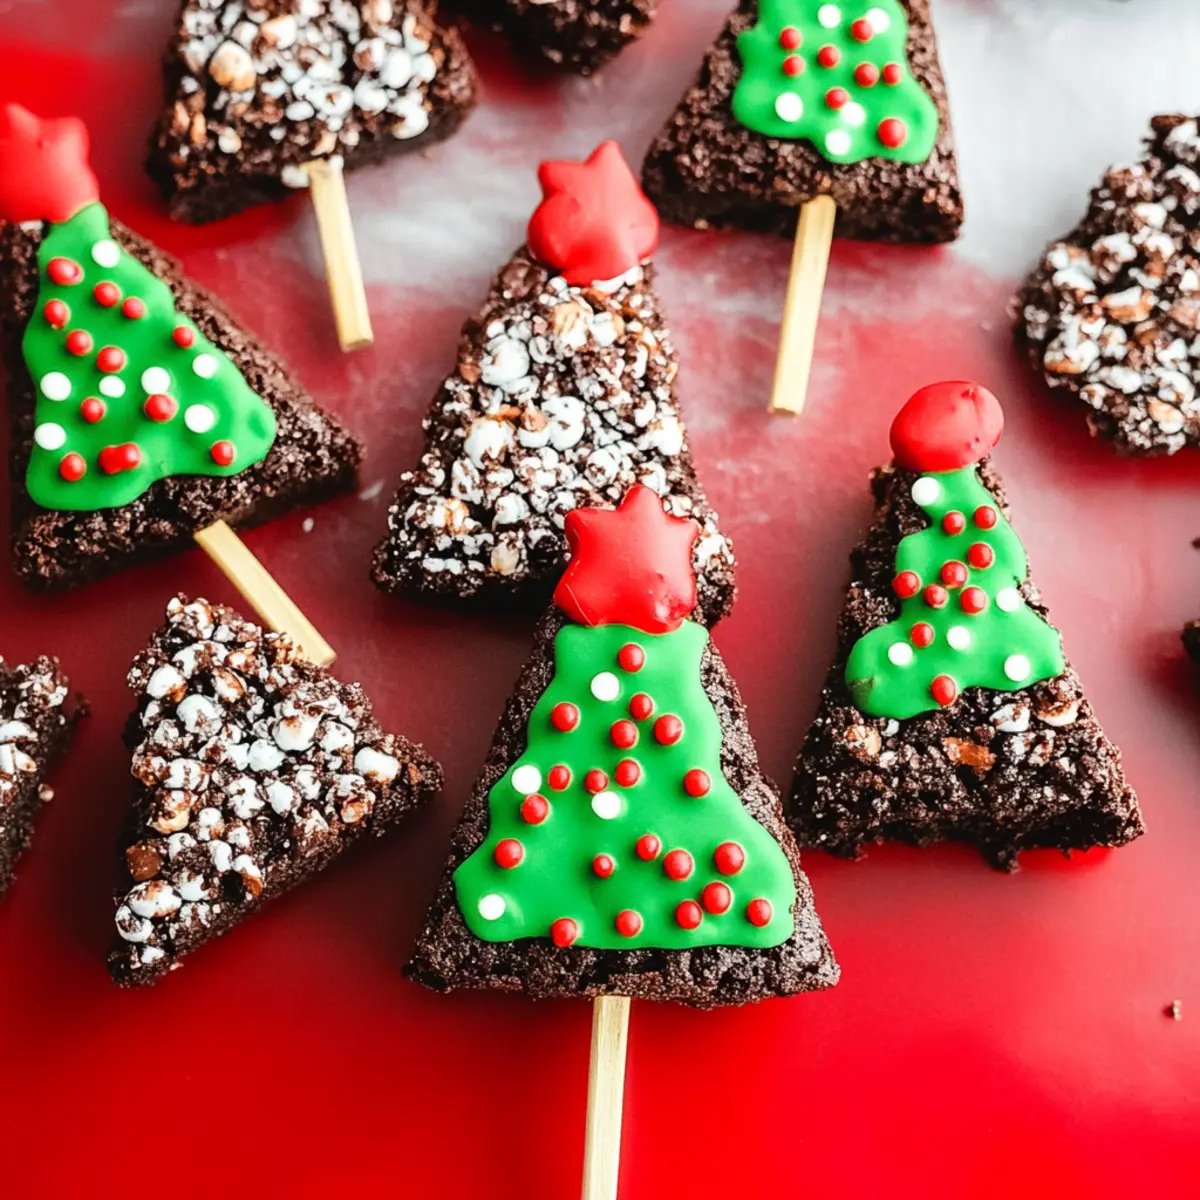
Cut into Shapes: Once cooled, cut the brownies into squares, and then slice each square diagonally to form tree shapes.
-
Prepare the Glaze: In a bowl, mix powdered sugar with milk, whisking until smooth. Add green food coloring to achieve your desired festive shade.
-
Decorate Trees: Use the green glaze to frost your brownie trees, then sprinkle on Christmas sprinkles for a joyful finish.
Optional: Drizzle with melted chocolate for an extra decadent touch!
Exact quantities are listed in the recipe card below.
Expert Tips for Easy Brownie Christmas Trees
-
Quality Ingredients: Use high-quality cocoa powder and butter for the best flavor. Cheap ingredients can compromise your brownie's deliciousness.
-
Room Temperature Eggs: Make sure your eggs are at room temperature before mixing. This helps create a smoother batter for your easy Brownie Christmas Trees recipe.
-
Avoid Overmixing: Mix the batter until just combined. Overmixing can result in tough brownies instead of the desired fudgy texture.
-
Allow Cooling: Always let the brownies cool completely before cutting them into shapes. Trying to cut them too early will make them fall apart.
-
Customize Decorations: Don't hesitate to get creative! Use different sprinkles or edible glitter to match your holiday theme for a festive touch.
Easy Brownie Christmas Trees Variations
Get ready to make these festive brownies even more delightful by customizing them to your taste!
-
Nutty Delight: Replace mini chocolate chips in the filling with your favorite nuts for a satisfying crunch. Walnuts or pecans add a lovely texture and earthy note.
-
Flavor Boost: Swap in peppermint extract instead of vanilla for a refreshing twist. The holiday spirit really shines through with this seasonal flavor change.
-
Gluten-Free: Substitute all-purpose flour with a gluten-free blend for a delicious gluten-free option. It's an easy switch that makes everyone feel included during the holidays.
-
Chocolate Glaze: Instead of green icing, drizzle rich chocolate glaze on top for a decadent finish. The combination of chocolate flavors takes these brownies to the next level!
-
Colorful Sprinkles: Get creative with colorful themed sprinkles. Choose red and white for a classic look or go wild with gold and silver for a bit of sparkle!
-
Cream Cheese Frosting: Use a tangy cream cheese frosting instead of glaze for a unique flavor contrast. This addition provides a rich and creamy layer that pairs beautifully with the brownie's sweetness.
-
Fruit Flavors: Incorporate raspberry or cherry preserves into the brownie mix for a fruity surprise. This offers a delightful tartness that contrasts perfectly with the chocolate.
-
Spicy Kick: Add a pinch of cayenne pepper or cinnamon to the batter for a surprising spiciness. The warmth enhances the chocolate, giving these brownies a festive depth!
What to Serve with Easy Brownie Christmas Trees?
Indulge your guests this holiday season by pairing these charming brownie delights with festive accompaniments!
-
Vanilla Ice Cream: A classic pairing, the creamy sweetness of vanilla ice cream balances the rich chocolate flavor, creating a wonderful contrast.
-
Peppermint Hot Chocolate: Serve these brownie trees alongside mugs of warm peppermint hot chocolate for a cozy and festive touch, perfect for chilly nights.
-
Fruit Salad: A refreshing fruit salad adds bright, natural sweetness, providing a light counter to the richness of the brownies. It's an excellent way to introduce fresh elements to your dessert table.
-
Whipped Cream: A dollop of homemade whipped cream can elevate your brownie trees, adding a light texture and hint of sweetness to each bite.
-
Coffee: Complement these brownies with a rich cup of coffee. The bitterness of the brew enhances the chocolate flavors, making each bite even more delicious.
-
Holiday Punch: Create a festive holiday punch to sip alongside your brownies. The fruity and bubbly nature of the punch rounds out the dessert perfectly.
-
Gingerbread Cookies: For a true holiday spread, serve with gingerbread cookies. The spicy warmth of gingerbread pairs beautifully with the sweetness of the brownie trees.
-
Chocolate Milk: Skip the traditional drinks and opt for rich chocolate milk to amplify the chocolate experience, delighting kids and adults alike!
-
Cheesecake Bites: Little cheesecake bites can be an elegant addition, providing a creamy richness that contrasts with the chewy texture of the brownies.
Storage Tips for Easy Brownie Christmas Trees
Room Temperature: Store decorated Brownie Christmas Trees in an airtight container at room temperature for up to 3 days to keep them fresh and delicious.
Fridge: For extended freshness, place the brownies in the fridge where they can last up to a week; just remember to seal them tightly to avoid drying out.
Freezer: Freeze unglazed brownie shapes individually, wrapped tightly in plastic wrap, for up to 2-3 months. Thaw at room temperature before decorating.
Reheating: If you prefer warm brownies, gently reheat them in the microwave for about 10-15 seconds, then add your favorite toppings for a delightful treat!
Make Ahead Options
These Easy Brownie Christmas Trees are perfect for busy home cooks looking to save time during the hectic holiday season! You can prepare the brownie batter up to 24 hours in advance; simply refrigerate it in an airtight container. Additionally, the brownies can be baked and cooled up to 3 days ahead. Store them in an airtight container at room temperature to maintain their moist, fudgy texture. When you're ready to serve, just cut them into tree shapes, prepare the green glaze, and decorate with colorful sprinkles. This way, you'll have delightful brownie treats ready to impress your guests with minimal last-minute effort!
Easy Brownie Christmas Trees Recipe FAQs
What type of cocoa powder should I use for the brownies?
For the best flavor and richness, I recommend using high-quality Dutch-processed cocoa powder. It provides a deeper chocolate taste, enhancing the overall experience of your Easy Brownie Christmas Trees.
How should I store the decorated brownies?
To keep your decorated Brownie Christmas Trees fresh, store them in an airtight container at room temperature for up to 3 days. For longer storage, you can refrigerate them, where they will stay good for up to a week. Just make sure they are sealed well to prevent drying out!
Can I freeze the brownies, and how?
Absolutely! To freeze unglazed brownie shapes, first wrap them tightly in plastic wrap. Place them in a freezer-safe bag or container to further prevent freezer burn. They can be kept frozen for 2 to 3 months. When you're ready to enjoy them, simply thaw them at room temperature and then decorate!
What should I do if my brownies come out too dry?
If your brownies turn out dry, it could be due to overbaking. Always keep an eye on them and perform the toothpick test-remove the brownies from the oven when moist crumbs cling to the toothpick. If they are overbaked, you can also serve them warm with a scoop of ice cream or a drizzle of cream to add moisture and indulgence.
Are there any dietary considerations for this recipe?
This Easy Brownie Christmas Trees Recipe contains common allergens like gluten, eggs, and dairy. If you have guests with allergies, consider gluten-free flour alternatives and dairy-free butter substitutes. Just make sure to check labels to ensure that there are no cross-contaminants.

Irresistibly Easy Brownie Christmas Trees Recipe to Delight
Equipment
- 9x13 inch Baking Pan
- Medium Bowl
- large bowl
- Whisk
- Spatula
Ingredients
For the Brownies
- 1 cup Unsalted Butter Adds richness and moisture; for best flavor, choose high-quality butter.
- 2 cups Granulated Sugar Sweetens the brownies and gives them a chewy texture.
- 4 large Eggs Make sure they’re at room temperature for better mixing.
- 1 teaspoon Vanilla Extract Enhances the chocolate flavor; using pure vanilla will yield the best results.
- 1 ⅓ cups All-Purpose Flour Gives the brownies structure; no need for specialty flours.
- ¾ cup Unsweetened Cocoa Powder Opt for Dutch-processed cocoa for a deeper taste.
- ½ teaspoon Baking Powder Helps with texture and rise.
- ¼ teaspoon Salt Balances sweetness and enhances the flavor.
- 1 cup Chocolate Chips Use semi-sweet or dark chocolate for pockets of molten goodness.
For the Cookie Dough Filling
- ¼ cup Unsalted Butter Adds a creamy base for the filling.
- ½ cup Light Brown Sugar Infuses caramel notes into the cookie dough layer.
- ¼ cup Granulated Sugar Sweetens the filling; feel free to adjust for taste.
- 1 large Egg Yolk Enhances richness and helps bind the filling.
- 1 teaspoon Vanilla Extract Offers a wonderful flavor boost.
- ½ cup All-Purpose Flour Forms the foundation for the filling.
- ¼ cup Mini Chocolate Chips Provides a delightful surprise element.
For the Glaze
- 1 cup Powdered Sugar The sweet touch to glaze your brownies; sifting ensures smoothness.
- 2-3 tablespoons Milk Adjusts the glaze's consistency.
- ¼ teaspoon Vanilla Extract For that extra flavor boost.
- Green Food Coloring Gel form is preferred for vibrant color.
- Christmas Sprinkles Add visual appeal and holiday cheer.
Instructions
Preparation
- Preheat your oven to 350°F (175°C). Prepare a 9x13 inch baking pan by greasing it and lining with parchment paper for easy release.
- In a medium bowl, whisk together all-purpose flour, cocoa powder, baking powder, and salt until well combined. Set this mixture aside.
- In a large bowl, blend melted butter and granulated sugar until smooth. Beat in the eggs one at a time, followed by the vanilla extract.
- Gradually fold the dry ingredients into the wet mixture until just combined. Fold in the chocolate chips.
- Pour the batter into your prepared pan and smooth the top. Bake in the oven for 25-35 minutes, checking with a toothpick for moist crumbs. Allow the brownies to cool completely.
- Once cooled, cut the brownies into squares, and then slice each square diagonally to form tree shapes.
- In a bowl, mix powdered sugar with milk, whisking until smooth. Add green food coloring to achieve your desired festive shade.
- Use the green glaze to frost your brownie trees, then sprinkle on Christmas sprinkles for a joyful finish.

Leave a Reply